This article is a record of the “logic” behind the development of “Slashing Samurai,” a mobile game for iOS released on the App Store on December 15, 2023, using the Godot Engine. However, to avoid excessive length, specific code details will be kept to a minimum.
Slashing Samurai is available for free download on the App Store. Just click the banner below to get this game!
Identifying Necessary Screens
I am the type to prioritize visuals. In game development, including the creation of “Slashing Samurai” in Godot, I started by identifying the necessary screens. I also considered the flow of screen transitions. Although there were many changes in the end, the base stayed relatively close to the initial plan.

Initially, the plan included the following screens:
- Start Screen
- Play Screen (including Pause Screen)
- Stage Selection Screen
- Settings Screen
In the end, the following screens were added:
- Prologue Screen
- Menu Screen
- Credit Screen
- Score Screen
- Falling Object Record Screen
This devlog will focus on documenting the screens that were originally planned to be the core of the game.
Start Screen and Prologue Screen
If we were to pursue a casual game, one might argue that the start screen is unnecessary. However, for developers, are there any screens other than the start screen that they want to prepare (probably)? While I had initially planned for the start screen to transition to the play, settings, and credit screens, looking at the specifications of mobile games in the market, I noticed that many had only a “Start” button. Believing there might be reasons for this trend, I decided to mimic it without much thought.
Next, to add a bit of fun to the start screen, I placed the player character, a samurai, in the center and animated it. From the beginning of development, I had the image of the samurai swinging a sword and striking a pose when the “Start” button is pressed, so I implemented that using the Player scene created for the play screen.
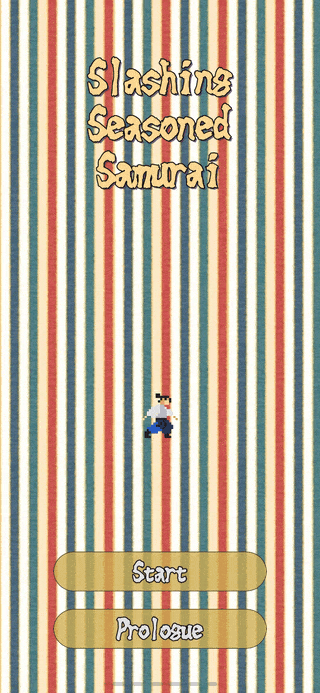
Later on, despite being a casual game, I began to incorporate various elements. Call it passion in the name of foolishness. One of the elements I added was the prologue. Initially, I had set up the start screen to automatically transition to the prologue screen a few seconds after being left idle. However, as the loading time for the next screen started to become noticeable, I decided to place a “Prologue” button on the start screen, almost saying, “Please enjoy while waiting.”
The structure of the prologue screen is quite simple. Essentially, I applied a pattern texture for the background to a TextureRect node and added a Label node with the prologue text applied to it in a ScrollContainer node. I implemented the mechanism for it to automatically flow from bottom to top with the following code:
const MAX_SCROLL : int = 5924

func _process(_delta):
    if scroll_container.scroll_vertical < MAX_SCROLL:
        scroll_container.scroll_vertical += 1
Play Screen
The play screen is the main part of the game, so it’s quite extensive. With the Game scene as the topmost, I added the necessary scenes below it. Although the final form involves adding various nodes for detailed effects, the basic structure is as follows:
- Game: Node
- World: Node2D
- Background: Node2D
- Player: CharacterBody2D
- Obj: RigidBody2D
- UI: Control
- World: Node2D
Background Scene
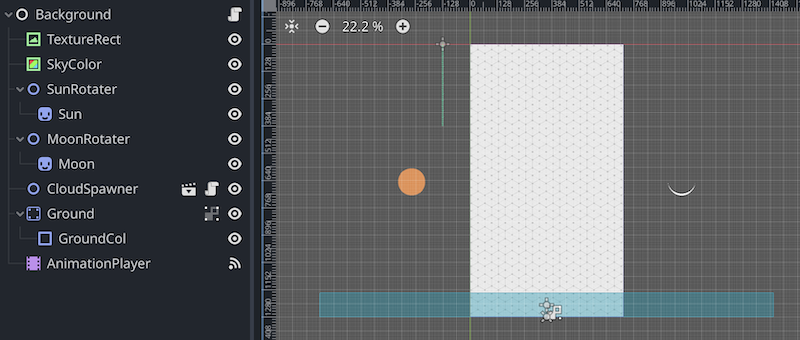
I created the Background scene and added it as a branch to the World scene. In this scene, I used a TextureRect node with a full rectangular pattern texture for the background, and at the bottom of the screen, I set up a StaticBody2D node as a platform for the player character to walk on.
As a small detail, I added the movement of the sun from east to west and the waxing and waning of the moon in the development version. The sprites for the sun and moon were created using the Aseprite app.
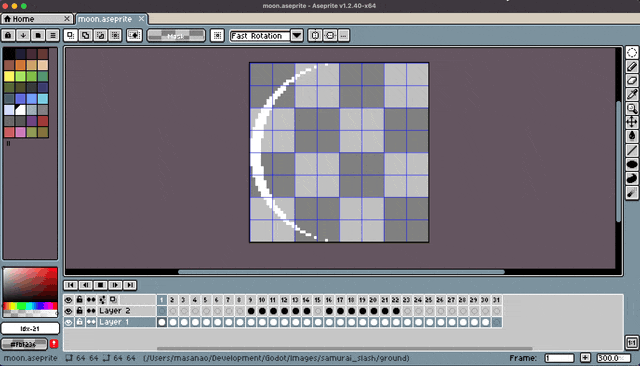
All the changes in the background, such as the movement of the sun and moon, sunrise, sunset, and changes in the color of the sky at night, were consolidated in an AnimationPlayer.
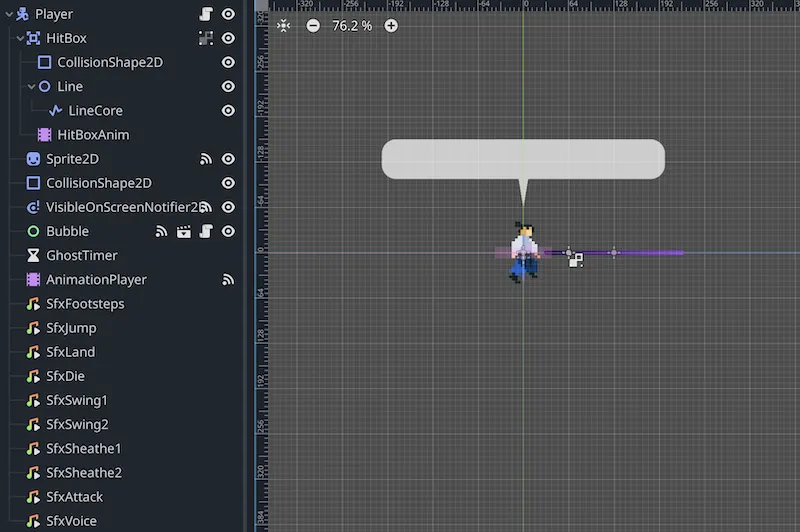
Player Scene
I created the Player scene and added it as a branch to the World node. This scene has the CharacterBody2D node at the top, and I set a pixel art samurai as a texture on a Sprite2D node.
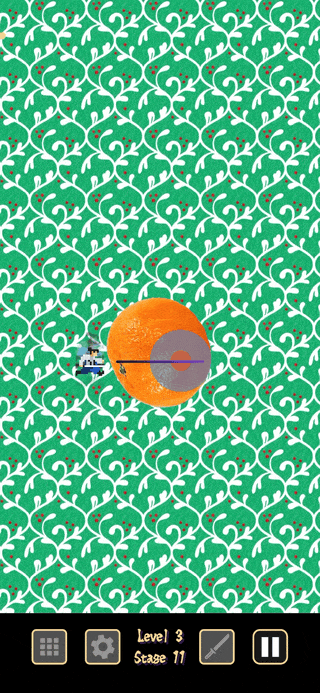
Since the player character needs a hitbox area for the objects falling towards it, I prepared a Hitbox with an Area2D node. Despite being called a “box,” it’s actually a line. To visually indicate this to the player, I added a Line2D node with the same length as the line of the CollisionShape2D of the Hitbox node. I chose a purplish color for the line, matching the image color. I also added a VisibleOnScreenNotifier2D node because there were methods triggered by the appearance and disappearance of the samurai, which I utilized in the script.
In the latter part of development, I introduced dialogue for the samurai. For this purpose, I created a Bubble scene to display speech balloons 💬 and added it as a branch to the Player scene. I used the DialogueManager plugin for this, which proved to be relatively easy to use due to its comprehensive tutorial.
To add some flair to the samurai’s actions, I also included a ghost effect for the player character.
All the sound effects used for the samurai, such as footsteps, jumping, landing, and the sound of slashing with a sword, were added one by one as AudioStreamPlayer nodes. Despite making the scene tree somewhat redundant, I believed it would be faster to process than loading sound assets on the fly during gameplay.
User operation for the samurai, including jumping, maintaining height while keeping the touch, and releasing the touch to interact with the hitbox, was implemented in the unhandled_input() method. This method also included closing the samurai’s speech balloon 💬.
func _unhandled_input(_event):
    if player_state == PlayerState.IDLING \
    and is_on_floor() \
    and Input.is_action_just_pressed("touch"):
        if speech_state == SpeechState.SAID:
            bubble.hide()
        elif speech_state == SpeechState.SILENT:
            print("Screen Touched")
            is_touching = true
            hit_box_col_shape.disabled = false  # CollisionShape2D of Hitbox node
            sfx_jump.play()  # AudioStreamPlayer
            anim_player.play("jump")  # AnimationPlayer
            velocity.y = -JUMP_SPEED
            player_state = PlayerState.JUMPING

    if is_touching \
    and not is_on_floor() \
    and Input.is_action_just_released("touch"):
        print("Screen Released")
        is_touching = false
        released.emit()
        hit_box.hide()
        hit_box_col_shape.disabled = true
        if player_state == PlayerState.JUMPING:
            velocity.y = move_toward(velocity.y, 0, 1600)
Obj Scene
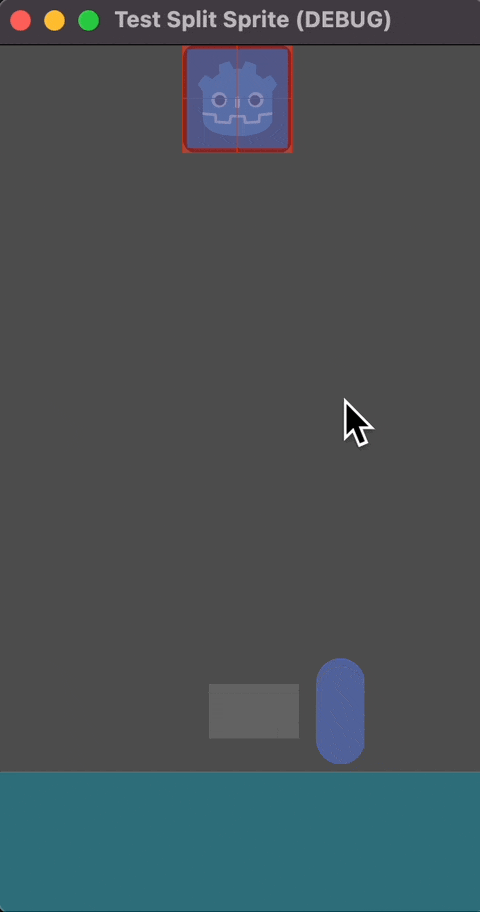
Obj, short for Object, is the scene for falling objects. I added this scene as a branch to the World scene. The root of the Obj scene is a RigidBody2D node. Since it automatically handles physics calculations, it was straightforward to make the falling objects drop from the top of the screen. Next, I pondered a bit on how to divide the falling objects evenly when they were cut by the samurai. Perhaps it could be easily implemented using shaders if mastered (I still don’t know if it’s possible). However, since I have no skills with shaders, I had no choice but to proceed with another method. If it’s challenging to split the sprite of a falling object directly, why not give the illusion that it is split? That’s when the idea struck me: line up cleanly cut pieces from the beginning to make it appear as if they were never cut. The following videos demonstrate the implementation of this method in the early stages of development.
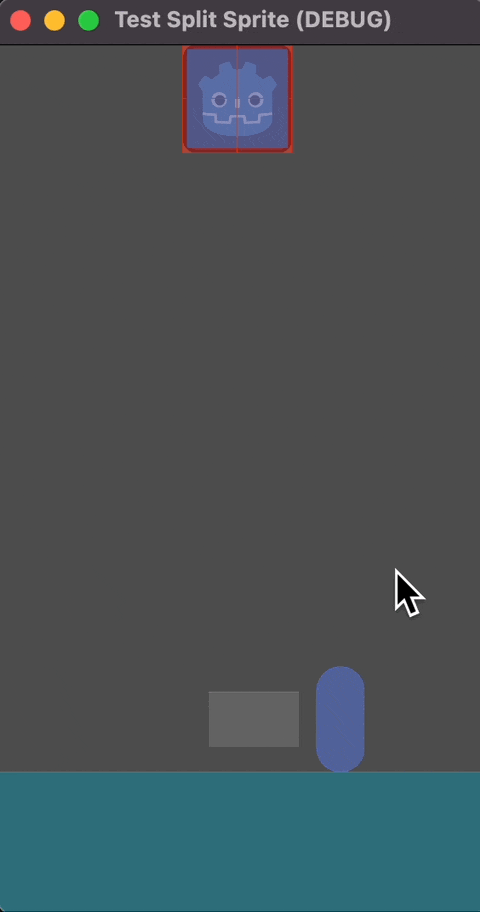

I implemented the pseudo-split effect using the following method:
- Freeze the Obj node when the falling object is cut by the samurai (turn on the Freeze property).
- Add ObjPiece scenes as child nodes to the Obj node, dividing them as needed.
- Position each ObjPiece node to overlap with the parent Obj node’s sprite at regular intervals.
- Apply a texture divided using the AtlasTexture class to each ObjPiece node, based on the sprite of the Obj scene.
- Generate CollisionPolygon2D as child nodes for each ObjPiece node based on the transparency of the AtlasTexture.
The logic for the above was coded in the following scripts.
Script for the Obj node:
const PIECE_SCENE : PackedScene = preload("res://obj_base/obj_piece/obj_piece.tscn")

@onready var sprite: Sprite2D = $Sprite2D

func generate_obj_pieces():
    var tex_image = sprite.texture
    var tex_size = sprite.texture.get_size()
    var h_cuts := 12
    var v_cuts := 8
    var frag_size = Vector2(tex_size.x / h_cuts, tex_size.y / v_cuts)

    for i in h_cuts:
        for j in v_cuts:
            var pce = PIECE_SCENE.instantiate()
            var cor = Vector2(frag_size.x * i, frag_size.y * j)
            var pos = (cor + frag_size/2 - tex_size/2)

            pieces.call_deferred("add_child", pce)
            pce.position = pos
            pce.call_deferred("set_sprite", tex_image, cor, frag_size)
            pce.call_deferred("set_col_poly")
Script for the ObjPiece node:
func set_sprite(tex_image:Texture2D, frag_pos:Vector2, frag_size:Vector2):
    var tex := AtlasTexture.new()
    tex.set_atlas(tex_image)
    tex.set_region(Rect2(frag_pos, frag_size))
    sprite.texture = tex

func set_col_poly():
    var polygons = sprite.create_polygons()
    if not polygons.is_empty():
        for i in polygons.size():
            var col_poly := CollisionPolygon2D.new()
            col_poly.set_polygon(polygons[i])
            col_poly.position -= sprite.texture.get_size() / 2
            col_poly.disabled = false
            call_deferred("add_child", col_poly)
Script for the child Sprite node of the ObjPiece node:
func create_polygons():
    var bitmap = BitMap.new()
    bitmap.create_from_image_alpha(texture.get_image())
    var rect := Rect2(Vector2.ZERO, texture.get_size())
    var polygons = bitmap.opaque_to_polygons(rect)
    return polygons
I faced some challenges, such as ObjPiece nodes falling ahead of the Obj node or vice versa while the parent Obj node was falling. In the end, I struggled quite a bit and realized that I needed to set the Freeze property of the ObjPiece (RigidBody2D) root node in the Inspector beforehand and also set the Freeze Mode to Kinematic.
In the final version, I established collision areas for “single cut” and “multiple cuts” on the falling objects and determined the number of divisions for each, branching the script accordingly. “Single cut” provides a more detailed and satisfying cutting effect.
UI Scene
For the UI during gameplay, I initially placed the HUD at the bottom of the screen. I aligned it with the collision shape of the StaticBody2D node, which represents the samurai’s platform in the Background scene. The HUD includes four buttons for “Pause,” “Resume,” “Open Settings,” and “Go to Stage Selection.” I kept the design of the buttons simple by using royalty-free material only for the icons and adjusting the properties of each node for other design and layout aspects.
I also created a pause screen as one of the UI scenes. I added a semi-transparent light green ColorRect node covering the entire screen and displayed the text “Paused” using a Label node. All buttons except the “Pause” button on the HUD are disabled during the pause. This is a preventive measure against accidental clicks.
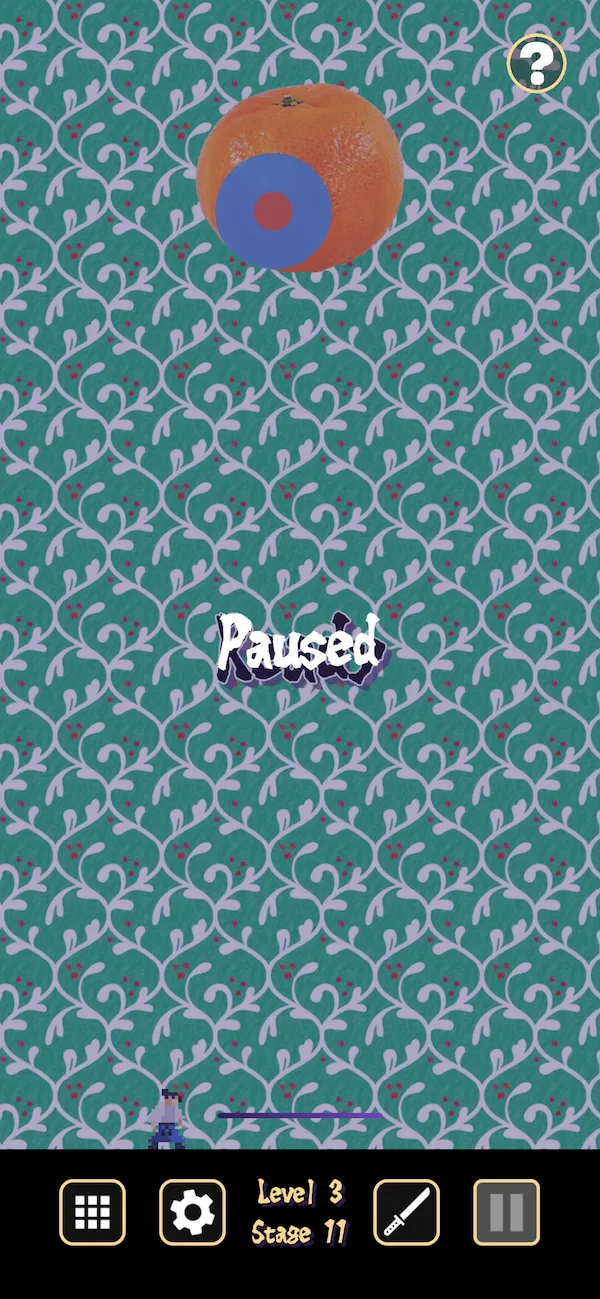
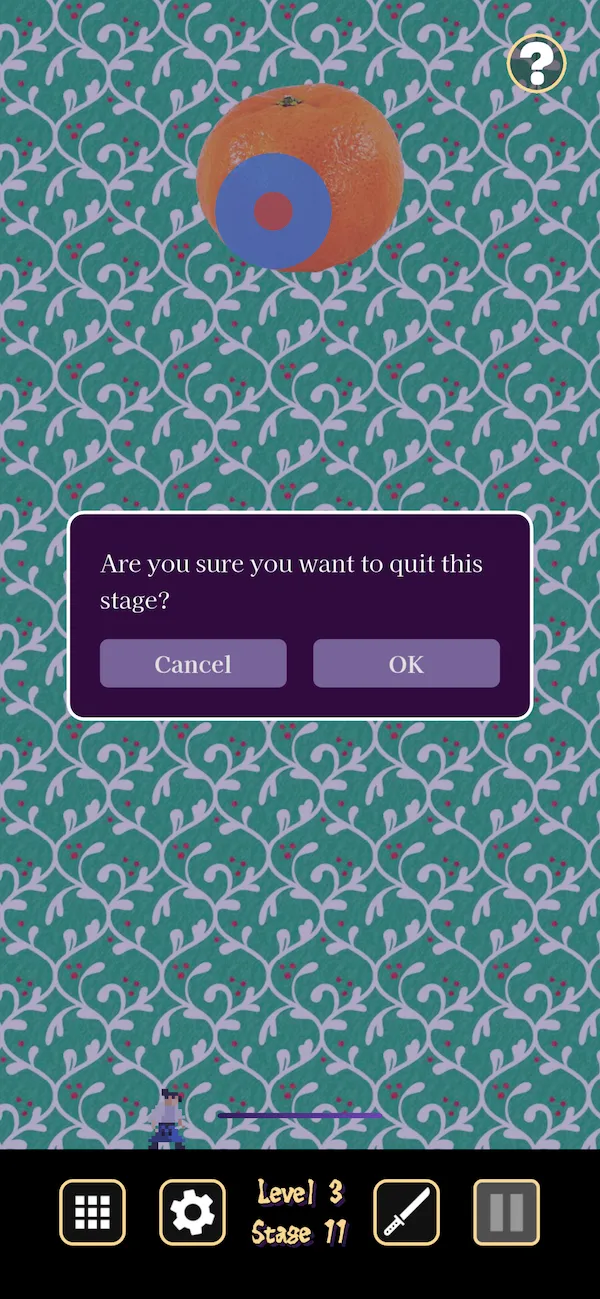
When pressing the “Go to Stage Selection” button, a confirmation dialog is displayed asking, “Are you sure you want to interrupt the game and move to the stage selection screen?” The final options for the buttons are “Yes” and “No,” but in the early stages of development, I used wording like “Understood(承知)” and “Decline(断る)” to create a more atmospheric feel. However, I decided to discard this in favor of clarity over atmosphere.
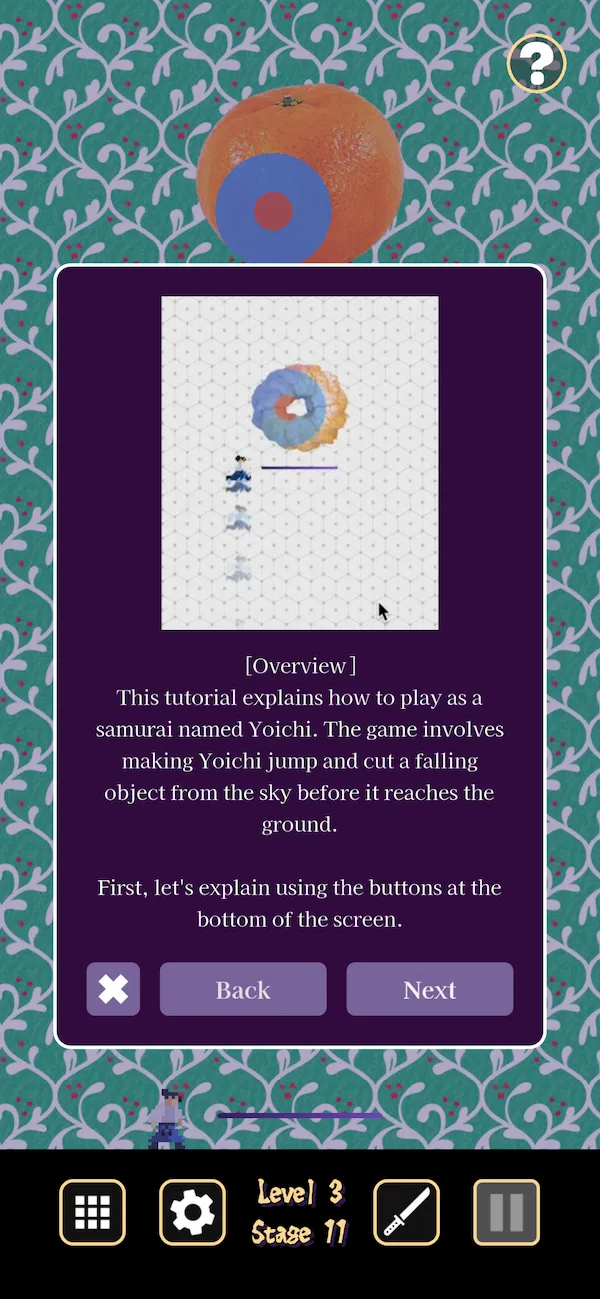
Towards the end of development, I added a tutorial. Although I initially aimed for gameplay that could be easily understood without a tutorial, I thought it would be nice to have the option to view a tutorial at any time. Therefore, I set it up so that the tutorial starts when you press the (?) icon in the upper right corner of the screen during a pause.
I implemented hitbox feedback for when the samurai sheaths the sword and when falling objects are cut. A “Clean Cut (Ippon)” or “Skillful Cut (Waza-ari)” hitbox indication is displayed. Initially, there was a memory leak issue related to the animation that resized the font from an extra-large size to a standard size in an instant. In the end, I discovered that directly changing the scale property value is the correct approach for animating text size changes in a Label node, rather than manipulating the Theme Overrides Font Size property in AnimationPlayer. It’s essential to be cautious about assumptions.
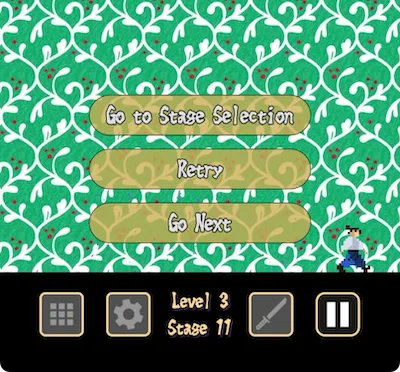
I also implemented post-stage options buttons. The options are “Proceed to Next,” “Retry,” and “Stage Selection.” Considering mobile casual gaming scenarios, where players might be on public transportation and sometimes operating the game with one hand, I placed these option buttons at the bottom of the screen. Since “Proceed to Next” is likely the most frequently pressed, I positioned it at the bottom.
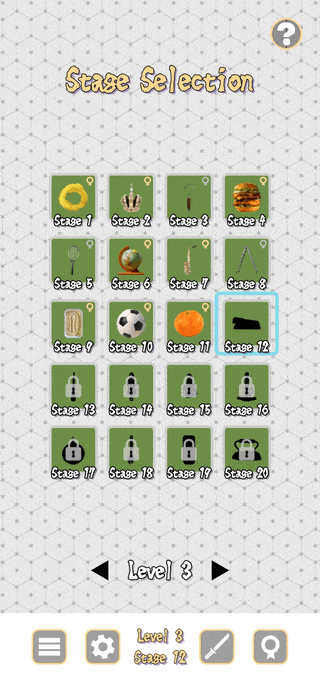
Stage Selection Screen
I created the stage selection screen separately from the gameplay screen. From this screen, you can navigate to the settings, menu, and falling object records screens. The menu screen further provides links to the score screen, credit/license screen, App review page, and game data deletion feature.
Initially, I prepared 200 stage selection icons inside a ScrollContainer, and the VisibleOnScreenEnabler2D node controlled their visibility based on whether they were on or off-screen to conserve computer resources. However, even with this logic, the scrolling motion felt sluggish, so I changed the structure. I added level change buttons and adjusted the display to show only 20 stage icons for one level within one screen. This eliminated the sluggishness.
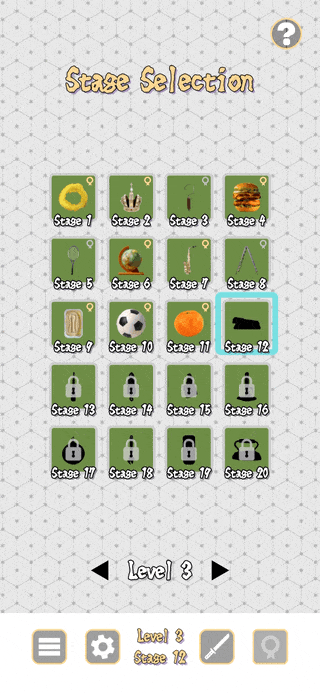
Similar to the gameplay screen, I added a tutorial for the stage selection screen, assuming some users might find the controls a bit confusing. You can access the tutorial at any time by pressing the (?) icon in the upper right corner.
Settings Screen
The structure of the settings screen itself is straightforward. I used Container-type nodes to organize the layout. The button icons use royalty-free material.
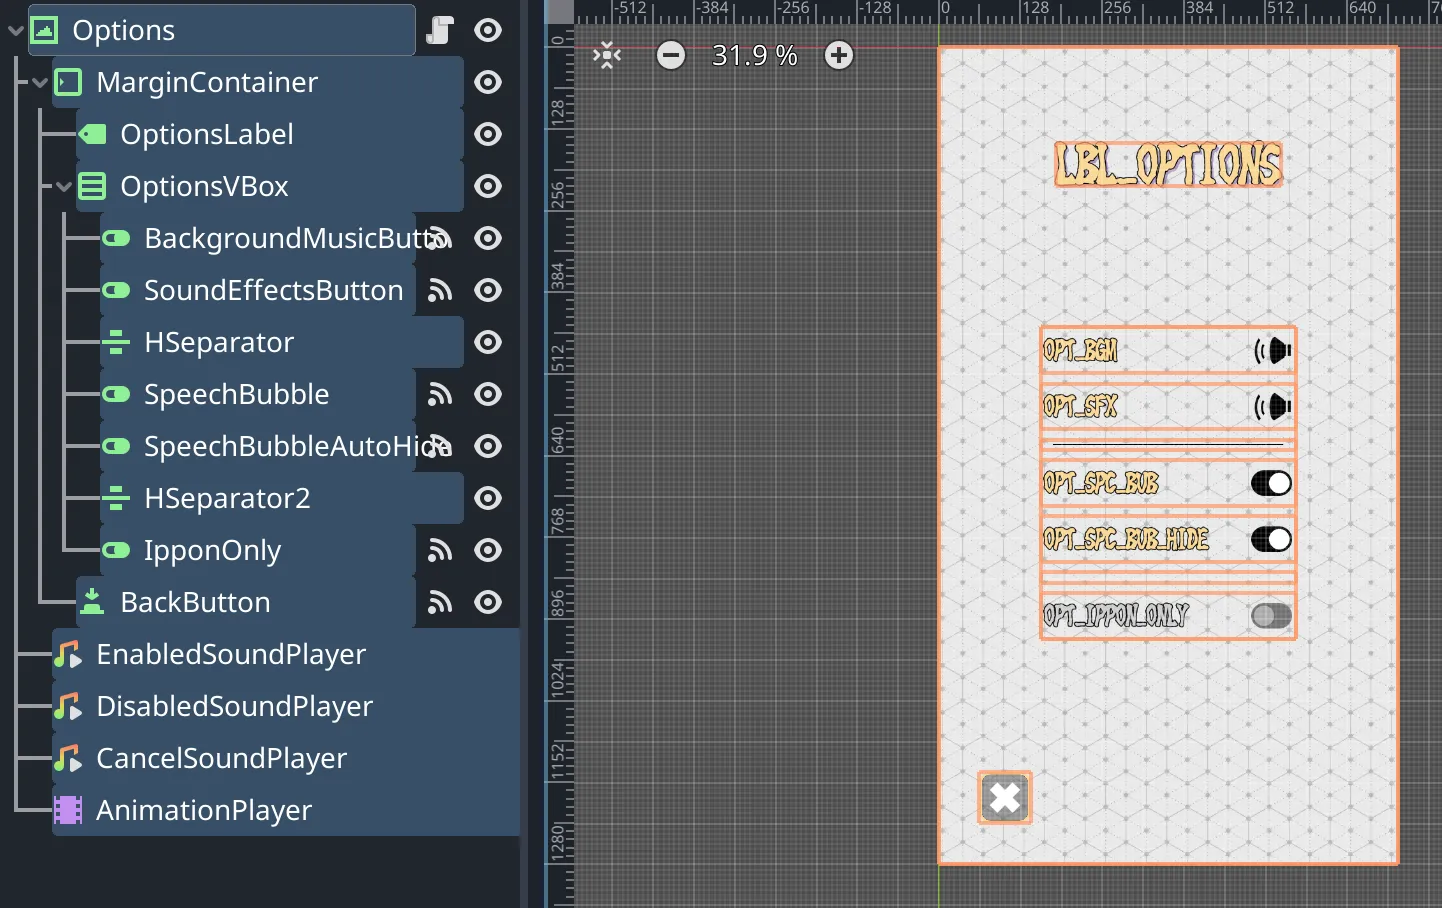
All buttons have Toggle Mode enabled, and the toggled(button_pressed: bool) signal is connected to the root node’s script. For example, the signal of the BGM button is connected to the following method:
func _on_background_music_button_toggled(button_pressed):
    if button_pressed:
        Gamedata.bgm_enabled = true
        if Gamedata.sfx_enabled:
            enabled_sound_player.play()
        bgm_disabled.emit()
    else:
        Gamedata.bgm_enabled = false
        if Gamedata.sfx_enabled:
            disabled_sound_player.play()
        bgm_enabled.emit()

    bgm_button.release_focus()
In the above code, Gamedata is a script loaded using Godot’s Autoload feature. To save settings, a gamedata.gd script was created to handle save/load functionality, and it gets automatically loaded at the start of the game. The script code is as follows:
const OPTIONS_PATH := "user://options.save"

var bgm_enabled := true
var sfx_enabled := true
var background_pattern := true
var ippon_only := false
var speech_bubble_enabled := true
var speech_bubble_auto_hide := false

func save_options():
    var options = {
        "bgm_enabled": bgm_enabled,
        "sfx_enabled": sfx_enabled,
        "background_pattern": background_pattern,
        "ippon_only": ippon_only,
        "speech_bubble_enabled": speech_bubble_enabled,
        "speech_bubble_auto_hide": speech_bubble_auto_hide
    }

    var file = FileAccess.open(OPTIONS_PATH, FileAccess.WRITE)
    file.store_var(options)
    file.close()

func load_options():
    var file = FileAccess.open(OPTIONS_PATH, FileAccess.READ)
    if !file: return

    var options = file.get_var()
    if !options:
        file.close()
        return

    if options.has("bgm_enabled"):
        bgm_enabled = options["bgm_enabled"]
    if options.has("sfx_enabled"):
        sfx_enabled = options["sfx_enabled"]
    if options.has("background_pattern"):
        background_pattern = options["background_pattern"]
    if options.has("ippon_only"):
        ippon_only = options["ippon_only"]
    if options.has("speech_bubble_enabled"):
        speech_bubble_enabled = options["speech_bubble_enabled"]
    if options.has("speech_bubble_auto_hide"):
        speech_bubble_auto_hide = options["speech_bubble_auto_hide"]
    file.close()
Conclusion
That concludes the portion of this development log related to the logic of “Mono Kiri Samurai.”
While I cannot speak for 3D games, for 2D games, I found that by combining various classes provided by Godot, you can achieve almost anything you want. However, simultaneously translating game ideas into algorithms, reading documentation to implement them, and validating these processes can require a considerable amount of patience, as I have come to understand.
I hope this development log serves as a helpful resource for someone involved in game development.