
In this tutorial, we are going to make four types of guns that commonly appear in 2D top-down shooters. Specifically, they are as follows.
- Handgun
- Shotgun
- Machine gun
- Laser Gun
Environment
This tutorial was created in the following environment
・Godot version: 3.4.2
・Computer OS version: macOS 11.6.5
Since this tutorial will focus on gun creation, the following has been prepared in advance.
1. Game world
A scene called “World.tscn” was prepared, and the appearance was simply created by adding a “TileMap” node. In addition to the “TileMap” node, a “Player” node and several “Obstacle” nodes were added. For these, we created individual scenes and added the instances.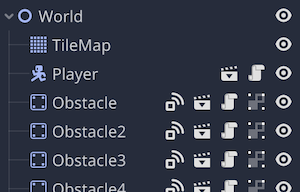
2. Player Character
Created as “Player.tscn” scene. The root node is the “KinematicBody2D” class, and the “Sprite” and the “CollisionShape2D” were added as child nodes. The texture of the “Sprite” node is a hitman with a gun. A node named “Muzzle” of the “Position2D” class was placed at the tip of the image of the gun held by the hitman. This will be used later to specify the position where the bullet instance is generated when the gun is fired.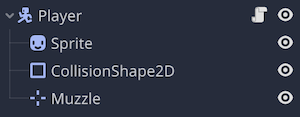
The following actions have already been added to the input map. Used to move the player character, shoot, and switch guns.
- up: W key - used to move the player character forward
- down: S key - used to move the player character backward.
- fire: Left mouse button - fires the gun.
- switch: Right mouse button: Switches between gun types.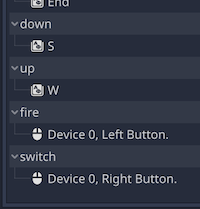
Note that, for the sake of brevity in the tutorial, the player character’s sprite remains the same, even if the gun type is changed. Let’s say it looks like a handgun, but it can be a machine gun, a laser gun, or anything else.
3. Obstacle
We created a scene called “Obstacle.tscn”. All the brown crate objects on the screen are instances of this scene. The root node is the “StaticBody2D” class, and the “Sprite” and the “CollisionShape2D” were added as its child nodes.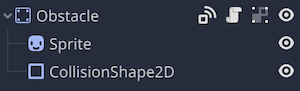
With these preparations, when the project is executed, the world, hitman, and obstacles are drawn as shown below, and the hitman is currently only capable of movement operations.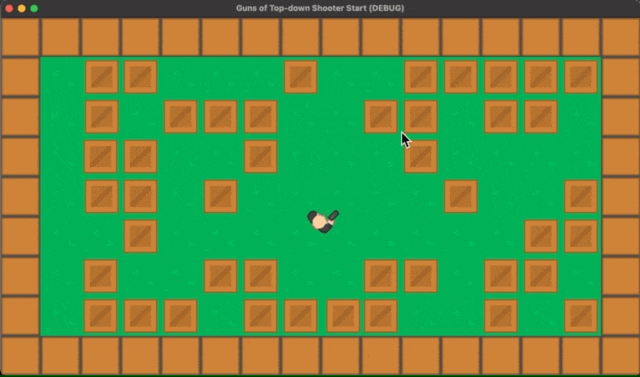
The project files for this tutorial are located at GitHub repository . If you download the .zip file and import the “Start” folder into Godot Engine, you can start from the project with only the above preparations completed. If you want to check the completed project immediately, you can import the “End” folder.
In addition, all of the assets that have been imported into this project were downloaded from the KENNEY website. We would like to thank KENNEY for providing us with a wide variety of very easy-to-use assets with the license CC0. The following asset packs were used this time.
Now let’s proceed with the implementation of the gun.
Creating a bullet scene
First, let’s create the bullet scene. Since the bullet scene can be used for all three types of guns (handgun, shotgun, and machine gun), let’s create the bullet scene first.
- Select “Scene” menu > “New Scene”.
- Select “Other Node” for “Create Root Node”.
- Select the “Area2D” class as the root node and rename it to “Bullet”.
- Add a child node of the “Line2D” class to the root node. The only use of this node in this tutorial is to create the appearance of a bullet. Of course, you may prepare a texture image for the bullet and make it the “Sprite” instead of the “Line2D”.
- Add a child node of the “CollisionShape2D” class to the root node.
- Add a child node of the “VisibilityNotifier2D” class to the root node. This is used to signal when a bullet fired by a gun goes off the screen and to release the bullet instance.
- save the scene once. The destination folder is provided, so save the scene so that the file path is “res://Bullet/Bullet.tscn”.
The scene tree should now look like the following.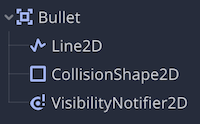
Then, edit each node.
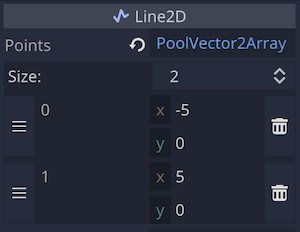
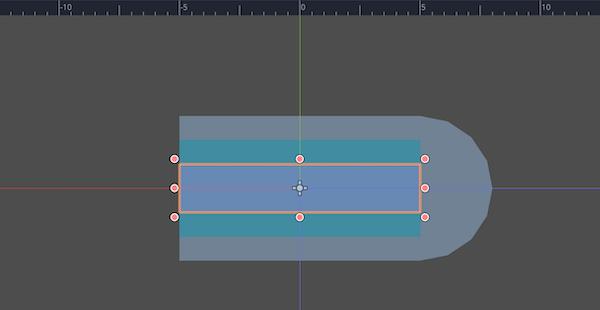
- Draw a path for the “Line2D” node in the 2D workspace. Draw a straight line path by first hitting the first point at (-5, 0) and then the second point at (5, 0). You can also type directly in the inspector.
- In the inspector, set the value of the “Width” property of the “Line2D” node to 16.

- Specify the bullet color with the “Default Color” property. Of course, you can set the color to your own preference. In this tutorial, I specified a bluish-gray color #708293 as a sample.

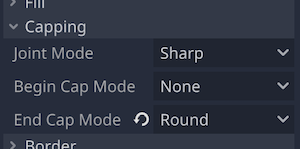
- Set the “Capping” > “End Cap Mode” property to “Round”. The end of the path (the second point) should now be rounded. This is much more bullet-like, isn’t it?
On the 2D workspace, the “Line2D” should now look like this.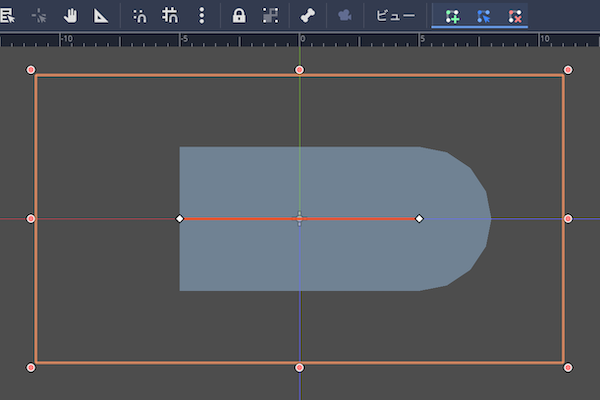
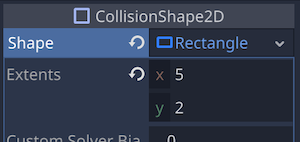
- Assign a “new RectangleShape2D” resource to the “Shape” property of the “CollisionShape2D” node.
- Adjust the collision shape to match the bullet shape created by the “Line2D” in the 2D workspace. You can make it exactly the same size as the bullet, or you can make it slightly smaller than the bullet size. In this sample, the value of the “Extents” property of the resource “RectangleShape2D” is (5, 2).
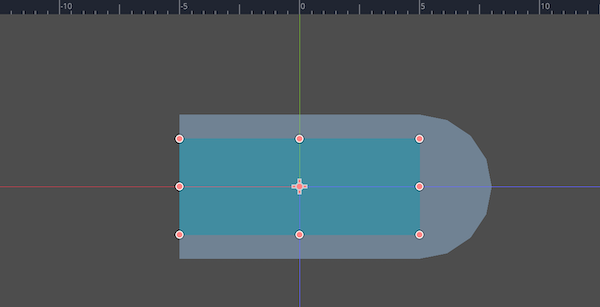
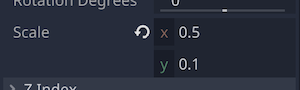
- Adjust the shape of the “VisibilityNotifier2D” node in the 2D workspace. We will use the signal that is emitted when this shape goes off the screen. The length in the y-axis is the same. The size of the shape can be approximate. In this sample, the “Scale” property value is (0.5, 0.1).
That’s it for adding nodes and editing the properties of each node.
Now we will attach the script to the root node and start coding.
- Attach the script to the root node. Create the file path as “res://Bullet/Bullet.gd”.
- Edit the “Bullet.gd” script as follows.
### Bullet.gd ###
extends Area2D

# Bullet speed per second
var speed = 1500
# Direction vector of bullet flying: once (0, 0)
var direction = Vector2.ZERO

# physics process: built-in method called 60 times/second
func _physics_process(delta):
	# Get the x value of the direction vector from which the bullet will be fired by cosine function from the bullet's current rotation angle
	direction.x = cos(global_rotation)
	# Get the y value of the direction vector from which the bullet will be fired by
  as a sine function from the current rotation angle of the bullet
	direction.y = sin(global_rotation)
	# Move the bullet every frame by direction * speed
	translate(direction * speed * delta)
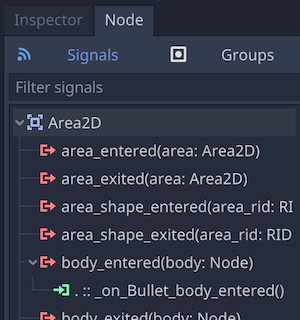
Next, let’s connect the signal that is sent out when the bullet hits the physics body to this script. Since the root node “Bullet” is an “Area2D” class, select the root node “Bullet” in the scene tree dock, select the “body_entered(body)” signal in the node dock > Signal tab, and click “Connect” button to connect it (or double-click the signal name).
body_entered signal connected
Once connected, edit the automatically added method _on_Bullet_body_entered as follows.
### Bullet.gd ###
# Method called by the signal emitted when the bullet hits the physics body
func _on_Bullet_body_entered(body):
	# if the body hit is an obstacle
	if body.is_in_group("Obstacles"):
		# free the obstacle object
		body.queue_free()
	# free the bullet instance
	queue_free()
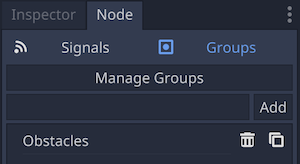
Note that I have already added the root node of the “Obstacle” scene to the group “Obstacles” in advance.
Now, if it hits an outer wall, only the bullets will be freed, and if it hits an obstacle, the obstacle and the bullets will be freed.
We will add one more signal. Let’s connect the “screen_exited()” signal, which is emitted when the “VisibilityNotifier2D” node disappears from the screen, to the “Bullet.gd” script. The procedure is the same as the previous signal connection, just select the “VisibilityNotifier2D” node in the scene tree dock and connect the “screen_exited()” signal in the Node Dock > Signal tab.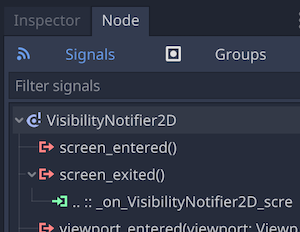
Once connected, edit the automatically added method _on_VisibilityNotifier2D_screen_exited as follows.
### Bullet.gd ###
# Method called by the signal emitted when a VisibilityNotifier2D node goes off-screen
func _on_VisibilityNotifier2D_screen_exited():
	# free the bullet instance
	queue_free()
The bullet will now be freed when it goes off-screen.
The bullet scene is now complete.
Implementing the handgun
Let’s start with the simplest handgun (pistol) to shoot. The script to be edited is the “Player.gd,” but since some code has already been prepared in the preliminary stage, let’s check that first.
See the prep part of the Player.gd code
### Player.gd ###
extends KinematicBody2D

# Preloaded bullet scene reference
const bullet_scn = preload("res://Bullet/Bullet.tscn")

# Guns currently in use (comment below for index and gun type
var gun = 0
# 0: hand
# 1: shot
# 2: machine
# 3: lazer

# Speed of player character
var speed = 200
# Speed with direction of player character
var velocity = Vector2()

# Referencing the Muzzle node
onready var muzzle = $Muzzle

# Method called when the scene is loaded
func _ready():
	rotation_degrees = 270  # Make the player look up at the start of the game

# Physics process: method called 60 times/sec by default
func _physics_process(delta):
	move() # call method to move player character
	switch_gun() # call method to switch gun type
	fire() # call method to fire the gun

# Method to move player character
func move():
	look_at(get_global_mouse_position()) # make the character look towards the mouse cursor
	velocity = Vector2() # initialize velocity to (0, 0)
	if Input.is_action_pressed("down"): # if S key is pressed...
		velocity = Vector2(-speed, 0).rotated(rotation) # set velocity backwards
	if Input.is_action_pressed("up"): # if W key is pressed...
		velocity = Vector2(speed, 0).rotated(rotation)  # set velocity forward
	velocity = move_and_slide(velocity) # move according to velocity

# Method to switch gun type
func switch_gun():
	if Input.is_action_just_pressed("switch"):  # if mouse right button click...
		if gun < 3: # if gun assignment number is less than 3...
			gun += 1 # increment the assigned number by 1
		else: # if gun assignment number is 3 (last number)...
			gun = 0 # set the gun's assigned number to 0
		print("Switched to ", gun) # Display in output panel for debugging

# Method to fire the gun
func fire():
	pass
So the fire method is currently empty. Update it as follows.
### Player.gd ###

# Method to fire the gun
func fire():
	# If the gun type is handgun (0) and the left mouse button is clicked
	if gun == 0 and Input.is_action_just_pressed("fire"):
		# Call a method to create and fire a bullet instance
		put_bullet()
The method put_bullet appears here, which is the method we are going to define. Let’s define it by adding the following code under the fire method.
### Player.gd ###

# Method to create and fire a bullet instance
func put_bullet():
	# reference to a bullet scene instance
	var bullet = bullet_scn.instance()
	# make the position of the bullet instance the same as the muzzle position
	bullet.global_position = muzzle.global_position
	# set the orientation of the bullet instance to be the same as the Player's orientation
	bullet.rotation_degrees = rotation_degrees
	# Make it a child of its parent node (World node) instead of Player node
	get_parent().add_child(bullet)
	# make it the second child of World (front from the tile map, back from the player character)
	get_parent().move_child(bullet, 1)
You should now have a handgun implementation. Let’s run the project and check it out.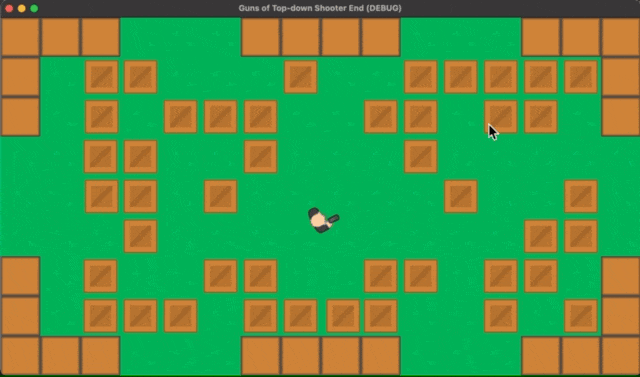
Implementing the shotgun
The next step is to implement a shotgun. A shotgun in a top-down shooter would generally be designed to have multiple bullets each flying forward at a slightly different angle. This is a powerful gun that can wipe out multiple objects over a wide area in a single shot.
Let’s start by updating the fire method.
### Player.gd ###

func fire():
	if gun == 0 and Input.is_action_just_pressed("fire"):
		put_bullet()
	# If the gun type is shotgun (1) and the left mouse button is clicked
	if gun == 1 and Input.is_action_just_pressed("fire"):
		# 5 loops
		for n in 5:
			# Call the method that creates an instance of the bullet and fires it, passing a value as an argument.
			put_bullet(n)
Added a second if block to the fire method. If the property gun has a value of 1 (the assigned number of the shotgun), the shotgun can be fired with a left mouse click. The content of the if block calls put_bullet 5 times in a for loop, but unlike the previous handgun, the argument is passed n, the number of times around the loop. We will see how this method handles the arguments it receives as we update the put_bullet method later.
func put_bullet(dir_offset = 2): # Added argument dir_offset, default value is 2
	var bullet = bullet_scn.instance()
	bullet.global_position = muzzle.global_position
	bullet.rotation_degrees = rotation_degrees + (20 - 10 * dir_offset) # 更新
	get_parent().add_child(bullet)
	get_parent().move_child(bullet, 1)
It is a little complicated, but if the argument dir_offset is not entered when the method is called, the default value of 2 is automatically passed as an argument. The third line in the method block specifies the rotation angle (direction) of the bullet, but in the case of a handgun, for example, the method is called without specifying an argument, so the default value of 2 is passed as the argument, the 20 - 10 * dir_offset part becomes 0, and the bullet’s angle is the same as the player character is facing.
On the other hand, in the case of a shotgun, this put_bullet method is called 5 times in the for loop in the fire method, and the number of loop laps n (counting from 0 to 4) is passed as the argument dir_offset. Therefore, the angle of the bullet changes as follows, depending on how many times the loop has looped.
- Loop 0: The angle the player character is facing + 20°
- Loop 1: The angle the player character is facing + 10°
- Loop 2: The angle the player character is facinge + 0°
- Loop 3, The angle the player character is facing + -10°
- Loop 4, The angle the player character is facing + -20.
With the above code, five bullets are fired simultaneously at different angles of 10° in the range from -20° to +20° relative to the direction the Player is facing, completing a gun that can fire a wide range of bullets at once. The computer processes a loop of about five times in an instant, so the bullets will be fired at different angles at about the same time.
You should now have a shotgun implementation. When you run the project to check it out, click the right mouse button once to switch to shotgun and then try firing it.
Implementing the machine guns
Next, let’s look at machine guns. Unlike guns that require a single pull of the trigger to fire, machine guns can fire automatically and continuously as long as the trigger is pulled. Although machine guns cannot fire over a wide area in a single shot as shotguns can, they fire automatically at high speed and can wipe out a wide range of objects as soon as the player character himself turns.
Now let’s add the code for the machine gun to the “Player.gd” script.
First, we added the property interval.
### Player.gd ###

var speed = 200
var velocity = Vector2()
# Count until the next bullet of the machine gun is fired
var interval: int = 0 # 追加
The specification of the machine gun is to automatically fire bullets continuously if the left mouse button is held down, but if the fire method is called every frame in the _physics_process method, the interval between bullets is too short and the bullets appear to stop (see GIF image below).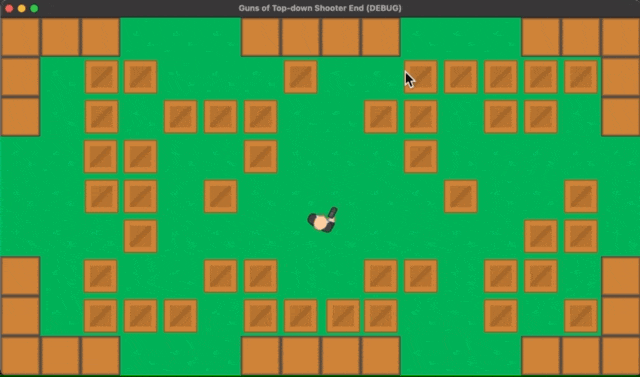
The frame rate of 60 FPS for the physical process is quite fast. So this time, we will add +1 to the interval property every frame so that a bullet is fired when the count exceeds 5. In other words, the bullet will be fired once every 5 frames.
So let’s add an if block for the machine gun to the fire method.
func fire():
	if gun == 0 and Input.is_action_just_pressed("fire"):
		put_bullet()
	if gun == 1 and Input.is_action_just_pressed("fire"):
		for n in 5:
			put_bullet(n)
	# If the gun type is machine gun (2) and the left mouse button is pressed
	if gun == 2 and Input.is_action_pressed("fire"):
		# +1 count to the next bullet
		interval += 1
		# If the count is greater than 5
		if interval >= 5:
			# Set count back to 0.
			interval = 0
			# Call a method that creates and fires a bullet instance with no arguments
			put_bullet()
Note that the handgun and shotgun use the is_action_just_pressed method of the Input class for the if condition, but this method does not continuously detect the input even if the left button is pressed continuously. On the other hand, the machine gun uses the is_action_pressed method. This method has a similar name only without “just,” but this one is suitable for use in “press-and-hold” operations, since input is detected every frame even if the button is kept pressed.
You should now have a machine gun implemented. When you run the project to check it, click the right mouse button twice to switch to machine gun and then try to fire it.
Create a laser scene
The last step is to implement the laser gun. A laser gun fires lasers, not bullets, so let’s start by creating the scene of the laser being fired. Add particles and animations to give it a minimal effect.
- Select “Scene” menu > “New Scene”.
- Select “Other Node” for “Generate Root Node”.
- Select the “RayCast2D” class as the root node and rename it to “Laser”.
- Add a child node of the “Line2D” class to the root node. It will be used to create the look of the laser as well as the bullet scene. Of course, there is a way to prepare a texture image for the laser and make it the “Sprite” instead of the “Line2D,” but we did not use it this time.
- Add a child node of the “Particle2D” class to the root node. This is used to add the effect of bubbling particles when the laser hits the object.
- Add a child node of the “Tween” class to the root node. This will be used to slowly increase the width of the laser from 0 to a certain width when the laser is fired, and vice versa when the laser ends.
- Save the scene. The destination folder is already prepared, so save the scene so that the file path is “res://Laser/Laser.tscn”.
The scene tree should now look like the following.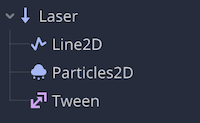
Next, edit each node.
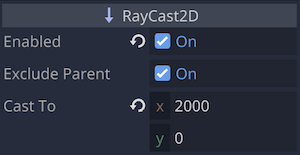
- In the Inspector, turn on the “Enabled” property of the root “Laser” node and set the “Cast To” property to (2000, 0).
It should now look like the following screenshot on the 2D workspace.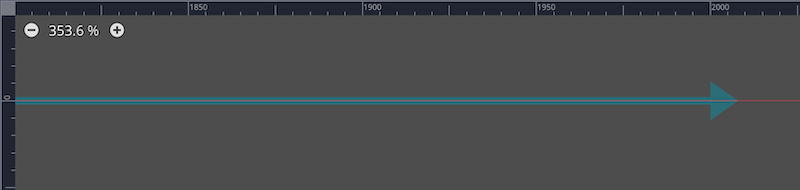
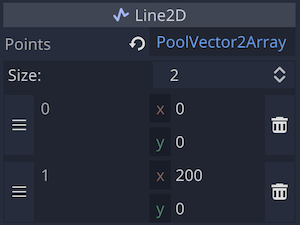
- Draw the path of the “Line2D” node in the 2D workspace. Draw a straight-line path by hitting the first point at (0, 0) and then the second point at (200, 0). You can also type directly in the inspector. The second point is controlled by a script, so if the y value is 0, the x value can be any value that is easy to see in the 2D workspace.
- In the inspector, set the “Width” property of the “Line2D” node to 16.

- Specify the color of the laser with the “Default Color” property. Of course, you can set the color of the laser to your image. In this tutorial, we use #00b1ff blue as a sample.

On the 2D workspace, the “Line2D” should now look roughly like this.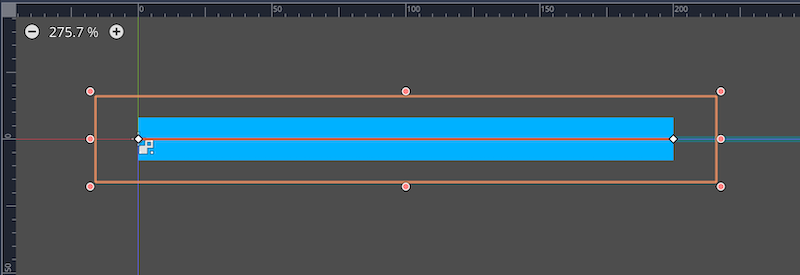
- from here, edit the properties of the “Particle2D” node as follows. It is going to be hard work because there are many properties to be edited, but let’s do our best.
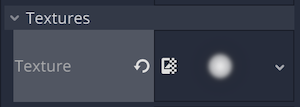
- First, apply the resource “res://Assets/circle_05.png” to the “Textures” > “Texture” property.
- Turn on the “Emitting” property.
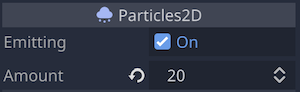
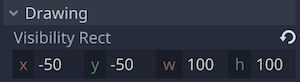
- Set the value of the “Drawing” > “Visibility Rect” property to (x: -50, y: -50, w: 100, h: 100).
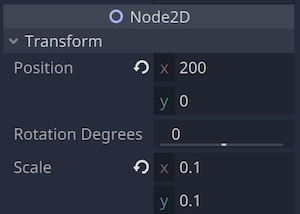
- Set the “Transform” > “Position” property to (x: 200, y: 0) and “Transform” > “Scale” property to (x: 0.1, y: 0.1)
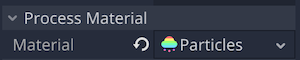
- Assign a “New ParticleMaterial” to the “Process Material” property.
From here, we will edit the properties of the “ParticleMaterial” resource we have just assigned.“Emission Shape” >
- Change the “Shape” property to “Box”.
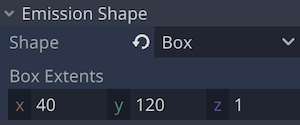
- Change the “Shape” property to “Box”.
“Direction” >
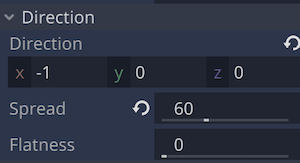
- Set the “Direction” property to (x: -1, y: 0, z: 0), which is the negative direction of the x axis.
- Set the “Spread” property to 60 in order to spread particles with a width of 60°.
“Gravity” >
- Set the “Gravity” property to (x: -300, y: 0, z: 0). This will add gravity in the negative direction of the x axis.
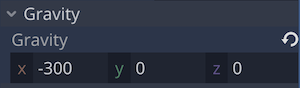
- Set the “Gravity” property to (x: -300, y: 0, z: 0). This will add gravity in the negative direction of the x axis.
“Initial Velocity” >
- Set the “Velocity” property to 800. This is probably the speed per second.
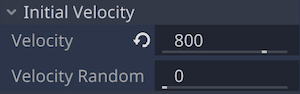
- Set the “Velocity” property to 800. This is probably the speed per second.
“Scale” >
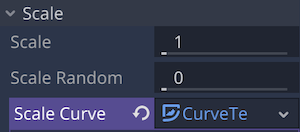
- Assign the resource “New CurveTexture” to the “Scale Curve” property.
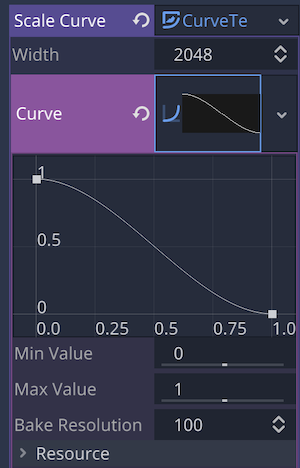
Next, edit the properties of the assigned resource. - “CurveTexture” >
- Assign the “New Curve” property to the “Curve” property and hit two points as shown in the screenshot below to create a curve and set the change in value. Now, each particle will gradually become smaller as time passes.
- Assign the “New Curve” property to the “Curve” property and hit two points as shown in the screenshot below to create a curve and set the change in value. Now, each particle will gradually become smaller as time passes.
- Assign the resource “New CurveTexture” to the “Scale Curve” property.
“Color”>
- Assign the resource “New GradientTexture” to the “Color Ramp” property. This is for the purpose of gradually changing the color of the particles from the time they are created to the time they disappear.
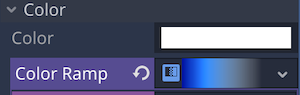
- Assign the resource “New Gradient” to the “GradientTexture” resource property assigned above.

- Edit the properties of the “Gradient” resource. In the inspector, intuitively specify three colors as the basis for the gradient.
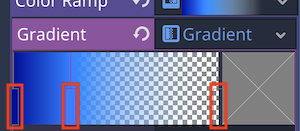
- Leftmost: #001096 (deep blue)
- Slightly left of center: #2780ff (light blue)
- Rightmost: #00ffffff (white with opacity 0)
This would result in the following resource properties.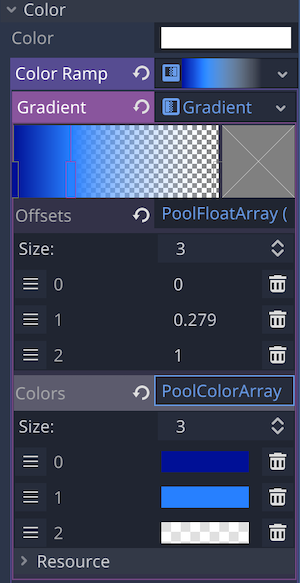
- Edit the properties of the “Gradient” resource. In the inspector, intuitively specify three colors as the basis for the gradient.
- Assign the resource “New GradientTexture” to the “Color Ramp” property. This is for the purpose of gradually changing the color of the particles from the time they are created to the time they disappear.
- First, apply the resource “res://Assets/circle_05.png” to the “Textures” > “Texture” property.
This completes the process of adding nodes and editing the properties of each node.
From here, attach the script to the root node “Laser” and start coding.
- Attach the script to the root node “Laser” and create the file path as “res://Laser/Laser.gd
- Edit the “Laser.gd” script as follows.
### Laser.gd ###
extends RayCast2D

# Reference to the Line2D node
onready var line = $Line2D
# Reference to the Particle2D node
onready var particle = $Particles2D
# Reference to the Tween node
onready var tween = $Tween

# Methods called when the scene is loaded
func _ready():
	# Turn off the Emitting property of the Particle2D node...
	# ...to prevent it from being left on in the inspector
	particle.emitting = false
	# Set up the animation of the tween node...
	# ...change the Width property of the Line2D from 0 to 10 over 0.5 seconds
	tween.interpolate_property(line, "width", 0, 10.0, 0.5)
	# Start the animation of the tween node
	tween.start()

# Physics process: Method called at 60FPS
func _physics_process(delta):
	# if RayCast2D (root node) is colliding with the physics body...
	if is_colliding():
		# set the position of the second point (endpoint) of the Line2D node to the position where RayCast2D collides with the physics body
		line.set_point_position(1, to_local(get_collision_point())))

		# if the object collided with was an obstacle...
		if get_collider().is_in_group("Obstacles"):
			# Referencing an obstacle instance
			var obstacle = get_collider()
			# Add the value of delta to the laser irradiation time of the obstacle instance
			obstacle.irradiated_time += delta
			# If the laser irradiation time exceeds the maximum irradiation time...
			if obstacle.irradiated_time > obstacle.max_irradiation:
				# Free the obstacle instance
				obstacle.queue_free()

	# If RayCast2D (root node) does not collide with the physical body...
	else:
		# Set the position of the second point (end) of the Line2D node to be the same as the position of the tip of the RayCast2D (root node)
		line.set_point_position(1, cast_to)

	# Set the position of the Particle2D node to be the same as the end position of the path of the Line2D node
	particle.position = line.points[1].
	# Turn on the Emitting property of the Particle2D node (start particle animation)
	particle.emitting = true

	# If the finger is released from the left mouse button...
	if Input.is_action_just_released("fire"):
		# Call the method to stop the laser
		stop_laser()

# Define a method to stop the laser
func stop_laser():
	# Set up the animation of a tween node: change the Width property of the Line2D node from 10 to 0 over 0.5 seconds
	tween.interpolate_property(line, "width", 10.0, 0, 0.5)
	# Start the animation of the tween node
	tween.start()
	# Wait for the tween node to finish animating
	yield(tween, "tween_completed")
	# Free the tween node
	queue_free()
A few additional notes on this code. In the script “Obstacle.gd” attached to the root node of the obstacle scene “Obstacle.tscn” that has been created as a preliminary step, two properties, irradiated_time and max_irradiation, are defined. The former is the irradiation time of the laser, and the latter is the maximum irradiation time of the laser. This system was created based on the idea that rather than destroying obstacles immediately after the laser strikes them, it would be more laser-like if the obstacles were destroyed after a certain amount of time (maximum irradiation time: 0.2 seconds).
The laser scene is now ready. The next step is to update the “Player” scene so that it can fire the laser.
Implementing the laser gun
Now that we have a laser scene, let’s implement the laser gun. The first specification for the laser gun is to add an instance of “Laser.tscn” created earlier to the “Player” scene when it fires. The player’s control should be the same as that of the machine gun, so that the gun will continue to fire as long as the left mouse button is held down. On the other hand, when the finger is released from the button, the “Laser.gd” script coded earlier will make the laser disappear and the instance will be released.
Now let’s edit the “Player.gd” script in concrete terms. First, I want you to add the fourth if block in the fire method as follows.
### Player.gd ###

func fire():
	if gun == 0 and Input.is_action_just_pressed("fire"):
		put_bullet()
	if gun == 1 and Input.is_action_just_pressed("fire"):
		for n in 5:
			put_bullet(n)
	if gun == 2 and Input.is_action_pressed("fire"):
		interval += 1
		if interval >= 5:
			interval = 0
			put_bullet()
	# If the gun-type is laser gun (3) and the left mouse button is pressed
	if gun == 3 and Input.is_action_just_pressed("fire"):
		# Call a method to create and fire a laser instance
		load_laser()
The fourth if block I added calls the load_laser method as long as the left mouse button is held down when the gun is the laser. This method is just about to be defined. Let’s add the following code under the put_bullet method.
### Player.gd ###

# Methods to create and fire laser instances
func load_laser():
	# Referencing instances of Laser.tscn
	var laser = laser_scn.instance()
	# Position the Laser instance at the same location as the muzzle
	laser.position = muzzle.position
	# Adds a Laser instance as a child node to the Player root node
	add_child(laser)
	# Move the Laser instance node to the 0th (backmost) of the Player root node's child nodes
	move_child(laser, 0)
After the “Laser” instance is created by pressing the left mouse button, the “Laser.gd” script controls the position, direction, length, and width of the laser, as well as the position of the particle at the tip. This includes freeing the “Laser” instance when the finger leaves.
That completes the implementation of the laser gun. When executing and checking the project, click the right mouse button three times to switch to the laser gun before firing.
After it was completed, I realized that the laser might have been better in another color. It looks like a water gun or a high water pressure washer.
Let’s run the project one last time, switching between the four guns as we play.
Conclusion
This time, we implemented four types of guns that are often implemented in top-down shooter games. If you want to make them more detailed, it might be more interesting to add the following elements, for example
- Change the appearance and speed of bullets depending on the gun type.
- When switching guns, the sprite of the player character should also be changed.
- Add animations and pauses for reloading bullets and filling the laser with energy.
- Add particles like smoke and debris when bullets hit objects and are released.
- Set the damage to objects hit by each type of gun, and set a certain life value on the object side, such as HP, so that the object can be destroyed when its life reaches 0.
Links
- KENNEY
- Godot online documentation: 2D Move Overview
- Godot online documentation: Line2D
- Godot online documentation: RayCast2D
- Godot online documentation: Particle System (2D)
- Godot online documentation: Particles2D
- Godot online documentation: ParticlesMaterial