In this tutorial, we will create a homing missile in a 2D top-down shooter. A homing missile is a missile that tracks its target.
Environment
This tutorial was created in the following environment
・Godot version: 3.4.2
・Computer OS version: macOS 11.6.5
To focus on the creation of the homing missile, the rest of the project has been pre-created in advance.
The project file for this tutorial is located at GitHub repository . After downloading the .zip file, import the “project.godot” file in the “Start” folder into the Godot Engine, and you can start the project with only the preliminary work completed. If you would like to see the completed project in a hurry, import the “project.godot” file from the “End” folder.
All the assets imported into the project were downloaded from KENNEY website. I used an asset pack called Tower Defense (top-down) . I just want to thank them for making such a great asset pack available to the public.
Preliminary Preparation
The following game specifications, except for the homing missile part, which is listed as (planned), have already been prepared as a preliminary.
- Player Character (Fighter):
- The following keys can be used.
- move_up: W key - the player character moves up.
- move_down: S key - the player character moves down.
- move_right: D key - moves the player character to the right.
- move_left: A key - moves the player character left.
- magic: Spacebar or left mouse button - fires the machine gun.
- Bullets of the machine gun disappear when they hit the enemy character’s tank and the homing missiles it fires.
- Bullets of the machine gun disappear when they go off-screen.
- The following keys can be used.
- Enemy characters (tanks):
- Up to 5 tanks appear on the game screen. When there are no tanks left, 5 new tanks will be created.
- They always move toward the player character.
- When the player gets close to a certain distance, they will fire homing missiles (planned).
- The homing missiles will disappear when the player character or the machine gun is hit by a bullet (planned).
- HUD:
- A simple HUD (Heads Up Display) with only Life and Score displayed in the upper left corner.
- Life: Number of remaining lives of the player character (up to 5). If the player’s plane is hit by a homing missile from a tank, it will be reduced by 1. When it reaches 0, the game is over (debug panel will close).
- Score: Enemy character’s life (max 3) is reduced by 1 when the tank is hit by a machine gun round, and 1 point is added when it reaches 0 and the tank is destroyed.
Making a homing missile
Creating a scene
First, follow the steps below to create a scene for a homing missile.
- select “Scene” menu > “New Scene”.
- Select “Other Node” in “Generate Root Node”.
- Select a node of “Area2D” class as a root node.
- Rename the root node “Area2D” to “Missile”.
- Save the scene here once, and set the file path to “res://Enemy/Missile.tscn”.
Next, add child nodes to the root node “Missile”.
- add a node of “Sprite” class to the root node “Missile”. This is the appearance of a missile.
- Add a node of the “CollisionShape2D” class to the root node “Missile. This is used to detect the collision of the missile with the player’s plane and the machine gun projectile it fired.
- Add a node of the “Timer” class to the root node “Missile”. This is to release the missile instance after a certain period of time.
The scene tree should now look like the following.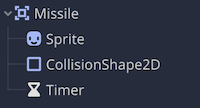
Editing node properties
Let’s edit the properties of each node in the scene tree in the inspector.
Missile (Area2D) Root node
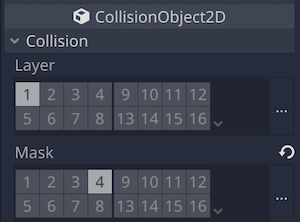
Edit the “Collision” > “Layer” property and “Collision” > “Mask” property of the “CollisionObject2D” class.
The “Layer” property allows you to set which collision layer the object (in this case, the “Missile” node) will be assigned to.
The “Mask” property allows you to set which collision layer the object will enable collisions with objects in that layer. In other words, objects in layers not selected by the “Mask” property will pass through each other without colliding, even if their positions overlap.
For example, a homing missile will pass through without collision with an enemy character’s tank, but collisions with the player character or machine gun bullets must be detected. Since the player character’s plane is flying over the tank, collisions with the tank are ignored, while collisions with homing missiles need to be detected.
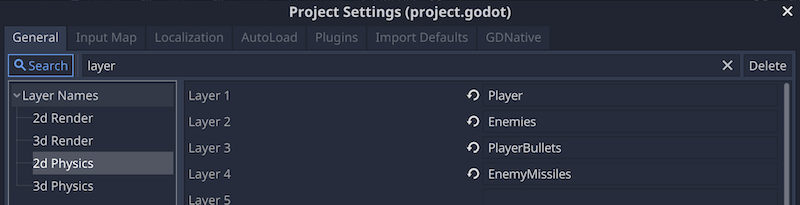
To make it easier to understand which object is assigned to which collision layer, I have already named the collision layers to be used by following the steps below.
- open the “Project” menu > “Project Settings
- Select “Layer Names” > “2d Physics” from the sidebar.
- Set the names of Layers 1 to 4 as follows.
- Layer 1: Player
- Layer 2: Enemies
- Layer 3: PlayerBullets
- Layer 4: EnemyMissiles
The “Layer” and “Mask” properties of the player character, machine gun bullets, and enemy characters have already been set as follows, according to the collision layer names above.
- Player Character: Player.tscn scene > Player (KinematicBody2D) root node
- Layer properties: Layer 1
- Mask property: Layer 4 (detects collisions with missiles)
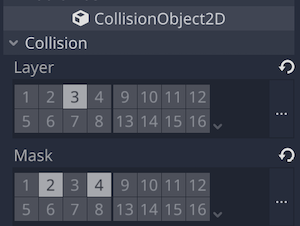
- Enemy character: Enemy.tscn scene > Enemy (KinematicBody2D) root node
- Layer property: Layer 2
- Mask property: Layer 2, 3 (detects collisions with other tanks and machine gun bullets)
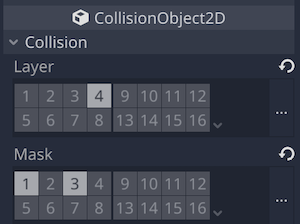
- Machine gun bullet: Bullet.tscn scene > Bullet (Area2D) root node
- Layer property: Layer 3
- Mask property: Layer 2, 4 (detects collisions between tanks and homing missiles)
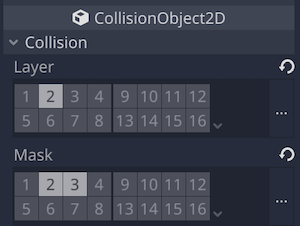
And I would like you to set up the homing missile you are editing now as well, as follows
- Homing missile: Missile.tscn > Missile (Area2D) root node
- Layer property: Layer 4
- Mask property: Layer 1, 3 (detects collisions between planes and machine gun bullets)
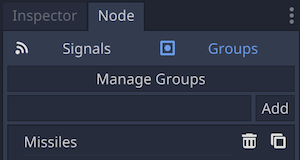
Once we have edited the properties of the root node “Missile”, we should incidentally add this node by creating a group called “Missiles”. This is used to determine whether a missile is a missile or not when a machine gun bullet hits a missile.
- select “Missile” in the scene tree dock
- open the node dock > group tab and add the group “Missiles”.
Sprite Node
The method of setting a texture for a sprite by specifying the range of textures you want to use from a single sprite sheet that contains many textures is used.
- In the inspector, apply the resource file “res://towerDefense_tilesheet.png” to the “Texture” property.
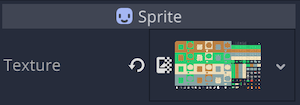
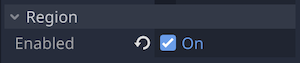
- Turn on “Region” > “Enabled”.
- open the “Texture Region” panel at the bottom of the editor and specify the region of the texture you want to use in the sprite sheet.

- First, expand the panel to the top of the editor so that it is easy to see, and then enlarge the sprite sheet to a size that is easy to see.

- select “Grid Snap” in “Snap Mode” at the top of the “Texture Region” panel.

- set the “step” at the top of the panel to 64px 64px as well. This will make the grid the same size as the sprites on the sprite sheet.

- select the texture of the larger missile on the sprite sheet.

Return to the inspector and set the “Transform” > “Rotation” property to 90.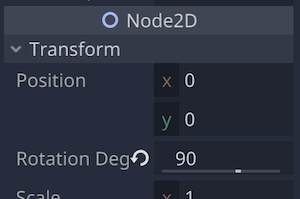
This will rotate the texture by 90°. Since the object’s normal orientation is 0° along the positive x-axis and the missile’s direction of travel is based on this, the sprite’s orientation was adjusted accordingly.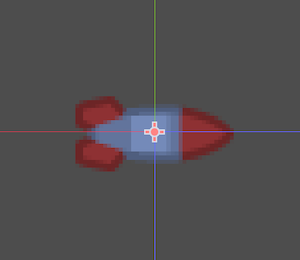
- First, expand the panel to the top of the editor so that it is easy to see, and then enlarge the sprite sheet to a size that is easy to see.
CollisionShape2D node
This node sets the collision shape of the homing missile. It is required to determine the collision between the missile and the player character, and the system will alert you if a child node that sets the collision shape has not been added to the “Area2D” class node.
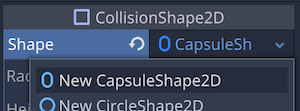
- In the inspector, apply the “New CapsuleShape2D” resource to the “Shape” property.
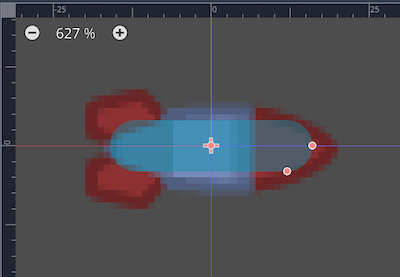
- In the 2D workspace, match the collision shape to the size of the “Sprite” node texture.
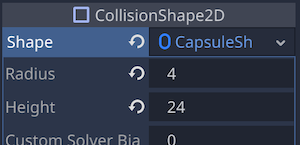
- If you want to enter directly in the inspector, set the properties of the “CapsuleShape2D” resource as follows
- Set the “Radius” property to 8.
- Set the “Height” property to 24.
Timer node
This node is a timer for homing missiles to self-destruct after a certain amount of time. If missiles continue to exist in the game indefinitely, the number of missiles will grow and the computer will run out of memory to handle them. To avoid this, the system is designed to release instances when the time expires. For missiles that fly in a straight line, it is possible to use the signal of the “VisibilityNotifier2D” node to release instances when they go off the screen, but for homing missiles that track the player character, a timer is more appropriate.
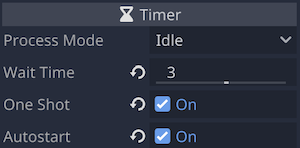
- In the inspector, set the “Wait Time” property to 3. This is the effective time of the missile. You can tweak it to your liking, but be aware that if it is too long, there will be too many missiles at the same time, which will consume too much memory.
- Turn on the “One Shot” property.
- Turn on the “Auto Start” property.
This completes the property editing for each node.
Controlling it with a script
Next, we will create a script to control the missile. We want you to attach a new script to the root node “Missile”. The file path should be created as “res://Enemy/Missile.gd”.
First, edit the “Missile.gd” script as follows.
### Missile.gd ###
extends Node2D

# Missile speed
export var speed = 400
# Velocity of the missile
var velocity = Vector2()

# Physics process
func _physics_process(delta):
	# velocity = current orientation x speed
	velocity = transform.x * speed
	# Update position: current position + velocity x delta (seconds per frame)
	position += velocity * delta
	# Update orientation: match current velocity
	rotation = velocity.angle()
Now, the missile should fly straight for the time being. Let’s run the scene and check it out.
Can you see the missile flying from left to right across the top portion of the GIF image?
Next, we will add the motion to track the player character to the script. First, let’s define some necessary properties. In the following code, please add the commented “# Add”.
### Missile.gd ###
extends Node2D

export var speed = 400
# Add: the ability to steer in the direction the player is in.
# The higher the value, the quicker the direction correction
export var steering_force = 20.0

var velocity = Vector2()
# Add: acceleration
var acceleration = Vector2()
# Reference to the target Player object (as soon as detected)
var target = null
Next, define the method by which the missile will steer toward the player character (correct its trajectory).
### Missile.gd ###
# method to steer the missile towards the player character
func steer():
	# Define as velocity to steer
	var steering = Vector2()
	# Define ideal velocity (direction x speed towards player character from current position)
	var ideal_velocity = (target.position - position).normalized() * speed
	# speed to steer = direction vector obtained by ideal_velocity - current_velocity x force to steer
	steering = (ideal_velocity - velocity).normalized() * steering_force
  # output velocity to steer
	return steering
Since it may be difficult to visualize from the comments on the code alone, I will supplement this with a diagram.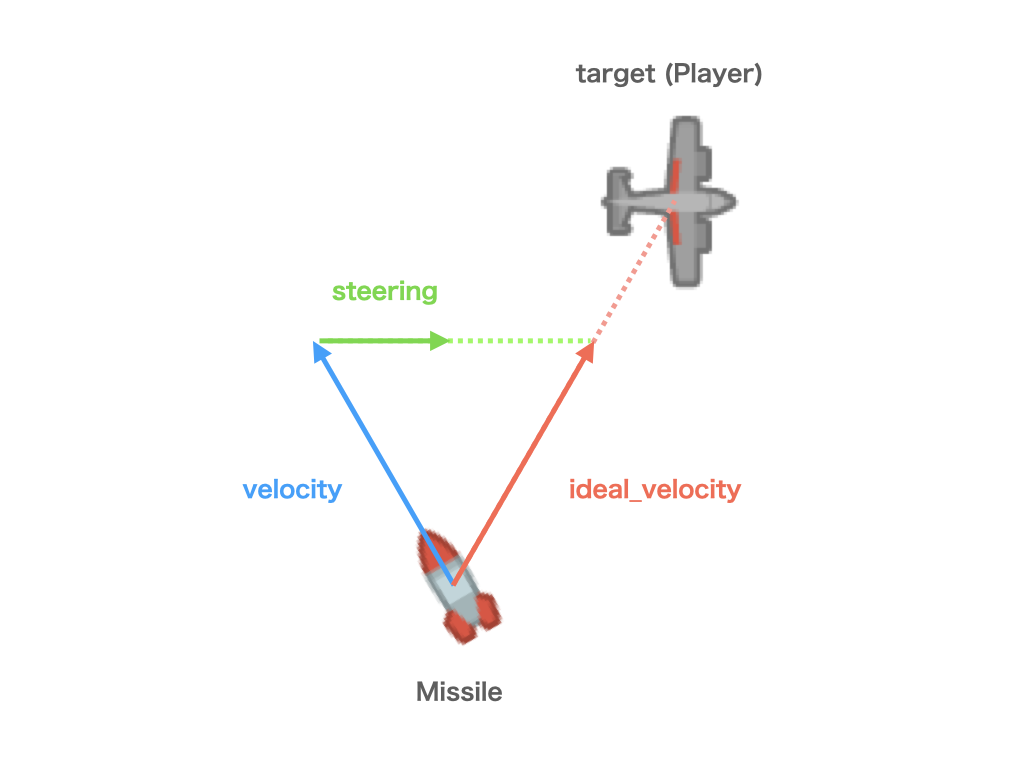
When the homing missile detects the player character’s plane, it will track it as a target. The ideal velocity is the variable ideal_velocity, assuming that the missile could travel in a straight line in the direction of the target. In reality, however, the missile is flying in the direction that the property velocity has, and we want to steer it toward ideal_velocity to correct its trajectory.
That’s where the vector calculation comes in. If we take the vector ideal_velocity minus velocity and turn it into a direction vector (a vector of length 1) using the method normalized. Then, multiply it by the value of the property steering_force, which is the force to steer, the value of the variable steering is determined, which is the velocity to steer.
Now, let’s use the value of the variable steering output by the method steer to modify the missile so that it flies while correcting its trajectory. Please add the comment “# Add” to the method _physics_process.
### Missile.gd ###
func _physics_process(delta):
	velocity = transform.x * speed
	# Add: add velocity to steer to acceleration
	acceleration += steer()
	# Add: add the velocity plus the acceleration x delta value to the velocity
	velocity += acceleration * delta
	# Add: limit the length of the velocity vector so that it does not exceed the speed
	velocity = velocity.clamped(speed)
	position += velocity * delta
	rotation = velocity.angle()
This should have implemented the movement of the homing missile tracking the player character.
Let’s continue by adding a program for when the missile hits the player character or the machine gun projectile. For this, we will use the signal of the Area2D class of the root node “Missile”.
Now, after selecting “Missile” in the scene tree dock, go to the node dock > Signal tab and connect the signal “body_entered(body: Node)” to this “Missile.gd” script.
After connecting, edit the automatically generated method _on_Missile_body_entered as follows.
### Missile.gd ###
# Method called by the signal sent when the physical body is hit by a missile
func _on_Missile_body_entered(body):
	# If the physical body is the player character
	if body.name == "Player":
		print("Missile hit ", body.name)
		# Play the animation "hit" of the AnimationPlayer in the Player scene
		body.anim_player.play("hit")
		# Emit the signal player_hit for the Player node
		body.emit_signal("player_hit")
		# If the Player's Life is greater than 1, set it to -1
		if body.life > 1:
			body.life -= 1
		# if the Player's Life is less than 1
		else:
			# wait for animation hit to finish playing
			yield(body.anim_player, "animation_finished")
			# release the Player object
			body.queue_free()
			print("Game Over!")
			# Close debug panel and exit
			get_tree().quit()
	# release the missile itself
	queue_free()
Now, when a missile hits the player character’s plane, it animates (flashes red) and the player’s Life is reduced by one, and the game is over when there are no more than 0 planes left.
The next step is to create a mechanism to release the missile when the time expires using the timer in the “Timer” node. This also uses the signal of the “Timer” node. Now, select “Timer” in the scene tree dock, and connect the signal “timeout()” to the script.
In the block of the method _on_Timer_timeout generated by the connection, simply add the method queue_free.
### Missile.gd ###
func _on_Timer_timeout():
	queue_free()
The missile is now complete.
Making the enemy character launch a homing missile
The next step is for the “Enemy.tscn” scene to create an instance of the “Missile.tscn” scene that we just created, so that the enemy character’s tank fires homing missiles.
Editing and controlling the script
Let’s open and edit the “Enemy.gd” script attached to the root node “Enemy” in the “Enemy.tscn” scene.
First, let’s preload the missile scene file. At the beginning of the script, define constants for references. You will see the comment “# Add”.
### Enemy.gd ###
extends KinematicBody2D

signal enemy_killed

# Add: reference to preloaded Missile.tscn scene file
const missile_scn = preload("res://Enemy/Missile.tscn")
Next, since the block of the method _on_Timer_timeout contains only pass, please update it as follows. Incidentally, this method was generated by connecting the signal “timeout()” of the “LaunchTimer” node (Timer class). In other words, this method is called every time the timer times out.
### Enemy.gd ###
# Method called by a signal sent out when a LaunchTimer node times out
func _on_LaunchTimer_timeout():
	# If the parent node (World) has a node named Player
	if get_parent().has_node("Player"):
		# call the method to launch the missile
		launch_missile()
Please insert the following code defining the method launch_missile, which is described at the end of the above code, after the above _on_LaunchTimer_timeout.
### Enemy.gd ###
# Method to launch a missile
func launch_missile():
	# Instantiate the Missile.tscn scene
	var missile = missile_scn.instance()
	# Assign the Player object to Missile's target property
	missile.target = get_parent().get_node("Player")
	# Add a missile instance to the parent node (World)
	get_parent().add_child(missile)
	# Align the missile with the tip of the tank's cannon
	missile.position = muzzle.global_position
	# Align the direction of the missile with the direction of the tip of the tank's cannon
	missile.rotation = muzzle.global_rotation
The missile should now be able to be launched. Let’s run the project to see if the implementation so far works without problem.
Extra: Adding visual effects
For visual effect, we have prepared explosion particles when the missile hits and smoke particles coming out from behind the missile in the preliminary stage. Let’s use these by adding code to the “Missile.gd” script to give the missile a more visually appealing performance.
After opening the “Missile.gd” script, add the line “# Add” to the code.
### Missile.gd ###
# Add: See preloading Smoke.tscn (scene with only smoke particles)
const smoke_scn = preload("res://Effect/Smoke.tscn")
# Add: Preload reference to Explosion.tscn (scene with only explosion particles)
const explosion_scn = preload("res://Effect/Explosion.tscn")

export var speed = 400
export var steering_force = 20.0

var velocity = Vector2()
var acceleration = Vector2()
var target = null
# Add: count to space out the smoke
var smoke_count = 0
Next, call the method that produces the smoke within the _physics_process method.
### Missile.gd ###
func _physics_process(delta):
	velocity = transform.x * speed
	acceleration += steer()
	velocity += acceleration * delta
	velocity = velocity.clamped(speed)
	position += velocity * delta
	rotation = velocity.angle()

  # Add the value of delta to smoke_count
	smoke_count += delta
	# If smoke_count is greater than 0.05
	if smoke_count > 0.05:
		# Set smoke_count back to 0
		smoke_count = 0
		# Call the method that spawns the smoke
		spawn_smoke()
And let’s define the last method spawn_smoke as follows. This code should be inserted under the steer method.
### Missile.gd ###
# spawn_smoke() method
func spawn_smoke():
	# Instantiate a scene of smoke particles
	var smoke = smoke_scn.instance()
	# Add instance node to parent node (World)
	get_parent().add_child(smoke)
	# Put smoke at current missile position
	smoke.position = global_position
	# Align the direction of the smoke with the direction of the current missile (doesn't make much sense)
	smoke.rotation = global_rotation
Next, we now define a method to generate explosion particles. Add it under the method spawn_smoke above.
### Missile.gd ###
# 爆発させるメソッド
func explode():
	# Instantiate a scene of explosion particles
	var explosion = explosion_scn.instance()
	# Add instance node to parent node (World)
	get_parent().add_child(explosion)
	# Place the explosion particle at the current missile position
	explosion.position = global_position
	# Align the orientation of the explosion particle with the orientation of the current missile (doesn't make much sense)
	explosion.rotation = global_rotation
Let’s update the code to call the method explode at the three places with the following “# Add” comments.
### Missile.gd ###
func _on_Missile_body_entered(body):
	if body.name == "Player":
		print("Missile hit ", body.name)
		body.anim_player.play("hit")
		body.emit_signal("player_hit")
		if body.life > 1:
			body.life -= 1
		else:
			explode() # Add
			yield(body.anim_player, "animation_finished")
			body.queue_free()
			print("Game Over!")
			get_tree().quit()
	explode() # Add
	queue_free()


func _on_Timer_timeout():
	explode() # Add
	queue_free()
That’s all for the update. Let’s run the project one last time to see the direction we added.
By the way, both smoke and explosion particles use the “Particles2D” class node. macOS seems to have some performance issues with this node. I’m a macOS user, and it certainly caused a delay. You may be able to see it in the gif image above.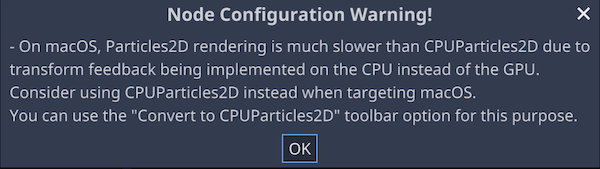
If you are using macOS, you can convert the root node (Particles2D class) to the “CPUParticles2D” class using “Convert to CPUParticles2D” from “Paricles” on the toolbar with the root node selected in the scene tree dock. It seems to be possible to convert it to the “CPUParticles2D” class.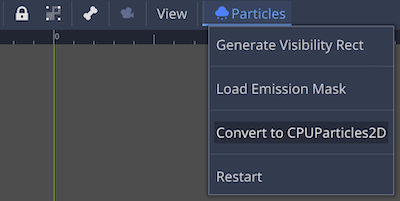
Conclusion
In this tutorial, we created a homing missile in top-down shooting. Let’s summarize the key points in creating it.
- The missile scene should be programmed to fly by itself as soon as an instance is added.
- To reproduce the tracking motion of the missile, sequentially perform the following every frame in the physics process.
- Multiply the direction vector to the target (the “Player” in this tutorial) by the speed to obtain the ideal velocity.
- Normalize the vector of the difference between the ideal velocity and the actual velocity to find the direction to steer.
- Multiply the direction to steer by the force to steer predefined by the property to obtain the speed to steer.
- Add the velocity to steer to the current acceleration.
- Add the updated acceleration to the current velocity.
- When creating an instance of a missile scene, make it a child of an object that does not move, such as its parent node (“World” in this tutorial), rather than of an object that rotates or moves (“Enemy” in this tutorial), so that the missile will fly correctly.
- To reduce memory consumption, use Timer’s signal so that the missile instance is released at timeout.
Links
The YouTube videos and articles on KidsCanCode were very helpful in preparing this tutorial. I would like to take this opportunity to thank them. For a better understanding, we recommend that you also view those contents.
- Godot Docs: Matrices and transforms
- YouTube: Godot Recipes: Homing Missiles
- YouTube: Godot 3.0: Top-down Tank Battle - Part 10: Homing Missiles
- KidsCanCode: HOMING MISSILE