In this tutorial, we will create a match 3 puzzle game. Match 3 is a puzzle game in which players move multiple colorful pieces evenly arranged along a grid on the board to eliminate three or more pieces of the same color in a row. This genre is particularly popular among mobile game players because it is easy to operate and enjoyable.
Candy Crush, Toon Blast, and Royal Match are just a few examples of popular games. Puzzle & Dragons and LINE Tsum Tsum are also based on Match 3, although the controls are slightly different. In this tutorial, we will create a puzzle like Candy Crush, in which the pieces are moved only one square at a time to match colors. If you want to make a game like “LINE tsum tsum”, check another tutorial, Connecting matching colors puzzle game in Godot .
The final project file for this tutorial is located at GitHub repository . If you download the .zip file and import the “project.godot” file in the “End” folder with the Godot Engine, you can check the project directly.
Environment
This tutorial was created in the following environment
・Godot version: 3.4.4
・Computer OS version: macOS 11.6.5
Memo:
Please also use the following articles to help you start creating your game.
Downloading Godot
Project Manager of Godot
Creating a new project
Start Godot Engine and create a new project. You can name your project as you like. If you can’t think of one, let’s call it “Match3 Start”.
Updating project settings
When the editor appears, let’s go ahead and update project settings for the entire project.
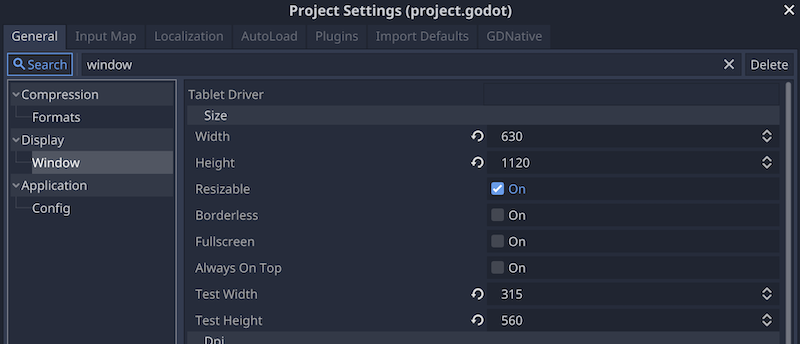
First, set the display size for the game. In this case, we will assume a smartphone screen in portrait orientation and set the aspect ratio to 16 : 9.
- Open the “Project” menu > “Project Settings”.
- In the “General” tab, search for “window” and select “Display” > “Window” in the sidebar.
- In the “Size” section, change the values of the following items
- Width: 630
- Height: 1120
- Test Width: 315
- Test Height: 560
- In the “Stretch” section, change the values of the following items
- Mode: 2d
- Aspect: keep

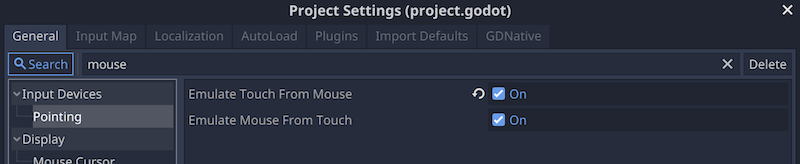
With the “Project Settings” window open as it is, configures the settings to substitute the mouse for the phone’s touch operation in the debug panel.
- Search for “mouse” in the “General” tab and select “Input Devices” > “Pointing” in the sidebar.
- Check “On” for “Emulate Touch From Mouse”.
In addition, with the “Project Settings” window open, add an action to the input map corresponding to a smartphone touch operation.
- Switch to the “Input Map” tab and add “touch” to the action.
- Add a left mouse click to the “touch” action.

Downloading and importing assets
Next, let’s download assets from KENNEY’s site and use them. This time, we will use an asset pack called “Physics Assets ”. I’m going to use the cute alien face images in this asset pack as textures for the pieces on the game board. I can’t help but be thankful for this wonderful free resource.
After downloading, delete the images in the “/physicspack/PNG/Aliens” folder, leaving only the one with the file name “~_round.png” and drag the “Aliens” folder into the file system dock of the editor to import it into your project.
Creating a Grid scene
First, let’s create a “Grid” scene as the board on which the pieces are placed in a match 3 puzzle game.
- Select “Scene” menu > “New Scene”.
- Select “2D Scene” in “Generate Root Node”.
- When the root node of the “Node2D” class is generated, rename it to “Grid”.
- Save the scene. Create a folder and save the scene with the file path “res://Grid/Grid.tscn”.
Adding a node to the Grid scene
Let’s add another child node of class “Node2D” to the “Grid” root node and rename it to “PiecesContainer”. This node is used to organize the pieces placed on the board. During the game, when instances of the pieces are created by the script, they will all be added as children of this “PiecesContainer” node.
The scene tree dock should now look like the following.
Note that there is no need to edit the properties of the “Grid” scene node.
Translated with www.DeepL.com/Translator (free version)
Creating a Piece scene
Next, create a “Piece” scene for the pieces to be placed on the board. However, this “Piece” scene is only a blueprint, and the actual pieces of each color to be used in the game will be prepared later by inheriting this “Piece” scene.
- Select “Scene” menu > “New Scene”.
- Select “2D Scene” in the “Create Root Node” section.
- When the root node of “Node2D” class is generated, rename it to “Piece”.
- Save the scene. Create a folder and save the scene with the file path “res://Pieces/Piece.tscn”.
Adding a child node to the Piece node
Let’s add a child node of class “Sprite” to the “Piece” root node. The scene tree dock should now look like the following.
Editing the properties of the Sprite node
Let’s edit a few properties of the “Sprite” node. As mentioned above, the “Piece” is only a blueprint, so we will leave the “Texture” property of the “Sprite” node as it is without applying any resources to it in this scene. In the inherited scene, apply an image that matches the color of each piece.
Change the value of the “Offset” property to “(x: 35, y: -35)”. In the scene of each piece of color that inherits this scene, we will apply the KENNEY image imported earlier to the “Texture” property. Since the size of the image is 70 px in height and width, we shifted the center of the image to the upper right and set the lower left corner of the image to (x: 0, y: 0).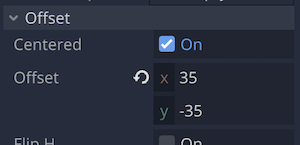
The grid of the board on which the pieces are placed is set to count from left to right on the x-axis and from bottom to top on the y-axis, and the size of one grid on the board is set to 70 px to match the size of the texture. If the lower left corner of the piece’s texture image is aligned with (x: 0, y: 0), then when the “Piece” root node is positioned (x: 0, y: 0) to the grid, the “Sprite” image will be placed exactly along the grid.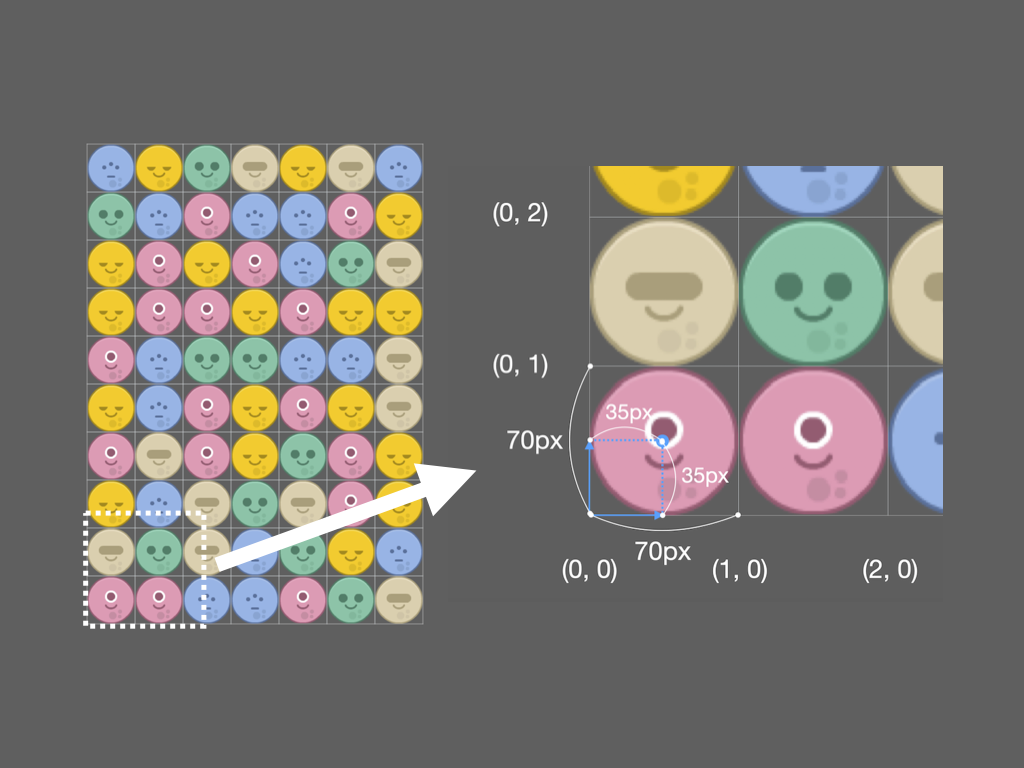
Attaching and editing a script to the Piece node
Let’s attach a new script to the “Piece” root node. Create a script file with the file path “res://Pieces/Piece.tscn”.
Edit the script as follows.
extends Node2D

# Property to set the color of the piece as string data
export (String) var color
# Property to indicate matched (3 or more of the same color in a row)
var matched = false
# Reference to a Sprite node
onready var sprite = $Sprite

# Method to move a piece
# Move the Piece instance to the position passed in the target argument
func move(target):
	position = target

# Method called when a match is found (3 or more of the same color in a row)
# Set the matched property to true and make the color translucent
func make_matched():
	matched = true
	sprite.modulate = Color(1,1,1,.5)
This completes the editing of the “Piece.gd” script.
Creating a scene for each color that inherits from the Piece scene
Now that the “Piece” scene, which will serve as a template, is complete, let’s create a scene that inherits the “Piece” scene in the number of colors of the piece. There are five Piece colors: beige, blue, green, pink, and yellow. First, let’s proceed with the steps using the “beige” drop as an example.
- Select “Scene” menu > “New Inherited Scene”.
- Select “Piece.tscn” as the source scene.
- After the inherited scene is generated, rename the root node to “PieceBeige”.
*The name of this root node should match the color of each drop. - Save the scene once. Save the file path as “res://Pieces/PieceBeige.tscn”.
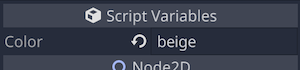
- With the root node “PieceBeige” selected in the scene tree dock, set the value of the “Color” property of “Script Variables” to “beige” in the inspector.
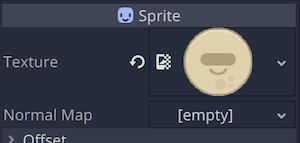
- Select the “Sprite” node in the scene tree dock and apply the previously imported resource “res://Aliens/alienBeige_round.png” to the “Texture” property (you can drag it from the file system dock).
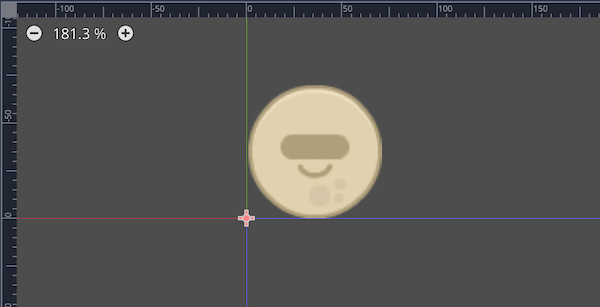
- On the 2D workspace it should now look like the following screenshot.
- The “PieceBeige” scene is now complete. Follow the same procedure to create scenes for the remaining four colored pieces. Please refer to the following for details on the different parts of each scene.
- Blue Piece
- Root node name: PieceBlue
- Color property: blue
- Sprite > Texture property: res://Aliens/alienBlue_round.png
- File path when saving the scene: res://Pieces/PieceBlue.tscn
- Green Piece
- Root node name: PieceGreen
- Color property: green
- Sprite > Texture property: res://Aliens/alienGreen_round.png
- File path when saving the scene: res://Pieces/PieceGreen.tscn
- Pink Piece
- Root node name: PiecePink
- Color property: green
- Sprite > Texture property: res://Aliens/alienPink_round.png
- File path when saving the scene: res://Pieces/PiecePink.tscn
- Yellow Piece
- Root node name: PieceYellow
- Color property: yellow
- Sprite > Texture property: res://Aliens/alienYellow_round.png
- File path when saving the scene: res://Pieces/PieceYellow.tscn
When the inherited scenes of all 5 colored pieces have been created, the work is complete.
Controlling the Grid scene with scripts
Now that we have created a scene for each color piece, we can now program and control the game. The amount of code is a bit large this time, so let’s do our best.
After switching to the “Grid.tscn” scene, attach a new script to the “Grid” root node. The file path should be “res://Grid/Grid.gd”.
In the comments in the script, “finger touched” or “finger released” should be replaced with “left mouse button pressed” or “left mouse button released” on the Godot debug panel.
Also, please note that “match” is defined as three or more of the same color.
Now, once the script editor is open, let’s define the necessary properties.
### Grid.gd ###

extends Node2D

# An array with scene files for each color piece as elements
const pieces_scn = [
	preload("res://Pieces/PieceBeige.tscn"),
	preload("res://Pieces/PieceBlue.tscn"),
	preload("res://Pieces/PieceGreen.tscn"),
	preload("res://Pieces/PiecePink.tscn"),
	preload("res://Pieces/PieceYellow.tscn")
]

# Number of grids in x-axis direction
var width: = 7
# Number of grids in y-axis direction
var height: = 10
# Grid start position (pixels) in x-axis direction
var x_start: = 70
# Grid start position (pixels) in y-axis direction
var y_start: = 910
# Size of one grid (should be the same as Texture of Sprite in Piece)
var grid_size: = 70

# A two-dimensional array (initially empty) that manages all the pieces of the board as elements and their grid coordinates
var all_pieces = [].

# Position where finger touches the screen
var touched_pos = Vector2()
# The position where the finger leaves the screen
var released_pos = Vector2()

# State where finger is touching the screen, touched: true / away: false
var is_touching = false
# State of automatic processing of matching, processing: true / stopped: false
var is_waiting = false

# Referencing the PiecesContainer node
onready var pieces_container = $PiecesContainer
Then let’s add the following method. Note that the two-dimensional array that appears in the following code is an array that stores arrays as elements.
In the case of the two-dimensional array used in this script, the first level of the array contains as many empty arrays as the number of grids in the x-axis direction of the board, and the second level of the array contains as many elements as the number of vertical grids in each array. By storing piece objects as elements, it is possible to manage where each piece is located on the board (how many grids along the x-axis and how many grids along the y-axis).
### Grid.gd ###

# Function called when the scene is loaded
func _ready():
    # Method to randomize the output result of a function that generates a random number each time
	randomize()
    # Make all_pieces a 2d array that makes up the grid of the board
	all_pieces = make_2d_array() # define after this
    # Spawn the pieces and place them on each grid
	spawn_pieces() # define after this

# Method to create a 2d array that makes up the grid of the board
func make_2d_array():
	# Prepare an array named array for output
    var array = [].
    # Fill the prepared array with the number of empty arrays for the number of grids along the x-axis
	for i in width:
		array.append([])
        # Add a value of null for the number of grids in the y-axis to each array
		for j in height:
			array[i].append(null)
    # return the two-dimensional array
	return array

# Method to spawn pieces and place them on each grid
func spawn_pieces():
    # Loop for the number of grids along the x-axis
	for i in width:
        # Loop over the number of grids in the y-axis
		for j in height:
			# If no piece exists in the corresponding grid on the 2D array of all pieces
            # (All null at the start of the game)
            if all_pieces[i][j] == null:
                # Randomly select one from the scenes of each color and instantiate it
				var index = floor(rand_range(0, pieces_scn.size()))
				var piece = pieces_scn[index].instance()
                # If it matches, delete the piece instance and start over
				while match_at(i, j, piece.color): # define after this
					piece.queue_free()
					index = floor(rand_range(0, pieces_scn.size()))
					piece = pieces_scn[index].instance()
                # Make a piece instance a child of a PiecesContainer node
				pieces_container.add_child(piece)
                # Place the piece instance at the position converted from grid to pixels
				piece.position = grid_to_pixel(i, j) # define after this
                # Update the 2D array of all pieces
				all_pieces[i][j] = piece
Let’s define the match_at and grid_to_pixel methods in the above code.
### Grid.gd ###

# Method to check if 3 or more pieces of the same color are lined up at the specified grid position.
# column is the grid position on the x-axis, row is the grid position on the y-axis, and color is the color of the piece
func match_at(column, row, color):
    # If the x-axis value of the specified grid coordinate is 3 or greater
	if column >= 2:
        # If there is a piece to the left of the specified grid coordinate and one more to the left
		if all_pieces[column-1][row] ! = null \
		and all_pieces[column-2][row] ! = null:
            # If the color of those pieces is the same as the color of the given piece
			if all_pieces[column-1][row].color == color \
			and all_pieces[column-2][row].color == color:
                # Return true
				return true
    # If the y-axis value of the specified grid coordinate is 3 or greater
	if row >= 2:
        # If there are pieces below the specified grid coordinates and one more below
		if all_pieces[column][row-1] ! = null \frz
		and all_pieces[column][row-2] ! = null:
            # If the color of those pieces is the same as the color of the given piece
			if all_pieces[column][row-1].color == color \
			and all_pieces[column][row-2].color == color:
                # return true
				return true

# Method to convert grid position to pixel position
func grid_to_pixel(column, row):
    # Define a Vector2 variable pixel_pos for pixel position output
	var pixel_pos = Vector2()
    # Pixel x-coordinate = grid start position along x-axis + grid size * grid x-coordinate
	pixel_pos.x = x_start + grid_size * column
    # Pixel y-coordinate = grid start position along y-axis - grid size * grid y-coordinate
	pixel_pos.y = y_start - grid_size * row
    # Return pixel position
	return pixel_pos
Now the pieces of each color should be randomly arranged on the board at the start of the game. Let’s run the project once to check it out. If you are running the project for the first time, select “Grid.tscn” as the main scene when the dialog for selecting the main scene appears.
Since we have just defined the grid_to_pixel method, we should also define the pixel_to_grid method to be used later. As the name suggests, this method is the opposite of grid_to_pixel defined earlier, and converts pixel positions to grid positions.
### Grid.gd ###

# Method to convert pixel position to grid position
func pixel_to_grid(pixel_x, pixel_y) -> Vector2:
	var grid_pos = Vector2()
	grid_pos.x = floor((pixel_x - x_start) / grid_size)
	grid_pos.y = floor((pixel_y - y_start) / -grid_size)
	return grid_pos
In addition, we define one more method is_in_grid to be used later. This method determines whether the position passed as an argument is within the board grid and returns true or false.
### Grid.gd ###

# Method that returns whether the given position is in the grid or not.
func is_in_grid(grid_position: Vector2):
	if grid_position.x >= 0 and grid_position.x < width \
	and grid_position.y >= 0 and grid_position.y < height
        # Return true if within the board grid
		return true
	else:
        # Return false if outside of the grid
		return false
Here, we will write a program to handle the player’s input for the game.
### Grid.gd ###

# Function called every frame in the main loop of the game
func _process(_delta):
    # If not in the process of matching
	if not is_waiting:
        # Process the player's input
		touch_input() # define after this

# Method to process player input
func touch_input():
    # If a finger touches the screen
	if Input.is_action_just_pressed("touch"):
        # Convert finger position from pixels to grid
		var start_pos = get_global_mouse_position()
		var start_grid = pixel_to_grid(start_pos.x, start_pos.y)
        # If the finger position is within the board grid
		if is_in_grid(start_grid):
            # Save the position where you touched your finger to the screen
			touched_pos = start_grid
            # Make the state with the finger touching the screen
			is_touching = true
	# If finger leaves the screen
    if Input.is_action_just_released("touch"):
        # Convert finger position from pixels to grid
		var end_pos = get_global_mouse_position()
		var end_grid = pixel_to_grid(end_pos.x, end_pos.y)
        # If finger position is within the board grid...
        # and the state is with the finger touching the screen
		if Is_in_grid(end_grid) and is_touching:
            # Save as released position information
			released_pos = end_grid
            # Call a method that handles the movement of the piece at the touched and released positions
			touch_and_release() # define after this
        # State is finger off the screen
		is_touching = false
In the above code, the touch_and_release method is called to acquire the position of the finger touching the screen and the position of the finger leaving the screen within the grid of the board, and to use this information to process the movement of the pieces.
Let’s define this method and a helper method called swap_pieces that is called further in the method. A helper method is simply a method that is called within a method and serves to keep the parent method simple.
### Grid.gd ###

# Method that handles the movement of the piece using the position of the touched finger and the position of the released finger
func touch_and_release():
    # Calculate the difference between the position where the finger touched and the position where the finger released
	var difference = released_pos - touched_pos
    # If the absolute value of the difference along the x-axis is greater than the absolute value of the difference along the y-axis
	if abs(difference.x) > abs(difference.y):
        # If difference along x-axis is greater than 0
		if difference.x > 0:
            # Call helper method to swap the piece at the touched position with the adjacent piece to the right
			swap_pieces(touched_pos, Vector2.RIGHT) # define after this
        # If the difference along the x-axis is less than 0
		elif difference.x < 0:
            # Call helper method to swap the piece at the touched position with the adjacent piece to the left
			swap_pieces(touched_pos, Vector2.LEFT) # defined after this
    # If the absolute difference along the x-axis is less than the absolute difference along the y-axis
	elif abs(difference.x) < abs(difference.y):
        # If the difference along y-axis is greater than 0
		if difference.y > 0:
            # Call helper method to swap the piece at the touched position with the piece adjacent below
			swap_pieces(touched_pos, Vector2.DOWN) # define after this
        # If the difference along the y-axis is less than 0
		elif difference.y < 0:
            # Call helper method to swap the piece at the touched position with the one adjacent above it
			swap_pieces(touched_pos, Vector2.UP) # defined after this

# Helper method to swap pieces
func swap_pieces(pos, dir):
    # Get the piece at the touched position from the 2D array of all pieces
	var touched_piece = all_pieces[pos.x][pos.y].
    # Get the piece adjacent to the piece in the direction of finger release from the 2D array of all pieces
	var target_piece = all_pieces[pos.x + dir.x][pos.y + dir.y]
    # If both pieces exist in the 2D array of all pieces
	if touched_piece ! = null and target_piece ! = null:
        # Overwrite the piece at the touched position in the 2D array of all pieces with the piece adjacent to the one you removed your finger from
		all_pieces[pos.x][pos.y] = target_piece
        # Overwrite the piece adjacent to the finger release position with the piece at the finger release position from the two-dimensional array of all pieces
		all_pieces[pos.x + dir.x][pos.y + dir.y] = touched_piece
        # Move the piece instance at the touched position on the board by 1 grid toward the one you removed your finger from
		touched_piece.move(grid_to_pixel(pos.x + dir.x, pos.y + dir.y))
        # move the piece instance adjacent to the one you release your finger on the board to the position touched by your finger
		target_piece.move(grid_to_pixel(pos.x, pos.y))
        # Set auto-processing state to "processing in progress" since processing of the matched piece starts here
		is_waiting = true
With the above code, we have implemented a process whereby a piece dragged by the player is replaced by an adjacent piece.
Let’s run the project to see if the input operation works correctly.
From here, the process that should be executed automatically after the pieces are replaced is implemented. The general flow is as follows:
- Change the automatic processing state during processing.
- Check if there is at least one matched piece, and if so, loop through the following process.
- Check all pieces and flag matched pieces.
- Delete the flagged piece.
- Fill the empty space by moving a piece from the same column.
- After the pieces are packed down, a new piece is created in the empty space at the end.
- When there are no more matched pieces, the automatic processing state is stopped.
Let’s code the general flow of the above.
First, let’s add a line is_waiting = true at the end of the swap_pieces method that swaps the pieces defined earlier. This changes the automatic processing state to “processing”.
### Grid.gd ###

func swap_pieces(pos, dir):
	var touched_piece = all_pieces[pos.x][pos.y]
	var target_piece = all_pieces[pos.x + dir.x][pos.y + dir.y]
	if touched_piece ! = null and target_piece ! = null:
		all_pieces[pos.x][pos.y] = target_piece
		all_pieces[pos.x + dir.x][pos.y + dir.y] = touched_piece
		touched_piece.move(grid_to_pixel(pos.x + dir.x, pos.y + dir.y))
		target_piece.move(grid_to_pixel(pos.x, pos.y))

        # Add the following
        # Set the auto-processing state to "processing" since this is where the automatic processing of the matched piece starts
		is_waiting = true
Let’s write the if syntax “if the state is in the process of executing automatic processing” in the touch_input method, and then add the processing we want to execute automatically in the block. The position for adding is just after the finger operation is finished. After the process is complete, let’s add a line is_waiting = false to set the automatic processing state to “stopped”.
### Grid.gd ###

func touch_input():
	if Input.is_action_just_pressed("touch"):
		# Omit
	if Input.is_action_just_released("touch"):
		# Omit

        # Add from here
        # If Input.is_action_just_pressed("touch"): # omit
		if is_waiting:
            # Check if there is at least one pair of matched pieces > loop as long as there are
			while check_matches(): # define after this
                pass
            # If no matched pieces are found and processing is complete, set autoprocessing state to waiting
			is_waiting = false
A while loop is used to repeat the necessary process if there is at least one pair of matching pieces.
First, define check_matches(), which is also the loop condition of the while loop, as follows.
### Grid.gd ###

# Method to check if there is at least one matched piece and return the result
func check_matches() -> bool:
    # Loop over the x-axis grid of the board
	for i in width:
        # Loop over the y-axis grid of the board
		for j in height:
            # if piece exists at that grid coordinate
			if all_pieces[i][j] ! = null:
                # return true if the piece matches at that grid coordinate, and method also terminates
				if match_at(i, j, all_pieces[i][j].color):
					return true
    # Check all pieces and return false if none of them match
	return false
Then, let’s define the find_matches method to perform the “first process in the while loop”, which is to check all the pieces and flag the matched ones, as follows. By “flagging” here, I mean changing the value of the matched property of a piece instance to true.
### Grid.gd ###

# Find matching pieces and flag method
func find_matches():
    # Loop over the number of x-axis grids on the board
	for i in width:
        # Loop over the number of y-axis grids on the board
		for j in height:
            # If a piece exists at the coordinates of that grid
			if all_pieces[i][j] ! = null:
                # Define the current color as the color of that piece
				var current_color = all_pieces[i][j].color
                # If its x-axis coordinates are less than the number of x-axis grids - 2
				if i < width - 2:
                    # If there are pieces to the right of that piece and further to its right
					if all_pieces[i+1][j] ! = null }
					and all_pieces[i+2][j] ! = null:
                        # If the color of those pieces is the same as the current color
						if all_pieces[i+1][j].color == current_color \
						and all_pieces[i+2][j].color == current_color:
                            # If the piece is not flagged
							if not all_pieces[i][j].matched:
                                # Set the matched property of the piece to true to flag it
                                # Make the piece's texture color translucent at the same time
								all_pieces[i][j].make_matched()
                            # If the piece's right neighbor is not flagged
							if not all_pieces[i+1][j].matched:
								all_pieces[i+1][j].make_matched()
                            # If the piece's two neighbors to the right are not flagged
							if not all_pieces[i+2][j].matched:
								all_pieces[i+2][j].make_matched()
				# If the piece's y-coordinate is less than the number of grids along the y-axis - 2
                if j < height - 2:
                    # If there are pieces above and further to its above that piece
					if all_pieces[i][j+1] ! = null \f}
					and all_pieces[i][j+2] ! = null:
                        # If the color of those pieces is the same as the current color
						if all_pieces[i][j+1].color == current_color \
						and all_pieces[i][j+2].color == current_color:
                            # If the piece is not flagged
							if not all_pieces[i][j].matched:
                                # Set the matched property of the piece to true to flag it
                                # Make the piece's texture color translucent at the same time
								all_pieces[i][j].make_matched()
                            # If the piece above it is not flagged
							if not all_pieces[i][j+1].matched:
								all_pieces[i][j+1].make_matched()
                            # If the piece two above it is not flagged
							if not all_pieces[i][j+2].matched:
								all_pieces[i][j+2].make_matched()
We need to call this find_matches method in the while loop in the touch_input method, so let’s update it as follows.
### Grid.gd ###

func touch_input():
	if Input.is_action_just_pressed("touch"):
		# Omit
	if Input.is_action_just_released("touch"):
		# Omit

		if is_waiting:
            # Check if there is at least one pair of matched pieces > loop as long as there are
			while check_matches():
                # Find matched pieces and flag them
				find_matches()
                # Wait 0.3 seconds to make the process visually clear
				yield(get_tree().create_timer(0.3), "timeout")
			is_waiting = false
Now the matched property of each matched piece instance should be true and the color of the piece should be translucent.
Let’s run the project and check it out.
Next, I would like you to define a delete_matches method that executes the second process “delete flagged pieces” in the while loop as follows.
### Grid.gd ###

# Method to delete matched pieces
func delete_matches():
    # Loop over the number of x-axis grids on the board
	for i in width:
        # Loop over the number of y-axis grids of the board
		for j in height:
            # If a piece exists at that grid coordinate
			if all_pieces[i][j] ! = null:
                 # If a piece at that grid coordinate is flagged
				if all_pieces[i][j].matched:
                    # Delete the piece at that grid coordinate
					all_pieces[i][j].queue_free()
                    # Empty the element with that grid coordinate from the 2D array of all_pieces[i][j].queue_free()
					all_pieces[i][j] = null
Let’s add this delete_matches method to the while loop of the touch_input method.
### Grid.gd ###

func touch_input():
	if Input.is_action_just_pressed("touch"):
		# Omit
	if Input.is_action_just_released("touch"):
		# Omit

		if is_waiting:
            # Check if there is at least one pair of matched pieces > loop as long as there are
			while check_matches():
                # Find matched pieces and flag them
				find_matches()
                # Wait 0.3 seconds to make the process visually clear
				yield(get_tree().create_timer(0.3), "timeout")
                # Delete flagged pieces
				delete_matches()
                # Wait 0.3 seconds
				yield(get_tree().create_timer(0.3), "timeout")
            # If no matched pieces are found and processing is complete, invalidate the in-process state
			is_waiting = false
Now the matched pieces should become translucent and then be deleted.
Let’s run the project and check it out.
Next, I would like you to update the collapse_columns method that executes the third process in the while loop, “Move and pack pieces from the grid above the same column into the space vacated by the deletion”, as follows.
### Grid.gd ###

# Method to collapse a column by moving the piece above it in a space where no piece exists
func collapse_columns():
    # Loop over the number of x-axis grids in the board
	for i in width:
        # Loop over the number of y-axis grids in the board
		for j in height:
            # If no piece exists at that grid coordinate (null)
			if all_pieces[i][j] == null:
                # Loop from one row above the y-coordinate of that grid to the top row
				for k in range(j + 1, height):
                    # If a piece exists on the grid one above
					if all_pieces[i][k] ! = null:
                        # Move the piece on the grid above to an empty grid below
						all_pieces[i][k].move(grid_to_pixel(i, j))
                        # Put one piece above into the current grid coordinates of the 2D array of all_pieces
						all_pieces[i][j] = all_pieces[i][k].
                        # Empty the grid coordinate one above in the 2D array of all_pieces
						all_pieces[i][k] = null
                        # Exit the loop
						break
Let’s call this collapse_columns method inside the while loop of the touch_input method.
### Grid.gd ###

func touch_input():
	if Input.is_action_just_pressed("touch"):
		# Omit
	if Input.is_action_just_released("touch"):
		# Omit

		if is_waiting:
            # Check if there is at least one pair of matched pieces > loop as long as there are
			while check_matches():
                # Find matched pieces and flag them
				find_matches()
                # Wait 0.3 seconds to make the process visually clear
				yield(get_tree().create_timer(0.3), "timeout")
                # Delete flagged pieces
				delete_matches()
                # Wait 0.3 seconds
				yield(get_tree().create_timer(0.3), "timeout")
                # Move and collapse pieces on the same column into empty space
				collapse_columns()
                # Wait 0.3 seconds
				yield(get_tree().create_timer(0.3), "timeout")
            # If no matched pieces are found and processing is complete, invalidate the in-process state
			is_waiting = false
Now we have an algorithm that fills the empty space with the piece above it after the piece has been deleted. The while loop should also continuously delete the matching piece after it has been stuffed into the empty space.
Let’s run the project and check it out.
Finally, if the spawn_pieces method is called after the pieces are packed down, new pieces will be placed in the empty space and the board will be filled. This method is already defined and called in the _ready method to place the pieces on the board at the beginning of the game.
Now let’s update the touch_input method as follows.
### Grid.gd ###

func touch_input():
	if Input.is_action_just_pressed("touch"):
		# Omit
	if Input.is_action_just_released("touch"):
		# Omit

		if is_waiting:
            # Check if there is at least one pair of matched pieces > loop as long as there are
			while check_matches():
                # Find matched pieces and flag them
				find_matches()
                # Wait 0.3 seconds to make the process visually clear
				yield(get_tree().create_timer(0.3), "timeout")
                # Delete flagged pieces
				delete_matches()
                # Wait 0.3 seconds
				yield(get_tree().create_timer(0.3), "timeout")
                # Move and collapse pieces on the same column into empty space
				collapse_columns()
                # Wait 0.3 seconds
				yield(get_tree().create_timer(0.3), "timeout")
                # Spawn and place a new piece in an empty space
				spawn_pieces()
                # Wait 0.3 seconds
				yield(get_tree().create_timer(0.3), "timeout")
            # If no matched pieces are found and processing is complete, invalidate the in-process state
			is_waiting = false
This completes the coding of the automatic processing part. This is the end of this tutorial. Finally, let’s run the project to see how it works.
Sample Game
We have prepared a sample game that is a brushed-up version of the project created in this tutorial. Note that the GIF images below are played at 3x speed, so they are actually a bit calmer.

The project file is located in the GitHub repository . Please download the .zip file from there and import the “project.godot” file in the “Sample” folder and import it into Godot Engine.
Conclusion
This time, we created a match 3 puzzle game. This is a perfect game genre for mobile games with simple controls that can be enjoyed over and over again.
Let me summarize the key points when creating a simple match 3 puzzle game like this one.
- There are only two minimum scenes required: the board and the pieces.
- Create a blueprint piece scene and then inherit it to create a piece scene for each color.
- Use a two-dimensional array to manage the pieces to be placed on the board grid.
- When replacing a piece, it is necessary to both replace the position of the piece on the screen and replace the elements of the two-dimensional array.
- The following are the key points of the script.
- The process of the player moving the pieces
- Get the position where the finger touches the screen and the position where the finger leaves the screen.
- Determine if the two positions are within the grid (valid operation).
- Determine the direction in which the pieces are swapped based on the difference between the two positions.
- Automatic processing (loop) when a match is made.
- Checks if there is at least one pair of matching pieces (loop condition).
- Flag the matched pieces.
- Delete flagged pieces (loop condition).
- Fill the space vacated by the removed piece with the piece above it.
- Create a new piece in the space vacated by the filling.
- The process of the player moving the pieces
Links
- KENNEY
- YouTube: Part 0: Why Godot? - Make a Match 3 game like Candy Crush Using Godot.
- Candy Crush
- Royal Match
- Toon Blast