In this tutorial, we will create an advanced match-3 puzzle game, a type of puzzle game in which one piece is moved freely on the board for a certain period of time to erase three or more pieces of the same color in a row.
This is easy to understand if you imagine a puzzle game like “Puzzle & Dragons” (a.k.a. “Puzzle Dora”), which has gained popularity as a mobile game.
However, the tutorial would be too large if it included all game elements such as decks, gacha, and battles with enemy characters, so we will focus on the puzzle part of the tutorial this time.
For more information on how to create an standard match-3 puzzle game like “Candy Crush” or a puzzle game like “LINE Tsum Tsum”, please refer to the following tutorial.
Other Tutorials
If you want to make a game like “Candy Crush”:
Match 3 puzzle game in Godot
If you want to make a game like “LINE: Disney Tsum Tsum”:
Connecting matching colors puzzle game in Godot
The project file that will be created at the end of this tutorial is located in the GitHub repository
. You can also check the project directly by downloading the .zip file and importing the “project.godot” file in the “End” folder with the Godot Engine.
Environment
This tutorial was created in the following environment
・Godot version: 3.4.4
・Computer OS version: macOS 11.6.5
Memo:
Please also use the following articles to help you start creating your game.
Downloading Godot
Project Manager of Godot
Creating a new project
Start Godot Engine and create a new project. The name of the project is up to you. If you can’t think of one, let’s call it “Advanced Match3 Start”.
###Updating project settings
Once the editor appears, let’s go ahead and update project settings for the entire project.
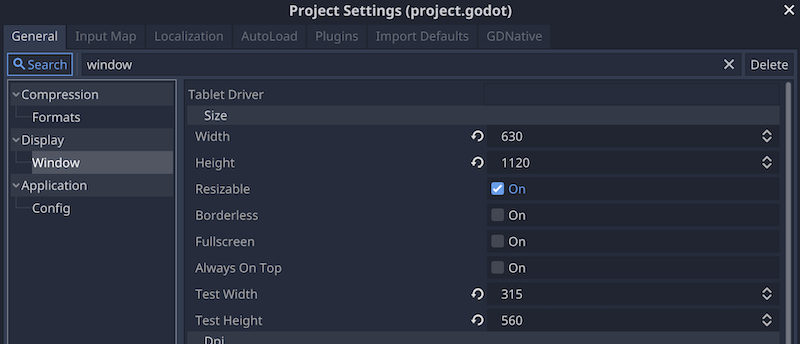
First, set the display size for the game. In this case, we will assume a smartphone screen in portrait orientation and set the aspect ratio to 16 : 9.
- Open the “Project” menu > “Project Settings”.
- In the “General” tab, search for “window” and select “Display” > “Window” in the sidebar.
- In the “Size” section, change the values of the following items
- Width: 630
- Height: 1120
- Test Width: 315
- Test Height: 560
- In the “Stretch” section, change the values of the following items
- Mode: 2d
- Aspect: keep

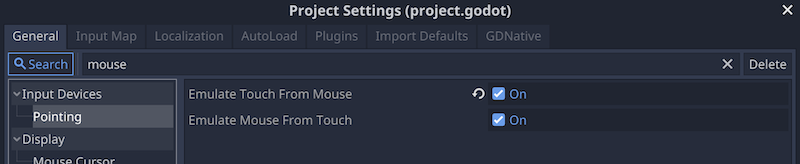
With the “Project Settings” window open as it is, configure the settings to substitute the mouse for the phone’s touch operation in the debug panel.
- Search for “mouse” in the “General” tab and select “Input Devices” > “Pointing” in the sidebar.
- Check the On checkbox for “Emulate Touch From Mouse”.
In addition, with the “Project Settings” window open, let’s add an action to the input map that corresponds to a smartphone touch operation.
- Switch to the “Input Map” tab and add “touch” to the action.
- Add a left mouse click to the “touch” action.

###Downloading and importing assets
Next, let’s download assets from KENNEY’s site and use them. This time, we will use an asset pack called “Physics Assets ”. I will use the cute alien face images in this asset pack as textures for the pieces I will place on the game board. I can’t help but be thankful for this wonderful free resource.
Once downloaded, delete the images in the “/physicspack/PNG/Aliens” folder with the file name “~_round.png” and drag the “Aliens” folder to the file system dock of the editor to import them into your project.
Creating a Grid scene
First, let’s create a “Grid” scene as the board on which the pieces are placed in a match-3 puzzle game.
- Select “Scene” menu > “New Scene”.
- Select “Other Node” in “Generate Root Node”.
- When the root node of the “Area2D” class is generated, rename it to “Grid”.
- Save the scene. Create a folder and save the scene with the file path “res://Grid/Grid.tscn”.
Adding a node to the Grid scene
Let’s add more nodes to the “Grid” root node.
- Add a “CollisionShape2D” node to the “Grid” root node.
- Add a “Node2D” node to the “Grid” root node and rename it to “PiecesContainer”.
- Add two “Timer” nodes to the “Grid” root node and rename them “TouchTimer” and “WaitTimer” respectively.
The scene tree should now look like the following.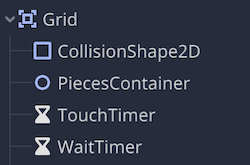
Let’s continue editing the nodes we have added.
Editing a node in a Grid scene
Grid (Area2D) Root node
In this puzzle, you can move the pieces freely on the board, but the pieces you are moving must not extend beyond the board. Otherwise, the pieces can be moved outside of the board and replaced with pieces that are far away from the board. In this puzzle game, the pieces you are moving and the adjacent drops are exchanged one after another.
The root node is an Area2D class node that uses a signal to detect when a finger (the piece being moved) moves off the board. As long as detection is possible, the movable area of the piece can be restricted by scripts. We will attach the script to this scene at the end, so we will connect the signals again at that time.
There is no need to edit the properties of this node itself.
CollisionShape2D node
This node is used to detect when a finger (the piece you are moving) protrudes outside of the board. Edit each property in the inspector as follows
- Shape: Apply a new RectangleShape2D resource.
- RectangleShape2D >
- Extents: (x: 225, y: 190)
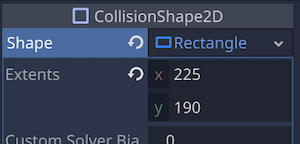
- Extents: (x: 225, y: 190)
- Transform >
- Position: (x: 315, y: 840)
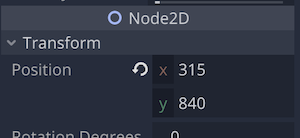
- Position: (x: 315, y: 840)
- RectangleShape2D >
On a 2D workspace, it should have looked like this.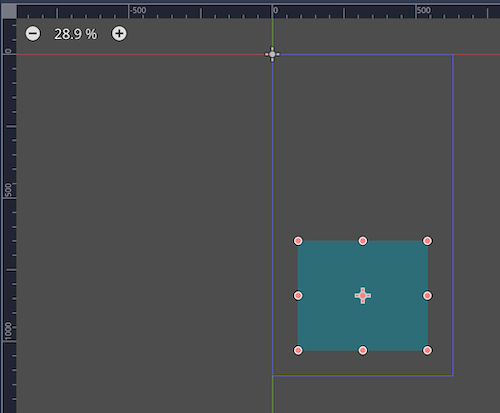
PiecesContainer (Node2D) node
This node is used to organize the pieces that will be placed on the board. During the game, every instance of a piece that is created by the script will be added as a child of this “PiecesContainer” node. This way, no matter how many instances of a piece are created, the order of the nodes in the scene tree will be maintained.
There are no particular properties that need to be edited, so let’s move on.
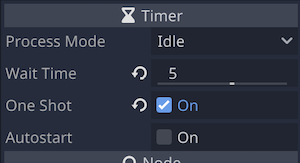
TouchTimer node
This node of the Timer class is used to start a countdown after the player starts moving the pieces with his/her finger, so that when the time runs out, the pieces he/she was moving will automatically leave his/her finger. This gives the player a certain sense of urgency to line up the pieces within the time limit. In this case, we will set the pieces to be able to move for 5 seconds.
Let’s edit the inspector as follows.
- Wait Time: 5
- One Shot: On
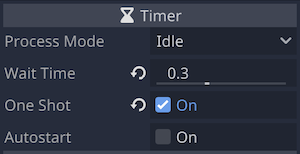
WaitTimer node
This node of the Timer class is used to pause for a moment between each process in the automatic process of matching pieces, deleting the matched pieces, filling the empty grid, and adding the missing pieces after the pieces leave the fingers. The node is used to pause for a moment between each process.
Edit as follows in the inspector.
- Wait Time: 0.3
- One Shot: On
This completes the editing of the “Grid” scene.
Creating a Piece scene
Next, create a “Piece” scene for the pieces to be placed on the board. However, this “Piece” scene is only a model, and the actual pieces of each color to be used in the game will be prepared later by inheriting this “Piece” scene.
- Select “Scene” menu > “New Scene”.
- Select “Other Scene” in “Generate Root Node”.
- When the root node of “Area2D” class is generated, rename it to “Piece”.
- Save the scene. Create a folder and save the scene with the file path “res://Pieces/Piece.tscn”.
Adding nodes to the Piece scene
Let’s continue adding the necessary nodes to the “Piece” scene.
- Add a “Sprite” node to the “Piece” root node.
- Add a “CollisionShape2D” node to the “Piece” root node.
- Add a “Tween” node to the “Piece” root node.
The scene tree for the Piece scene should now look like this.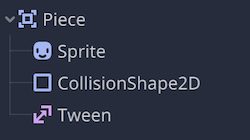
Editing a node in a Piece scene
Piece (Area2D) Root node
The root node is an Area2D class so that we can detect when a finger hits the piece we want to move, moves away from the piece, or when the pieces collide with each other.
The properties of this node do not need to be edited, but one property needs to be added to the group. After selecting the “Piece” root node in the scene dock, select the Node Dock > Groups tab and create and add a group named “Pieces.”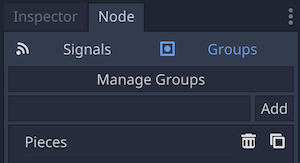
In the “Grid” scene, the “Grid” root node has a collision shape set up to detect overhang from the board, and this is a necessary group to distinguish collisions between pieces, since it is always in contact with all pieces.
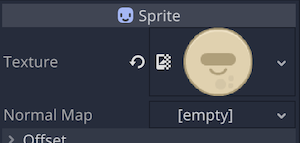
Sprite node
As mentioned above, the “Piece” is only the inheritance source (template), so in this scene, no resource is applied to the “Texture” property of the “Sprite” node and it is left as it is. The plan is to apply an image that matches the color of each piece in the inherited scene.
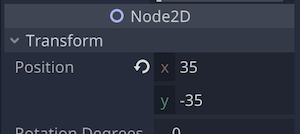
In the scene of each color piece inheriting this scene, we will apply the KENNEY image imported earlier to the “Texture” property, but since the size of the image is 70 px in height and width, let’s shift the center of the image to the upper right and set the “Offset” property so that the center of the image is shifted to the upper right and the lower left corner of the image fits (x: 0, y: 0).
- Offset:
Offset: (x: 35, y: -35)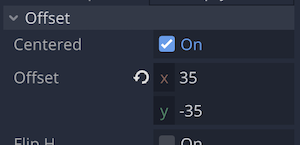
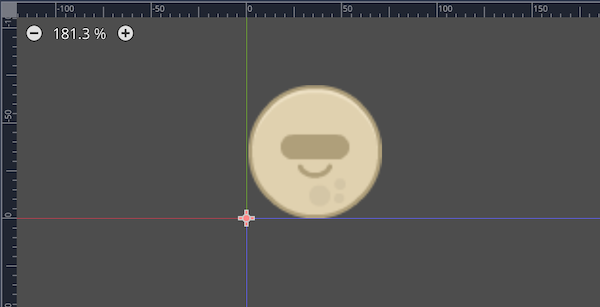
The grid of the board on which the piece is to be placed should count from left to right on the x-axis and from bottom to top on the y-axis, and the size of one grid on the board should be 70 px to match the size of the texture. If the lower left corner of the piece’s texture image is aligned with (x: 0, y: 0), then when the “Piece” root node is positioned (x: 0, y: 0) on the grid, the “Sprite” image will be aligned exactly with the grid.
CollisionShape2D node
The role of this node is to give the root node a collision shape. This node is needed to detect when a piece is touched by a finger, taken off a finger, or collides with a neighboring piece.
If the collision shape is perfectly aligned with the 70 px Sprite texture, the collision with the neighboring piece will be detected even if the piece is moved slightly.
On the other hand, if the collision shape is too small, the collision will not be detected even though the user intends to touch the piece with a finger, or when moving the piece, the collision between pieces will not be detected properly and the piece will pass between pieces.
Therefore, it is best to make the collision shape half the size of the Sprite’s Texture. The position of the collision should be adjusted so that it overlaps the Sprite texture nicely.
- Shape: Apply a new CircleShape2D resource
- CircleShape2D:
- Radius: 17.5
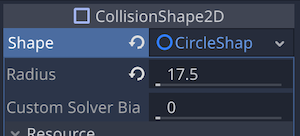
- Radius: 17.5
- CircleShape2D:
- Transform:
- Position: x: 35, y: -35
- Position: x: 35, y: -35
On the 2D workspace, it should have looked like this.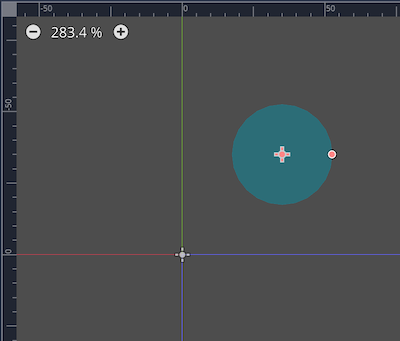
Tween node
This node can animate only a single property of a given node. The reason for using this node in this case is to animate the movement of the pieces when they are swapped positions or when a piece is packed in the position of a piece that has been matched and disappeared.
However, since the animation is implemented in a script, there is no need to edit the properties here.
Attaching and editing a script to the Piece node
Let’s attach a new script to the “Piece” root node. Create a script file with the file path “res://Pieces/Piece.gd”.
Edit the script as follows.
### Piece.gd ###
extends Area2D

# Signal to send out if the piece collides with a piece the player is moving
# (pass the piece itself as an argument)
signal collided(self_piece)

# Property to set the color of the piece
export (String) var color

# Property that flags if a match occurs
var matched = false
# Index assigned to the group of matched pieces
var matched_index = 0
# Property that will be a flag if the player is moving the piece
var held = false
# Offset equal to the texture of the piece
var offset = Vector2(35, -35)

# Reference to the Sprite node
onready var sprite = $Sprite
# Reference to a Tween node
onready var tween = $Tween

# Built-in method called every frame in the main loop
func _process(_delta):
    # If the player is moving a piece
	if held:
        # Shift the position of the piece by (35, -35) to follow the mouse
		position = get_global_mouse_position() - offset

# Method to move the piece
func move(destination):
    # Set the animation of the tween node.
    # Move the piece from the current position to the argument destination in 0.1 seconds
	tween.interpolate_property(self, "position", position, destination, .1, Tween.TRANS_QUINT, Tween.EASE_IN)
    # Start the animation of the tween node
	tween.start()

# Method called when a piece is matched
func make_matched(index):
    # Flag a match
	matched = true
    # Assign an index (argument index) for each matched group
	matched_index = index
    # Make the piece color translucent
	modulate = Color(1,1,1,.5)

# Method called when a player's finger touches a piece
func enable_held():
    # Set the flag that the player is moving the piece
	held = true
    # Make the color of the piece 20% transparent
	modulate = Color(1, 1, 1, 0.8)

# Method called when the player removes his/her finger from the piece
func disable_held():
    # Disable the flag that the player is moving
	held = false
    # Restore the piece's color to default
	modulate = Color(1, 1, 1, 1)
The next step is to use signals of the Area2D class. After selecting the “Piece” root node in the scene dock, go to the Node dock > Signal tab and connect area_entered(area: Area2D) to the “Piece.gd” script that you are currently editing.
When the piece the player is moving is hit, we want to send out a custom signal collided(self_piece), so let’s write the code for that in the auto-generated method _on_Piece_area_entered(area).
### Piece.gd ###

# Method called when Area2D is hit and a signal is sent out
func _on_Piece_area_entered(area):
    # If the Area2D hit is a "Pieces" group (i.e. an instance of Piece)...
    # and if it is a Piece being moved by the player
	if area.is_in_group("Pieces") and area.held:
        # Send a signal collided with the piece itself as argument
		emit_signal("collided", self)
This completes the editing of the “Piece.gd” script.
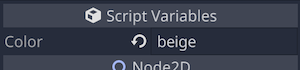
Creating a scene for each color that inherits from the Piece scene
Now that the “Piece” scene, which will serve as a template, is complete, let’s create a scene that inherits the “Piece” scene in the number of colors of the piece. There are five piece colors: beige, blue, green, pink, and yellow. First, let’s proceed with the procedure using the “beige” drop as an example.
- Select “Scene” menu > “New Inherited Scene
- Select “Piece.tscn” as the source scene
- After the inherited scene is generated, rename the root node to “PieceBeige.
*The name of this root node should match the color of each drop. - Save the scene once. Save the scene with the file path “res://Pieces/PieceBeige.tscn”.
- With the root node “PieceBeige” selected in the scene dock, set the value of the “Color” property of “Script Variables” to “beige” in the inspector.
- Select the “Sprite” node in the scene dock and apply the previously imported resource “res://Aliens/alienBeige_round.png” to the “Texture” property (you can drag it from the file system dock).
On the 2D workspace, it should now look like the following screenshot.
! Sprite - Texture Region
The “PieceBeige” scene is now complete. Follow the same procedure to create scenes for the remaining four colored pieces. Please refer to the following for details on the different parts of each scene.
- Blue piece.
- Root node name: PieceBlue
- Color property: blue
- Sprite > Texture property: res://Aliens/alienBlue_round.png
- File path when saving the scene: res://Pieces/PieceBlue.tscn
- Green piece.
- Root node name: PieceGreen
- Color property: green
- Sprite > Texture property: res://Aliens/alienGreen_round.png
- File path when saving the scene: res://Pieces/PieceGreen.tscn
- Pink piece.
- Root node name: PiecePink
- Color property: green
- Sprite > Texture property: res://Aliens/alienPink_round.png
- File path when saving the scene: res://Pieces/PiecePink.tscn
- Yellow piece.
- Root node name: PieceYellow
- Color property: yellow
- Sprite > Texture property: res://Aliens/alienYellow_round.png
- File path when saving the scene: res://Pieces/PieceYellow.tscn
When the inherited scene of all 5 colored pieces has been created, the work is complete.
Controlling a Grid scene with scripts
From here on, we will code scripts to control the game. The amount of code is rather large, so do your best.
After switching to the “Grid.tscn” scene in the Godot editor, attach a new script to the “Grid” root node. The file path should be “res://Grid/Grid.gd”.
In the comments in the script, “finger touched” or “finger released” should be replaced with “left mouse button pressed” or “left mouse button released” on the Godot debug panel.
Also, please note that “match” is defined as three or more of the same color.
Now, once the script editor is open, let’s define the necessary properties.
### Grid.gd ###

extends Area2D

# Signal sent out at the start of automatic matching process
signal waiting_started

# Array with scene files for each color piece as elements
const pieces_scn = [
	preload("res://Pieces/PieceBeige.tscn"),
	preload("res://Pieces/PieceBlue.tscn"),
	preload("res://Pieces/PieceGreen.tscn"),
	preload("res://Pieces/PiecePink.tscn"),
	preload("res://Pieces/PieceYellow.tscn")
]

# Number of grids in x-axis
var width: = 7
# Number of grids in y-axis
var height: = 6
# Grid start position in x-axis direction (pixels)
var x_start: = 70
# Grid start position in y-axis direction (pixel)
var y_start: = 1050
# Size of one grid (should be the same as Texture of Sprite in Piece)
var grid_size: = 70
# How many grid y-axis displacements to drop when the Piece is generated
var y_offset: = 3

# Array representing the placement of the pieces on the board (two-dimensional array)
var board = [].
# Reference to the piece the player is moving
var moving_piece
# Last grid position of the piece the player is moving
var last_pos = Vector2()

# Flag for preparing at the start of the game
var is_initializing = true
# Flag if the player is moving the piece
var is_touching = false
# Flag if the player is swapping pieces
var is_swapping = false
# Flag during automatic match processing after the player moves the piece
var is_waiting = false

# Number of groups of matched pieces (to be counted up)
var matched_groups = 0

# Reference to the PiecesContainer node
onready var pieces_container = $PiecesContainer
# Reference to the TouchTimer node
onready var touch_timer = $TouchTimer
# Reference the WaitTimer node
onready var wait_timer = $WaitTimer
Then from here on, we will be adding methods. Note that the two-dimensional array that appears in the following code is an array that stores arrays as elements, that is, an array of arrays.
In the case of the two-dimensional array used in this script, the first level of the array contains as many empty arrays as the number of grids in the x-axis direction of the board, and the second level of the array contains as many elements as the number of grids in the vertical direction within each array. By storing piece objects as its elements, we can manage where each piece is located on the board (how many grids in the x-axis direction and how many grids in the y-axis direction).
### Grid.gd ###

# Function called when scene is loaded
func _ready():
    # Call a built-in function to randomize the output result of a function that generates a random number each time
	randomize()
    # Make the board (array) into a 2d array that makes up the grid of the board
	board = make_2d_array() # define after this
    # Spawn the pieces and place them on the board and reflect the board information on the board
	spawn_pieces() # define after this
	is_initializing = false

# Method to create a 2d array that makes up the grid of the board
func make_2d_array() -> Array:
    # Prepare an array named array
	var array = []
    # Fill array with an empty array with the number of grids along the x-axis
	for i in width:
		array.append([])
        # Append null to each array for the number of grids along the y-axis for j in height:
			array[i].append(null)
    # Return the resulting two-dimensional array
	return array

# Method to spawn pieces, place them on the board, and reflect the board information to the board
func spawn_pieces():
    # Loop for the number of grids along the x-axis
	for i in width:
        # Loop over the number of grids along the y-axis
		for j in height:
            # If no piece exists in the corresponding grid on the 2D array of all pieces
            # (all are null at the start of the game)
			if board[i][j] == null:
                # Select one piece at random from the scene of pieces of each color and instantiate it
				var index = floor(rand_range(0, pieces_scn.size()))
				var piece = pieces_scn[index].instance()
                # If the game is being prepared at the start
				if is_initializing:
                    # If a match has occurred, delete the piece instance and start over
					while match_at(i, j, piece.color): # define after this
						piece.queue_free()
						index = floor(rand_range(0, pieces_scn.size()))
						piece = pieces_scn[index].instance()
                # Make a piece instance a child of a PiecesContainer node
				pieces_container.add_child(piece)
                # Collided signal for a piece instance...
                # connect to the _on_Piece_collided method (defined later)
				piece.connect("collided", self, "_on_Piece_collided")
                # Place the piece instance y_offset from the placement position...
                # move the piece instance to the placement position from there (drop it)
				piece.position = grid_to_pixel(i, j + y_offset) # define after this
				piece.move(grid_to_pixel(i, j)) # defined after this
                # Add the generated piece to the element at the appropriate index of the board as board information
				board[i][j] = piece
Let’s define the undefined match_at and grid_to_pixel methods in the above code.
### Grid.gd ###

# Method to check if 3 or more pieces of the same color are lined up at the specified grid position
# Arguments column is the x-axis grid position, the row is the y-axis grid position, and color is the color of the piece
func match_at(column, row, color):
    # If the x-axis position of the given grid is greater than or equal to 3
	if column >= 2:
        # If there is a piece to the left of the specified grid position and one more to the left
		if board[column-1][row] ! = null \
        and board[column-2][row] ! = null:
            # If the left neighbor and another left neighbor have the same color as the specified piece
			if board[column-1][row].color == color \
            and board[column-2][row].color == color:
                # Return true
				return true
    # If y-axis position of the specified grid is 3 or more
	if row >= 2:
        # If there are pieces below the specified grid position and one more below
		if board[column][row-1] ! = null \
        and board[column][row-2] ! = null:
            # If the color of the piece below and one more piece below is the same as the color of the specified piece
			if board[column][row-1].color == color \
            and board[column][row-2].color == color:
                # Return true
				return true

# Method to convert grid position to pixel position
func grid_to_pixel(column, row) -> Vector2:
    # Define a variable of type Vector2 for pixel position output
	var pixel_pos = Vector2()
    # Pixel x-coordinate = grid start position along x-axis + grid size * grid x-coordinate
	pixel_pos.x = x_start + grid_size * column
    # Pixel y-coordinate = grid start position along y-axis - grid size x grid y-coordinate
	pixel_pos.y = y_start - grid_size * row
    # Return pixel coordinates
	return pixel_pos
Now the pieces of each color should be randomly arranged on the board at the start of the game. Let’s run the project once to check it out. When you run the project for the first time, a dialog box for selecting the main scene will appear, so select “Grid.tscn” as the main scene.
Since we just defined the grid_to_pixel method, let’s define the pixel_to_grid method for later use. As the name suggests, this method is the opposite of grid_to_pixel defined earlier and converts pixel positions to grid positions.
### Grid.gd ###

# Method to convert a pixel position to a grid position
func pixel_to_grid(pixel_x, pixel_y) -> Vector2:
	var grid_pos = Vector2()
	grid_pos.x = floor((pixel_x - x_start) / grid_size)
	grid_pos.y = floor((pixel_y - y_start) / -grid_size)
	return grid_pos
In addition, we define one more method is_in_grid to be used later. This method determines whether the position passed as an argument is within the range of the board grid and returns the result.
### Grid.gd ###

# Method that returns whether the specified position is within the grid of the board
func is_in_grid(grid_position: Vector2) -> bool:
	if grid_position.x >= 0 and grid_position.x < width \
	and grid_position.y >= 0 and grid_position.y < height:
        # Return true if within the grid of the board
		return true
	else:
        # Return false if out of range of the board grid
		return false
From this point on, we will write a program to process the game player’s input (screen touch operation).
### Grid.gd ###

# Function called every frame in the main loop of the game
func _process(_delta):
    # if not in the process of matching
	if not is_waiting:
        # call a method to process the player's input
		touch_input() # defined after this

# Method for handling player input
func touch_input():
    # If a finger touches the screen
	if Input.is_action_just_pressed("touch"):
        # Call a method to perform processing when a piece is touched
		touch_piece() # defined after this
    # If the finger leaves the screen
	if Input.is_action_just_released("touch") and is_touching:
        # Call the method that executes the action when the finger leaves the piece
		release_piece() # defined after this

# Methods to execute when a piece is touched
func touch_piece():
    # Get the pixel coordinates of the piece when a finger touches it
	var pos = get_global_mouse_position()
    # Convert from pixel coordinates to grid coordinates
	var grid_pos = pixel_to_grid(pos.x, pos.y)
    # If grid coordinates are within the board
	if is_in_grid(grid_pos):
        # Register the grid coordinates as the last position of the piece being moved
		last_pos = grid_pos
        # register the piece at grid coordinates as the moving piece
		moving_piece = board[last_pos.x][last_pos.y]
        # Flag the piece as moving
		is_touching = true
        # Also flag the moving piece instance itself as moving
		moving_piece.enable_held()
        # Start a timer to limit the time the piece can be moved
		touch_timer.start()

# Method to execute when the finger leaves the piece
func release_piece():
    # If we find a piece we were moving among the elements of the two-dimensional array board...
    # Fit the moved piece exactly on the board grid
	for i in width:
		for j in height:
			if board[i][j] == moving_piece:
				moving_piece.move(grid_to_pixel(i, j))
				break
    # Disable the moving flag of the moving piece instance itself
	moving_piece.disable_held()
    # Disable the moving flag of the moving piece
	is_touching = false
    # Stop the timer for the time limit for moving the piece
	touch_timer.stop()
    # Signal the start of automatic matching process after this
	emit_signal("waiting_started")
Although we have not yet implemented the exchange of pieces, the coding up to this point should have implemented the movement of a piece that is touched by a finger, and when the finger is released, the piece that is being moved will settle exactly where it was last. Let’s run the project and check it out.
The next method we will define, _on_Piece_collided, has already been coded to connect a collided signal when the Piece instance is created. Recall that we coded this signal in the “Piece.gd” script to be sent out when a piece is hit by a piece being moved by the player.
Let’s define a method to swap the location of the moving piece and the piece that hit it, and call it in _on_Piece_collided.
### Grid.gd ###

# Method called on collided signal of a Piece instance
func _on_Piece_collided(self_piece):
    # If the piece is moving and not in the process of swapping pieces
	if is_touching and not is_swapping:
        # Flag the piece is being swapped
		is_swapping = true
        # Call a method to swap pieces
		swap_pieces(self_piece) # define later
        # Remove the flag that a piece is being swapped
		is_swapping = false

# Method to swap the location of the piece being moved and the piece that hit it
# The collided_piece argument is passed the piece that hit the piece being moved
func swap_pieces(collided_piece):
    # Get the grid coordinates of the piece that hit it.
	var collided_pos = pixel_to_grid(collided_piece.position.x, collided_piece.position.y)
    # If the piece being moved on the two-dimensional array board matches the piece being moved
	if board[last_pos.x][last_pos.y] == moving_piece:
        # Put the piece that hit the position of the moving piece on the board
		board[last_pos.x][last_pos.y] = collided_piece
        # Move the hit piece to the last grid coordinate of the piece being moved
		collided_piece.move(grid_to_pixel(last_pos.x, last_pos.y))
        # Put the piece being moved into the position of the hit piece on the board
		board[collided_pos.x][collided_pos.y] = moving_piece
        # Register the grid coordinates of the hit piece as the last position of the moving piece
		last_pos = collided_pos
Now you should be able to implement the exchange of pieces. Let’s actually run the project and move the pieces. Let’s see how the pieces of the route are exchanged one after another.
Now, at this point, there are two problems.
- Being able to move freely outside of the board.
- Being able to grab the piece forever.
These problems can be solved using signals.
Let’s connect the signals of the “Grid” root node of the Area2D class to the script. Remember how we adjusted the collision shape to the size of the board? The signal that is sent out when the finger (the piece that is being moved) goes out of that area will cause the release_piece method to be called so that the piece that was being moved will also go away from the finger and return to its last position on the board.
Select the “Grid” root node in the Scene dock, select Node dock > Signals tab, and connect the erea_exited signal to this script.
Another signal that is sent out when the time limit for moving the piece in the “TouchTimer” node times out is also connected to the script. In this case, the release_piece method should be called by the signal as well. Let’s connect the timeout signal.
Continuing on, let’s edit the methods generated by the connection of each signal as follows.
### Grid.gd ###

# Method called with a signal when Area2D is out of the board
func _on_Grid_area_exited(area):
    # If the area2D that has been moved out of the grid is a piece that is being moved
	if area.is_in_group("Pieces") and area.held:
        # Call the method that handles when the finger leaves the piece
		release_piece()

# Method called with a signal when the time limit for moving a piece expires
func _on_TouchTimer_timeout():
    # if the piece is moving
	if is_touching:
        # call a method that will do something when the finger leaves the piece
		release_piece()
Now, if the piece is out of the board, the piece should now leave your finger and return to its last position on the board. Also, if you grabbed the piece for more than 5 seconds, the timer should now cause the piece to leave your finger and return to the last grid coordinate on the board.
Now let’s actually run the project and see how it works.
From here, we will create a program to automatically process the matched pieces. At the end of the release_piece method, we used the code emit_signal("waiting_started") to send out a waiting_started signal, and we will start by connecting this signal to the script.
Select the “Grid” root node in Scene dock and connect the waiting_started signal to the script in the Node dock > Signals tab. Once the _on_Grid_waiting_started method is added to the script, we will write the automatic processing of the matched piece in the method. Roughly speaking, the automatic process is as follows.
- Set the flag for automatic matching process in progress.
- Check if there is at least one matched piece; if there is at least one, loop through the following process.
- Check all pieces and flag matched pieces.
- Delete the flagged piece.
- Fill the empty space by moving a piece from the grid above in the same row or column.
- After the pieces are moved down, a new piece is created in the empty space at the end.
- When there are no more matched pieces, the automatic processing flag is cleared.
Let’s implement the above process step by step. Let’s start with the “check all the pieces and flag the matching pieces” part.
### Grid.gd ###

# Method called with a signal sent out at the end of the release method
func _on_Grid_waiting_started():

# Set a flag that automatic Matching processing is in progress.
	is_waiting = true

    # Keep looping if there is at least one matched piece in a group of people
	while check_matches(): # define after this
        # Call method to flag matched pieces
		find_matches(): # define after this
        # Start WaitTimer timer (0.3 seconds)
		wait_timer.start()
        # Wait until WaitTimer times out
		yield(wait_timer, "timeout")
    # Clear the flag during automatic processing
	is_waiting = false


# Method to check if there is at least one pair of matched pieces
func check_matches() -> bool:
    # Loop over the number of x-axis grids on the board
	for i in width:
        # Loop over the number of grids in y-axis of the board
		for j in height:
            # If a piece exists at that grid coordinate
			if board[i][j] != null:
                # If the piece is matched
				if match_at(i, j, board[i][j].color):
                    # Return true
					return true
    # Return false if none of the pieces match
	return false


# Method to flag matched pieces
func find_matches():
    # Loop over the number of x-axis grids on the board
	for i in width:
        # Loop over the number of grids in y-axis of the board
		for j in height:
            # If a piece exists at that grid coordinate
			if board[i][j] != null:
                # Define current color as the color of the piece at that grid coordinate
				var current_color = board[i][j].color
                # If its x-axis coordinates are less than the number of grids along the x-axis - 2
				if i < width - 2:
                    # If there are pieces to the right of that piece and further to its right
					if board[i+1][j] != null \
					and board[i+2][j] != null:
                        # If the color of those pieces is the same as the current color
						if board[i+1][j].color == current_color \
						and board[i+2][j].color == current_color:
                            # Define a variable for the index to assign to the matched pairs
							var matched_index: int
                            # If the piece is already flagged as matched
							if board[i][j].matched:
                                # Index should be the same as the index information the piece has
								matched_index = board[i][j].matched_index
                            # If the piece is not flagged as matched
							else:
                                # Increment the number of groups in the matched pair
								matched_groups += 1
                                # Set the index to the number of groups in the matched pairs
								matched_index = matched_groups
                            # Flag the piece at those coordinates as matched, assign an index, and make it translucent
														board[i][j].make_matched(matched_index)
                            # Do the same for the piece to the right of those coordinates
							board[i+1][j].make_matched(matched_index)
                            # Do the same for the piece one more place to the right
							board[i+2][j].make_matched(matched_index)
                # Do the same for the y-axis direction
				if j < height - 2:
					if board[i][j+1] != null \f}
					and board[i][j+2] != null:
						if board[i][j+1].color == current_color \
						and board[i][j+2].color == current_color
							var matched_index: int
							if board[i][j].matched:
								matched_index = board[i][j].matched_index
							else:
								matched_groups += 1
								matched_index = matched_groups
							board[i][j].make_matched(matched_index)
							board[i][j+1].make_matched(matched_index)
							board[i][j+2].make_matched(matched_index)
Of the processing of the matched pieces, we have implemented the flagging of the matched pieces. Let’s run the project and see if the matched pieces become translucent.

The next step is to define a method to delete pieces that are flagged for match status.
### Grid.gd ###

# Method to delete a piece that is flagged as a match
# The argument index is the index of the match pair to delete
func delete_matches(index):
    # Loop over the number of x-axis grids on the board
	for i in width:
        # Loop over the number of grids in the y-axis of the board
		for j in height:
            # If a piece exists at that grid coordinate
			if board[i][j] != null:
                # If the piece at that grid coordinate is flagged as a match
				if board[i][j].matched:
                    # If the pair number of the piece at that grid coordinate matches the pair number of the piece to be deleted
					if board[i][j].matched_index == index:
                        # Release the piece at those grid coordinates
						board[i][j].queue_free()
                        # Set the corresponding element of the two-dimensional array board to null
						board[i][j] = null
Now that we have defined the delete_matches method, let’s put it in the loop of the _on_Grid_waiting_started method.
### Grid.gd ###

func _on_Grid_waiting_started():
	is_waiting = true

	while check_matches():
		find_matches()
		wait_timer.start()
		yield(wait_timer, "timeout")

        # Add here
        # If the number of matched groups is greater than 0
		if matched_groups > 0:
            # Loop over matched groups
            # Don't delete all of them at the same time, delete each matched group
			for index in range(1, matched_groups + 1):
                # Call method to delete matched pieces
				delete_matches(index)
                # Start WaitTimer timer (0.3 seconds)
				wait_timer.start()
                # Wait until WaitTimer times out
				yield(wait_timer, "timeout")
            # Set the number of matched groups back to 0 after all matched pieces are removed
			matched_groups = 0

	is_waiting = false
We should now be able to implement the matching piece to the point where it becomes translucent and then deleted. Let’s run the project and check it out.

Next, we will implement the process of filling (dropping) the top piece into the grid space vacated by the removed piece. Let’s start by defining the method.
### Grid.gd ###

# Method to collapse (drop) the top piece into the empty grid space
func collapse_columns():
    # Loop over the number of x-axis grids on the board
	for i in width:
        # Loop over the number of y-axis grids in the board
		for j in height:
            # If there is no piece at that grid coordinate
			if board[i][j] == null:
                # Loop over the remaining y-axis grids starting from the grid one above that y-coordinate
				for k in range(j + 1, height):
                    # If the piece exists at that grid coordinate
					if board[i][k] ! = null:
                        # Move the piece at that grid coordinate to an empty space
						board[i][k].move(grid_to_pixel(i, j))
                        # Replace the elements of the two-dimensional array board
						board[i][j] = board[i][k].
						board[i][k] = null
                        # End of loop
						break
Now that we have defined the collapse_columns method, let’s add it to the loop of the _on_Grid_waiting_started method.
### Grid.gd ###

func _on_Grid_waiting_started():
	is_waiting = true

	while check_matches():
		find_matches()
		wait_timer.start()
		yield(wait_timer, "timeout")

		if matched_groups > 0:
			for index in range(1, matched_groups + 1):
				delete_matches(index)
				wait_timer.start()
				yield(wait_timer, "timeout")
			matched_groups = 0

        # Add here
        # Call the method to collapse (drop) the top piece into the empty grid space
		collapse_columns()
        # Start timer for WaitTimer (0.3 seconds)
		wait_timer.start()
        # Wait until WaitTimer times out
		yield(wait_timer, "timeout")

	is_waiting = false
Now, after the matched and translucent piece is removed, the top piece should now be collapsed (dropped) into that empty space. Let’s run the project and check it out.

Finally, after the piece is dropped down, the empty space above it needs to be refilled with a new piece. The method for this is the already defined spawn_pieces method, which is also executed in the _ready function. When the game play starts, the is_initializing property is false, so the block in this method that re-generates the piece if it matches is skipped. In other words, a new match may already occur when the piece is generated by executing this method. This should generate more combos than expected and make the game experience more pleasant and fun.
Let’s add the spawn_pieces method inside the loop of the _on_Grid_waiting_started method.
### Grid.gd ###

func _on_Grid_waiting_started():
	is_waiting = true

	while check_matches():
		find_matches()
		wait_timer.start()
		yield(wait_timer, "timeout")

		if matched_groups > 0:
			for index in range(1, matched_groups + 1):
				delete_matches(index)
				wait_timer.start()
				yield(wait_timer, "timeout")
			matched_groups = 0

		collapse_columns()
		wait_timer.start()
		yield(wait_timer, "timeout")

        # Add here.
        # call a method to spawn pieces in the empty space
		spawn_pieces()
        # Start WaitTimer timer (0.3 seconds)
		wait_timer.start()
        # Wait until WaitTimer times out
		yield(wait_timer, "timeout")

	is_waiting = false
This completes the coding of the match process. This is the end of the work for this tutorial as well. Let’s finish up by running the project to make sure this puzzle game is working properly.

Sample game
I have prepared a sample game that is a further brushed-up version of the project created in this tutorial.
The project file of the sample game is located in GitHub repository
. Please download the .zip file from there and import the " project.godot” file in the “Sample” folder and import it into Godot Engine.
Game Rules:
- The player can move a piece for up to 5 seconds at a time; after 5 seconds, the piece leaves his/her finger.
- If the piece the player is moving goes out of the board, the piece leaves his/her finger and moves only that far.
- The number of combos goes up by the number of matched pairs of pieces. The player can attack aliens (enemy characters) by the number of combos, and their power is also increased.
- Attacking an alien reduces its HP by the amount of its power, and when the alien’s HP is reduced to 0, it can be defeated.
- Aliens attack players at regular intervals.
- The player has a maximum of 10 lives, which is reduced by one when the alien attacks, and the game is over when the player is attacked 10 times.
- Each time an enemy is defeated, the player’s level increases by one. The player’s power increases slightly as the level increases, while the enemy characters also increase their HP and attack at slightly shorter intervals.
- The enemy’s time gauge pauses during the automatic processing of matched pieces (during combo counting and attacking the enemy) after the player moves a piece and releases his finger.
- Ultimately, the number of aliens defeated is the game’s score.
Conclusion
In this tutorial, I created a puzzle game in the style of Puzzle and Dragons, which I call an evolutionary Match-3 puzzle game. Unlike the standard Match-3 game, we made the pieces move freely on the board for a certain period of time, and also made each matched piece disappear in turn, just like in Puzzle and Dragons. I hope you were able to make it through to the end.
Let me summarize the key points when creating an advanced match-3 puzzle game like this one.
- At a minimum, you need only two scenes: the board and the pieces.
- Create a template piece scene and then inherit it to create a piece scene for each color.
- Use a two-dimensional array to manage the pieces to be placed on the board grid.
- Use Area2D signals to detect the following
- When a finger touches a piece
- When a finger leaves a piece
- When a moving piece hits a stationary piece
- When a moving piece moves out of the board.
- Provide properties for flags to manage the state of the piece. For example
- Whether a piece is being moved or not
- whether a piece is being replaced or not
- whether a piece is being matched or not
- Whether the matched piece is being automatically processed or not
- When a piece is being swapped, the position of the piece on the screen and the elements of the two-dimensional array must be updated, respectively.
Links
- KidsCanCode: OBJECT HEALTHBARS
- KidsCanCode: HEART CONTAINERS: 3 WAYS
- App Store: Puzzle&Dragons
- Google Play:Puzzle&Dragons