This article introduces a method for implementing simple hit detection for melee attacks in 2D games.
This is a commonly used method where the object to attack (e.g., player character) has a collision shape (called “Hit Box”) that is only active during the attack, and the object to be attacked (e.g., enemy character, destructible barrels, crates, grass, etc.) has a collision shape (called “Hurt Box). The hit judgment of the attack can be implemented by enabling/disabling the Hit Box and Hurt Box, and changing their size and position in accordance with the animation of the attack.
This is relatively easy to implement, so let’s get started.
Environment
Godot version: 3.5.1
Computer OS version: macOS 11.6.5
Basic Articles
You may also find the following articles useful.
Downloading Godot
Project Manager of Godot
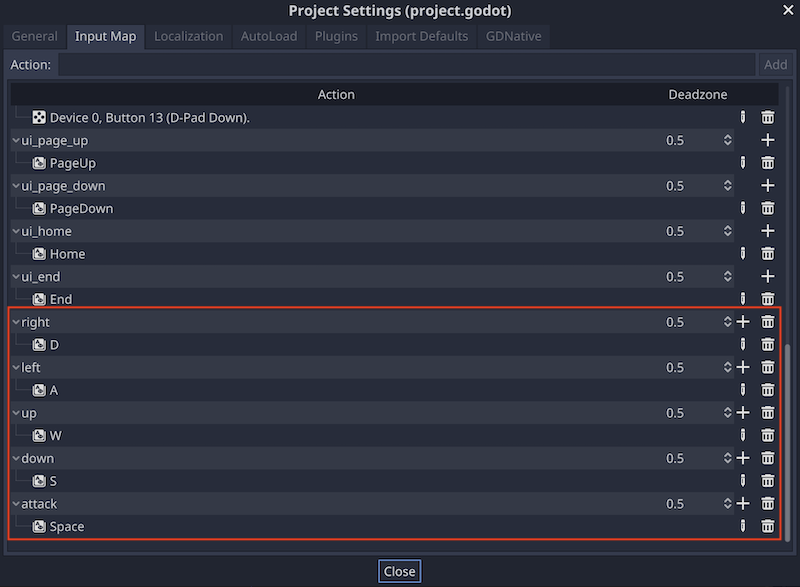
Add Actions to Input Map
First, go to “Project” > “Project Settings” > “Input Map” tab and add the following actions:
- right: D key
- left: A key
- down: S key
- up: W key
- attack: Space bar
Create a Player scene
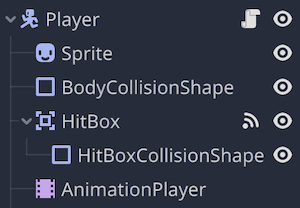
- Create a scene for the player character. Create the following scene tree by setting the root node to “KinematicBody2D” and adding the necessary nodes.
- Player (KinematicBody2D)
- Sprite (KinematicBody2D)
- BodyCollisionShape (CollisionShape2D)
- HitBox (Area2D)
- HitBoxCollisionShape (CollisionShape2D)
- AnimationPlayer
Save this scene as a file named “Player.tscn”.
- Player (KinematicBody2D)
Edit nodes in the Player scene
Sprite node
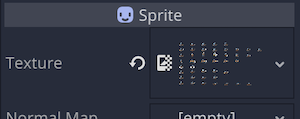
For the sprite sheet containing the player character’s melee attack animations, I downloaded and used the Pixel Art Dwarf Sprites
from itch.io
. In particular, we will use lines 3 to 5 as the animation for melee attacks.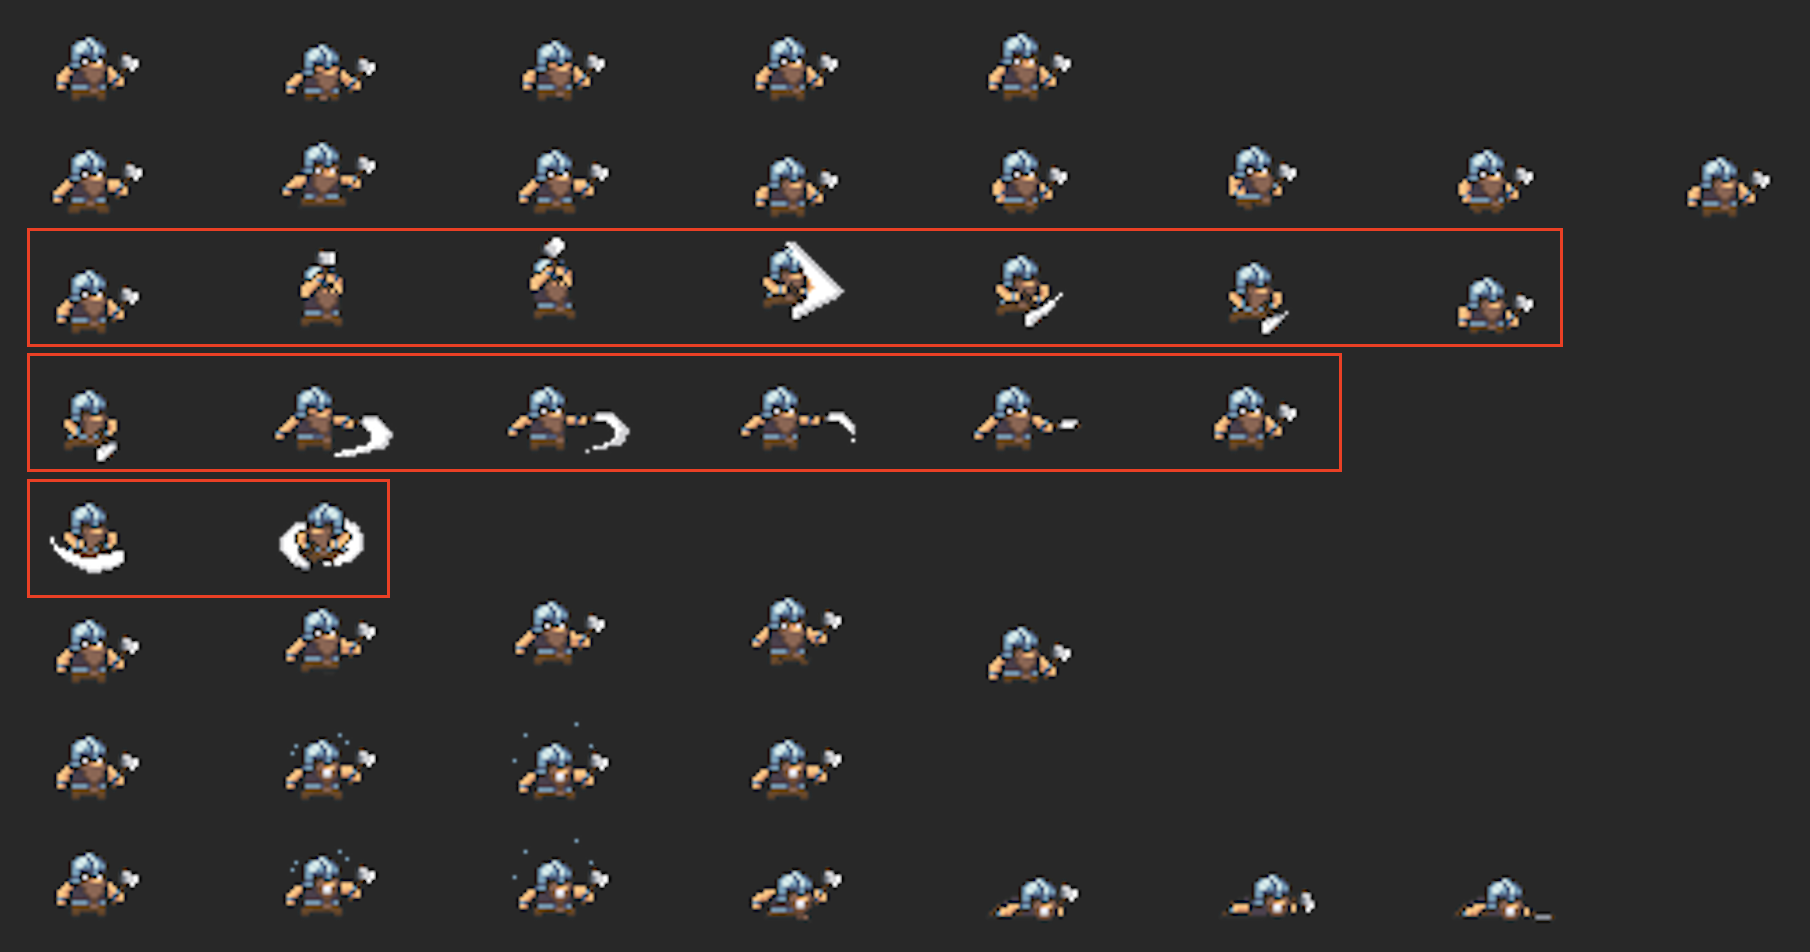
- Drag the downloaded sprite sheet to the file system dock and import it. Since the image will appear a little blurry as it is, select the file, apply the 2D Pixel preset from the Import dock, and reimport it.
- Apply the imported sprite sheet to the “Texture” property in the inspector dock.
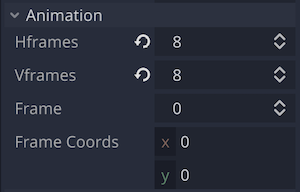
- Since this is a sprite sheet with 8 frames for each of the vertical and horizontal sides, set the values of “Animation” > “Hframes”/“Vframes” to 8 respectively.
It is OK if a texture for one frame appears on the 2D workspace.
BodyCollisionShape (CollisionShape2D) node
The parent “Player” root node is a KinematicBody2D class, so it is necessary to set up a collision shape. To distinguish it from the Hit Box collision shape we will create later, we rename it “BodyCollisionShape”.
- Apply the “RectangleShape” resource to the “Shape” property.
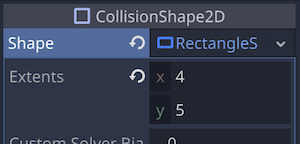
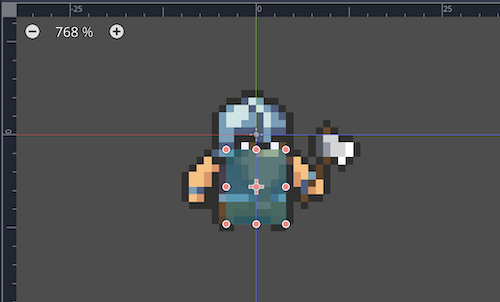
- In the 2D workspace, match the collision shape to the body part of the sprite’s texture.
- If the collision shape is visually distracting, you can set the node to be hidden in the scene dock if necessary.

HitBox (Area2D) node
A hit box is a collision shape used to determine when a character is hit by a melee attack, and since it is called a hit box, a rectangular collision shape is generally used. for the “Area2D” and its child node “CollisionShape2D”.
The parent “HitBox” node does not need to be edited, but the signals from this node will be used when scripting later.
HitBoxCollisionShape (CollisonShape2D) node
To distinguish it from the “BodyCollisionShape” node, it is named “HitBoxCollisionShape”.
- Apply a new “RectangleShape” resource to the “Shape” property and set a rectangle collision shape. The “Extents” property of “RectangleShape” can be left as default at this point, since the size and position will be changed later in the animation during the attack.

- Since we want to enable collision detection only when the player character attacks, the “Disabled” property should be set to ON to disable collisions.

AnimationPlayer node(Create animations)
To create melee attack animations with the “AnimationPlayer” node.
- Select the “AnimationPlayer” node in the scene dock.
- Open the animation panel.
- Create a new animation and name it “right_attack1”.
*It is assumed that we will create attack1, 2, and 3 for each of the left and right directions. - First, make the following settings.
- Automatic playback on loading: Off
- Animation length (seconds): 0.6
- Looping animation: Off
- Add a track for the “Frame Coords” property of the “Sprite” node: at 0.1 second intervals, add a texture for the third row of the sprite sheet, starting from the left end to the sixth row. Specifically, (0, 2), (1, 2), (2, 2), (3, 2), (4, 2), (5, 2), and only the x value (column of the sprite sheet) is changed from 0 to 5 while the y value (row of the sprite sheet) remains the same.

- Change the “Interpolation” type of this track to “Nearest”.

- Add a track with the “Disabled” property of “BodyCollisionShape”. Turn on the “Disabled” property of “BodyCollisionShape” at the 0.3 second position in the timeline and turn it back off at the 0.5 second position in order to prevent enemies from taking damage when the player character is attacking them.
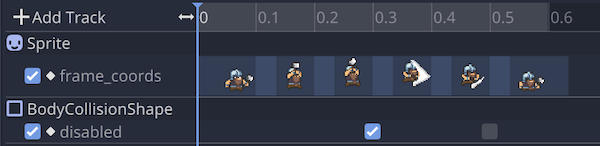
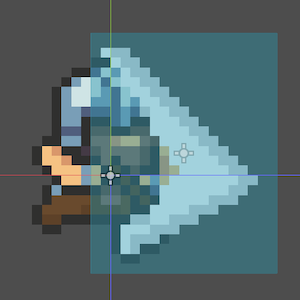
- Add a track for the “Disabled” property of “HitBoxCollisionShape”. In reverse order of the previous step, turn off the “Disabled” property at the 0.3 second position in the timeline and turn it back on at the 0.5 second position. This will enable the Hit Box hit detection only during the very animation frame of the player character’s attack animation when the axe is being swung down.
- Continue by adding the “Position” property of the “HitBoxCollisionShape” and the “Shape” > “Extents” property track. Adjust the size and position of the collision shape of the HitBox to match the animation of the axe swinging down at 0.3 seconds in the timeline. The “Position” value was set to (7.5, -2.25) and the “Extents” value was set to (9.5, 12.25) (slightly larger than the axe track on the texture).
The final “right_attack1” looked like this: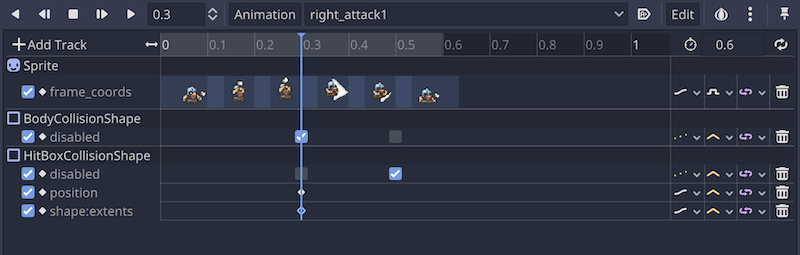
- Sprite node
- frame_coords property
- Time: 0 / Value: (0, 2) / Easing: 1.00
- Time: 0.1 / Value: (1, 2) / Easing: 1.00
- Time: 0.2 / Value: (2, 2) / Easing: 1.00
- Time: 0.3 / Value: (3, 2) / Easing: 1.00
- Time: 0.4 / Value: (4, 2) / Easing: 1.00
- Time: 0.5 / Value: (5, 2) / Easing: 1.00
- frame_coords property
- BodyCollisionShape node
- disabled property
- Time: 0.1 / Value: On / Easing: 1.00
- disabled property
- HitBoxCollisionShape node
- disabled property
- Time: 0.3 / Value; Off / Easing: 1.00
- Time: 0.5 / Value; On / Easing: 1.00
- position property
- Time: 0.3 / Value: (7.5, -2.25) / Easing: 1.00
- Time: 0.4 / Value: (4, 4) / Easing: 1.00
- shape:extents property
- Time: 0.3 / Value: (9.5, 12.25) / Easing: 1.00
- Time: 0.4 / Value: (6, 6) / Easing: 1.00
- disabled property
The following GIF image shows the “right_attack1” animation we just created, played back at 0.5x speed. You can see that the HitBox collision shape is activated (green) only at the timing when the axe is swung down.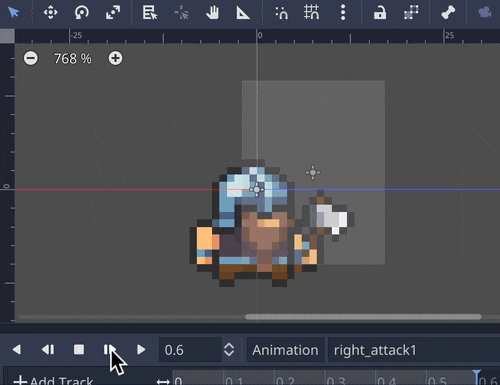
A similar procedure was used to create the “right_attack2” animation. The texture of line 4 of the sprite sheet was used. During 0.1 ~ 0.4 seconds of the timeline, the “Position” and “Extents” of “HitBoxCollisionShape” were changed slightly every 0.1 second.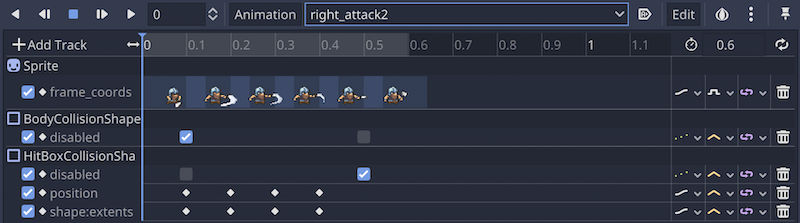
If you play “right_attack2” at 0.5x speed, it will look like this.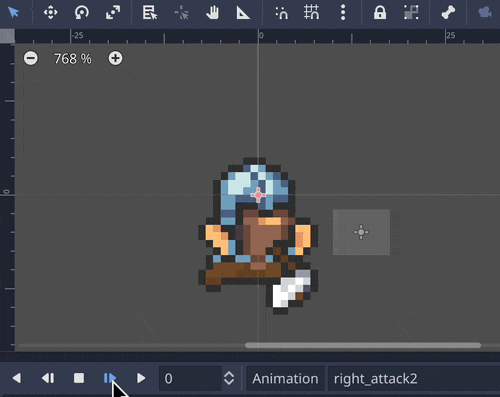
In addition, an animation of “right_attack3” was created. This one used the texture on line 5 of the sprite sheet. The texture is only two frames long, but the two are repeated four times. The “Sprite” node’s “Position” property track was added to make the animation move forward a little and then back.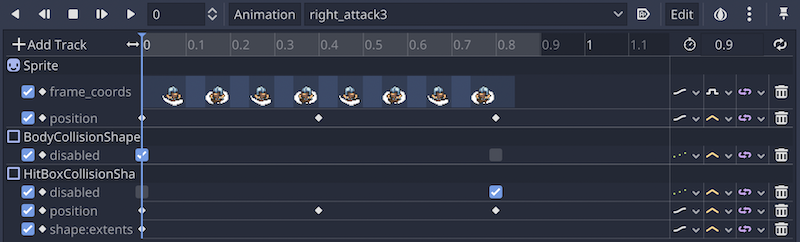
If “right_attack3” is played back at 0.5x speed, the result is as follows.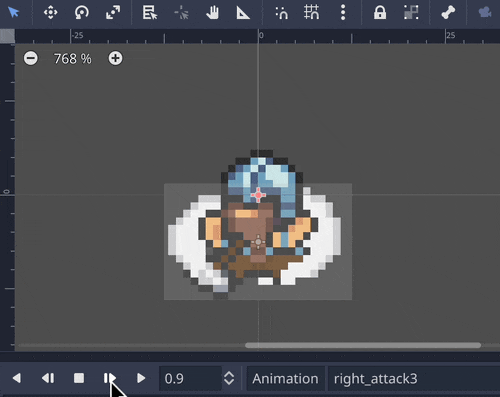
When creating a left-facing animation, it is easier to work with the Offset > Flip H property of the Sprite node turned on. It is easy to duplicate a previously created right-facing melee attack animation and adjust it for a left-facing animation.
Attach a script to the Player node
To control the player character’s movement and melee attacks, attach a script to the “Player” root node and code it like below:
###Player.gd###
extends KinematicBody2D

## Movement speed
var speed = 80.0
# Movement speed
var velocity: Vector2
# Number of attack animations (1 ~ 3)
var attack_num = 1
# Referencing a Sprite node
onready var sprite = $Sprite
# Reference to AnimationPlayer node
onready var anim_player = $AnimationPlayer

# Methods to control character movement inputs
func move():
	velocity = Vector2()
	if Input.is_action_pressed("right"):
		velocity.x += 1
		sprite.flip_h = false
	if Input.is_action_pressed("left"):
		velocity.x -= 1
		sprite.flip_h = true
	if Input.is_action_pressed("down"):
		velocity.y += 1
	if Input.is_action_pressed("up"):
		velocity.y -= 1
	velocity = velocity.normalized() * speed

	# Play idle animation if velocity is 0
	if velocity.length() == 0:
		play("idle")
	# Play run animation if velocity is greater than 0
	if velocity.length() > 0:
		anim_player.play("run")

# Built-in physics process function
func _physics_process(_delta):
	move()
	# reflect inputs related to movement as character's motion
	velocity = move_and_slide(velocity)

# Built-in callback function for input
func _unhandled_input(event):
	# if spacebar is pressed
	if event.is_action_pressed("attack"):
		# stop physics process to prevent movement
		set_physics_process(false)
		# if sprite is flipped left/right (facing left)
		if sprite.flip_h:
			# Play left-facing attack animation
			anim_player.play("left_attack" + str(attack_num))
		# if sprite is not flipped (right-facing)
		else:
			# Play the right-facing attack animation
			anim_player.play("right_attack" + str(attack_num))

		# If current attack animation number is less than 3, add 1 to the number
		if attack_num < 3:
			attack_num += 1
		# Reset the number to 1 if the current attack animation number is 3 or more
		else:
			attack_num = 1
Connect the “animation_finished” signal of the “AnimationPlayer” node to the script and edit the auto-generated method as follows
func _on_AnimationPlayer_animation_finished(anim_name):
	# Resume the physical process if the animation name contains "attack"
	if "attack" in anim_name:
		set_physics_process(true)
Let’s run the “Player” scene.
If you enable the setting to display collision shapes in the “Debug” menu in advance, it will be easier to see the changes in collision shapes during the animation.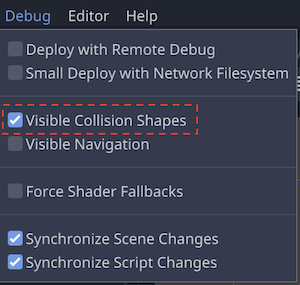
The movement of the player character will look like the following GIF image.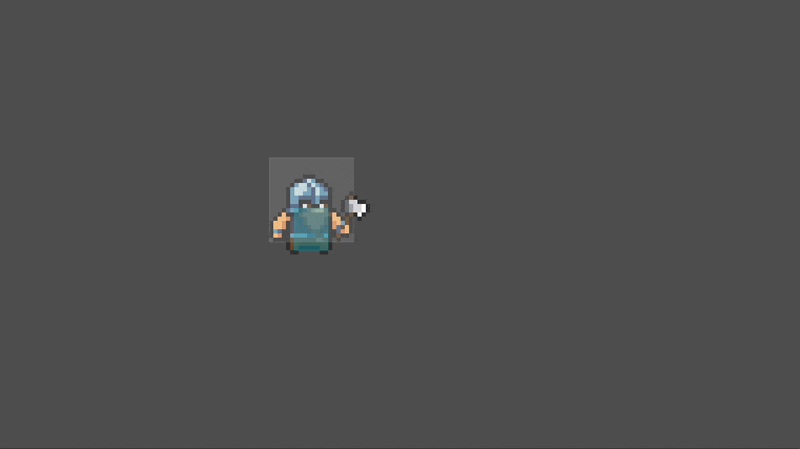
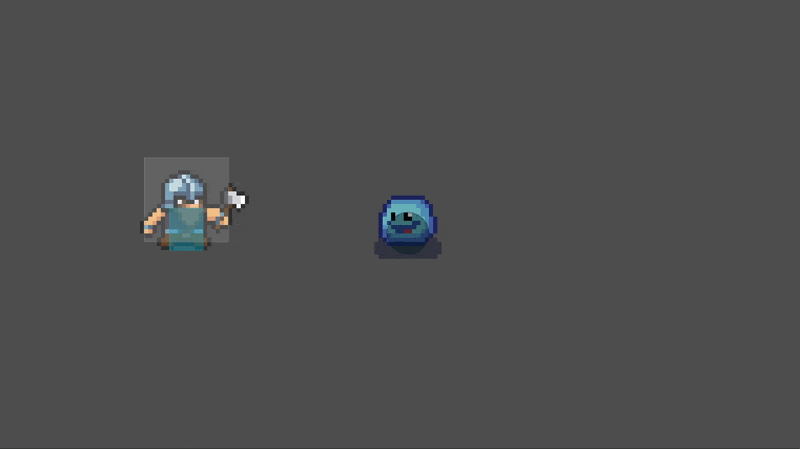
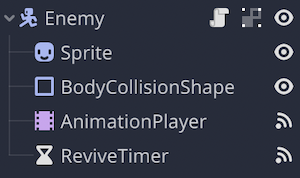
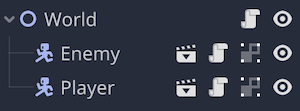
Create a Enemy scene
Prepare an “Enemy” scene to check the hit detection of the player character’s melee attacks. Since this is similar to the “Player” scene, I will briefly describe it here.
The scene tree is as follows.
- Enemy (KinematicBody2D)
- Sprite
- BodyCollisionShape (CollisionShape2D)
- AnimationPlayer
- ReviveTimer (Timer)
Edit nodes in the Enemy scene
Sprite node
We will use the assets from itch.io - mystic woods for the sprite textures of the enemy characters. Apply the “slime.png” sprite sheet from the downloaded assets to the “Texture” property of the “Sprite” node.
BodyCollisionShape node
For the “Shape” property, apply “CircleShape2D” to make the collision shape slightly smaller than the sprite. In this tutorial, this will be the so-called Hurt Box. When the player character’s hit box overlaps this collision shape, the hit detection becomes effective. This control will be done later in the script.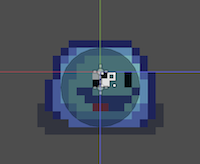
AnimationPlayer node
In the Animation panel, prepare the following four animations. All of them are set to change to the texture of the next frame on the sprite sheet every 0.1 second.
- jump: Animation of jumping when waiting (automatically played when loading)
- hurt: Animation for when the character takes damage.
- die: Animation for dying when life reaches 0.
- Turn on “Disabled” for “BodyCollisionShape
- revive: Animation when the character comes back to life after a certain period of time after death.
- Turn off “Disabled” of “BodyCollisionShape
RevieTimer node
Enable the “One Shot” property.
Attach a script to the Enemy node
Attach a script to the “Enemy” root node and code it like below.
###Enemy.gd###
extends KinematicBody2D

# Maximum value of life
export (int) var max_life = 3
# Current life
var life: int = max_life
# Variable to refer to Player instance
var player: KinematicBody2D
# Reference to the Sprite node
onready var sprite = $Sprite
# Reference to the AnimationPlayer node
onready var anim_player = $AnimationPlayer
# ReviveTimer node reference
onready var revive_timer = $ReviveTimer


func _process(_delta):
	# flip the Sprite's orientation or not depending on the player's position
	sprite.flip_h = global_position.x > player.global_position.x

# Damage methods
func hurt():
	# Reduce life by 1
	life -= 1
	# Play the animation hurt
	anim_player.play("hurt")
In addition, connect the “animation_finished” signal of “AnimationPlayer” and the “timeout” signal of “ReviveTimer” to the script and edit the respective generated methods as follows:
###Enemy.gd###
# Method called by AnimationPlayer's signal when animation is finished
func _on_AnimationPlayer_animation_finished(anim_name):
	# If the finished animation is hurt
	if anim_name == "hurt":
		# Return to jump animation if life is greater than 0
		if life > 0:
			anim_player.play("jump")
		# If life is less than 0, play die animation
		if life <= 0:
			play("die")
	# Start ReviveTimer if the animation that ended is die
	if anim_name == "die":
		revive_timer.start()
	# If the animation that ended is "revive"
	if anim_name == "revive":
		anim_player.play("jump")

# Method called on ReviveTimer timeout signal
func _on_ReviveTimer_timeout():
	# Play the revive animation
	anim_player.play("revive")
	# Return life to its maximum value
	life = max_life
Add a HitBox signal to the Player’s script
Make the “Player.gd” script call the hurt method of “Enemy.gd” by the “HitBox” signal when it is hit by a melee attack.
Return to the “Player.tscn” scene and connect the “body_entered(body: Node)” signal of the “HitBox” node to the “Player.gd” script.
###Player.gd###

# Omitted

# Method called with a signal when the physical body is hit by the HitBox
func _on_HitBox_body_entered(body):
	# If the name of the physical body is "Enemy", call its hurt method.
	if body.name == "Enemy":
		body.hurt()
Create a World scene
Finally, create a “World” scene and add a “Player” scene instance and an “Enemy” scene instance to it.
The scene tree is simply as follows.
- World (Node2D)
- Enemy (instance of Enemy.tscn)
- Player (instance of Player.tscn)
Place each instance appropriately on the 2D workspace.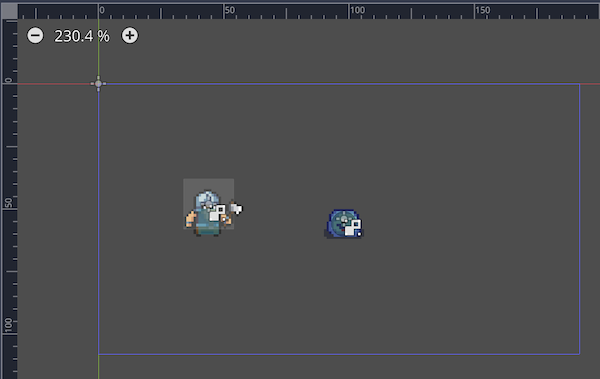
Attach a script to the World scene
Attach a script to the World scene and code it as follows. The purpose is to pass a reference to the “Player” instance from the “World” root node to the variable player in the “Enemy” node declared in “Enemy.gd”.
###World.gd###
extends Node2D


onready var player = $Player
onready var enemy = $Enemy


func _ready():
	enemy.player = self.player
Run the project
Finally, run the project to check the behavior of the hit judgment for melee attacks.
You can see that when the collision shape of the Player’s HitBox node overlaps with the Enemy’s BodyCollisionShape (Hurt Box), the hit detection is activated and the Enemy’s hurt animation is played.
Conclusion
In this article, I introduced a simple hit detection method for melee attacks in 2D games, and the implementation of hit detection using Hit Boxes and Hurt Boxes is relatively easy to understand and can be applied to various games.
Incidentally, in actual games, it is often the case that separate Hit Boxes and Hurt Boxes are set up for each body part, and more complex mechanisms are created by combining these Hit Boxes and Hurt Boxes.
For example, in a fighting game, if the attacker has several Hit Boxes for hands, feet, head, etc., and the receiver has Hurt Boxes for the upper, middle, and lower positions, the damage can be changed in complex ways depending on the combination of each Hit Box and Hurt Box.
In a zombie FPS game, you could have different Hurt Boxes for the zombie’s head and body, so that shooting at the head would kill the zombie in one shot, but not the other parts of the body.
Anyway, I hope this article has been of some help.
References
In preparing this article, we found the following links to be very helpful. We hope you will find them useful as well.
YouTube - Make an Action RPG in Godot 3.2 (P11 | Melee attacks with Hurtboxes and Hitboxes)
itch.io - Pixel Art Dwarf Sprites *Resource
itch.io - mystic woods *Resource