In this tutorial, we will explain how to create a type of game in which you trace and erase drops of the same color, like the very popular Disney Tsum Tsum smartphone game.
Note that the final project file in this tutorial is located in the GitHub repository . You can directly check the project by downloading the .zip file and importing the “project.godot” file in the “End” folder with the Godot Engine.
Environment
This tutorial was created in the following environment
・Godot version: 3.4.4
・Computer OS version: macOS 11.6.5
Memo:
Please also use the following articles to help you start creating your game.
Downloading Godot
Project Manager of Godot
Creating a new project
First, we would like you to start Godot Engine and create a new project. Let’s name the project “Connect Colors Start.
Editing project settings
Once the editor appears, let’s editing the settings for the entire project.
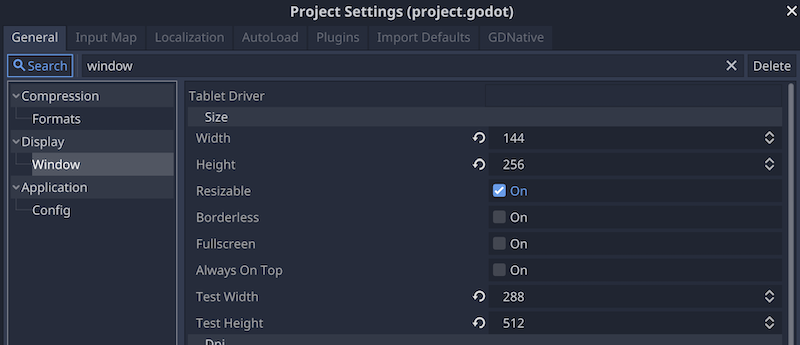
First, set the display size for the game. In this case, we set the aspect ratio to 16:9, assuming a smartphone screen in portrait orientation.
- Open the “Project” menu > “Project Settings”
In the “General” tab, search for “window” and select “Display” > “Window” in the sidebar. - In the “Size” section, change the values of the following items
- Width: 144
- Height: 256
- Test Width: 288
- Test Height: 512
- Change the values of the following items in the “Stretch” section
- Mode: 2d
- Aspect: keep

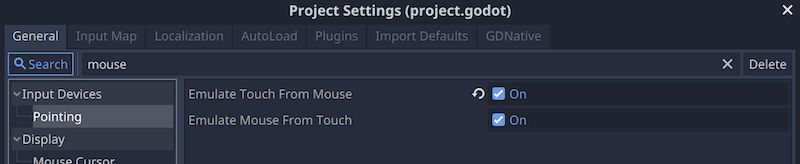
Keep the “Project Settings” open and configure the settings to substitute the mouse for the smartphone’s touch operation.
- Search for “mouse” in the “General” tab and select “Input Devices” > “Pointing” in the sidebar.
- Check “On” for “Emulate Touch From Mouse”.
With the “Project Settings” window open, add an action to the input map that corresponds to a smartphone touch operation.
- Switch to the “Input Map” tab and add “tap” to the action.
- Add a left mouse click to the “tap” action.

Downloading and importing the assets
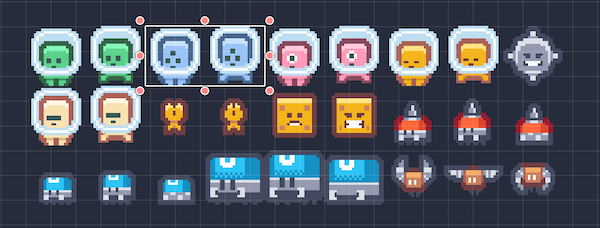
Next, let’s download assets from KENNEY and use them. The asset pack we will be using is called Pixel Platformer . I can’t help but be thankful for this wonderful free resource.
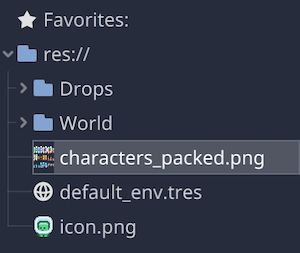
Once downloaded, drag and drop the “characters_packed.png” file from the “Tilemap” folder into the editor’s file system dock to import it into your project.
Immediately after importing the file, the image will look blurry, so follow the steps below to correct this.
- Make the imported asset file selected in the file system dock
- Select [Presets] > [2D Pixel] in the import dock.
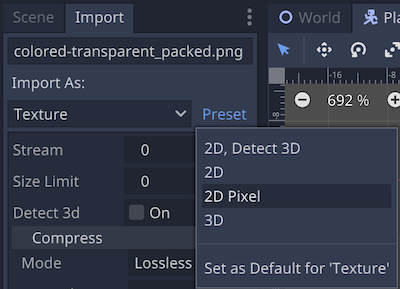
- Click the “Re-import” button at the bottom.
! click reinport
This will give the image the edgy look characteristic of pixel art.
Creating a World Scene
The first scene is to set the stage for the game. Let’s create a scene named “World”.
- Select “Scene” menu > “New Scene”.
- Select “Other Node” in “Generate Root Node”.
- Select a node of the “Node2D” class as the root node.
- Rename the root node to “World”.
- Save the scene at this point. Create a folder and save the scene with the file path “res://World/World.tscn”.
Adding nodes to the World scene
Let’s add nodes so that the world scene will look like the following scene tree. We will edit the properties of each node in turn later, so we can leave them as they are.
- World (Node2D)
- Bin (StaticBody2D)
- CollisionPolygon2D
- SpawnPath (Path2D)
- Spawner (PathFollow2D)
- AnimationPlayer
- Drops (Node2D)
- DropsLine (Line2D)
- Pointer (Area2D)
- CollisionShape2D
- Bin (StaticBody2D)
The scene tree dock should now look like this.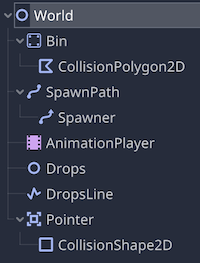
Editing nodes in the World scene
Bin (StaticBody2D) node
This node does not need to be edited. StaticBody2D is used in 2D games for obstacles and walls that do not move. In this case, we will use it as a container (bin) to keep falling drops (objects to be erased by tracing) on the screen.
CollisionPolygon2D node
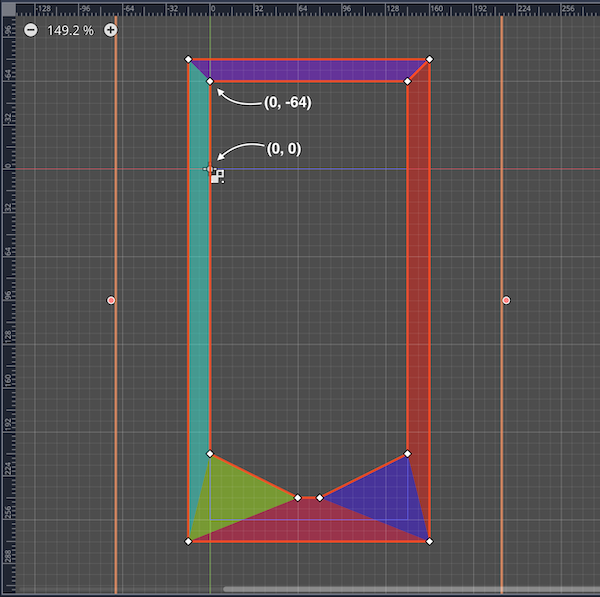
This node is used to add a collision shape to the parent node “Bin”. The collision shape is created by dotting in the 2D workspace.
Activate grid snap in the 2D workspace toolbar.
Basically, the collision shape is formed by dotting around the outside of the window frame. However, the upper part of the shape should be shifted by -64px from the y-coordinate 0 of the display size. This is to generate a drop outside the upper part of the window frame and make it fall. The lower part of the collision polygon is placed slightly inside the display size and slanted so that the drop will roll.
SpawnPath (Path2D) node
This node is used to move the position of the spawning drop along the x-axis at all times. This makes the drops fall from the different positions at the top of the screen every time. Let’s place it outside the top of the window frame.
- Create a straight path parallel to the x-axis by hitting two points (16, -32) and (128, -32) on the 2D workspace.
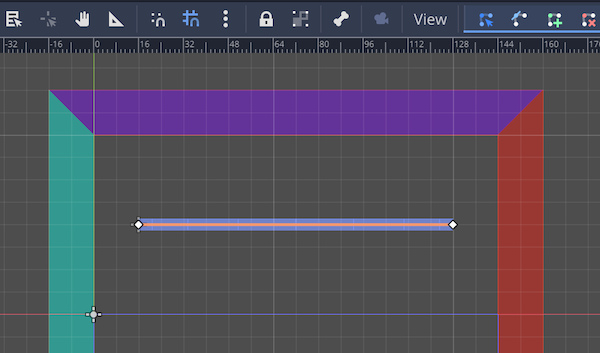
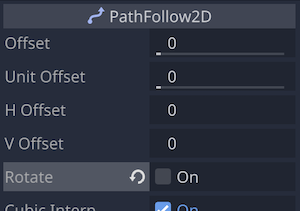
Spawner (PathFollow2D) node
This node moves along the path of the “SpawnPath” node edited earlier. This node should always move back and forth along the path to generate a drop from this node’s position. This will ensure that the drop’s position when spawned always changes within the path of the “SpawnPath” node.
- Turn off the property “Rotate”.
AnimationPlayer node
This node is used to move “Spawner” back and forth along the path of “SpawnPath” at all times. The “Spawner” property “Unit Offset” represents the starting point of the parent node “SpawnPath” path as 0 and the end point as 1. In other words, by constantly changing this property between 0 and 1, it is possible to make a round trip on the path.
- Create an animation as follows
- Animation name: move_spawn_pos
- Auto play on load: Enabled
- Animation length (seconds): 0.4
*0.4 seconds to move back and forth along the path - Animation looping: Enabled
- Track:
- Spawner node - unit_offset property
- Time: 0 / Value: 0 / Easing: 1.00
- Time: 0.2 / Value: 1 / Easing: 1.00
*Wrap from the end of the path at 0.2 seconds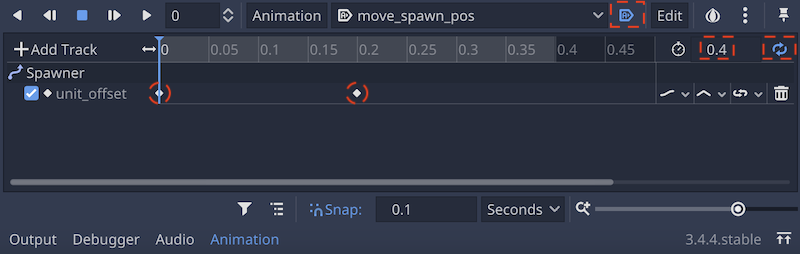
- Spawner node - unit_offset property
Drops (Node2D) node
No property editing is required for this node. Its role is just a container for multiple instances generated from a drop scene (to be created later).
DropLine (Line2D) node
This node is used to draw a line connecting drops of the same color when they are traced. This makes it easier to visually check which drop has been traced and how many drops are connected.
Change the property “Width” to 2. This is the thickness of the line.
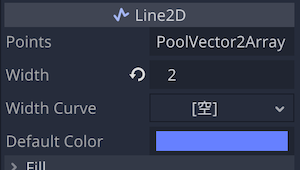
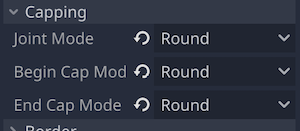
Change the properties “Capping” > “Joint Mode”, “Begin Cap Mode”, and “End Cap Mode” to “Round” respectively. This will make the shape of the joints, tips, and ends of the lines round.
Pointer (Area2D) node
There is no need to edit this node. The purpose of this node is to follow the finger on a smartphone or the mouse cursor on a PC to detect when a drop is touched. Later, we will write code in the script to make the position of this node always the same as the position of the finger or mouse cursor.
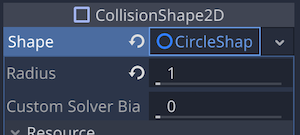
CollisionShape2D node
This node gives the parent node “Pointer” a collision shape. Considering the operation of touching the drop with a finger or mouse cursor, the collision should be as small a shape as possible.
- Apply the “New CircleShape2D” resource to the property “Shape”.
- Set the value of the property “Radius” of the applied resource “CircleShape2D” to 1.
This completes the editing of each node.
Creating a Drop scene
From here, we will create a “Drop” scene to be erased by tracing the same color.
- Select “Scene” menu > “New Scene”.
- Select “Other Node” in “Generate Root Node”.
- Select a node of the “RigidBody2D” class as the root node.
- Rename the root node to “Drop”.
- Save the scene at this point. Create a folder and save the scene with the file path “res://Drops/Drop.tscn”.
Adding nodes to the Drop scene
Let’s add nodes so that the Drop scene will look like the following scene tree. We will edit the properties of each node in turn later, so we can leave them as they are.
- Drop (RigidBody2D)
- Sprite
- CollisionShape2D
- PointableArea (Area2D)
- CollisionShape2D
- AnimationPlayer
- StickableArea (Area2D)
- CollisionShape2D
The scene tree dock should now look like this.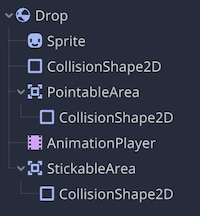
Editing nodes in the Drop scene
Drop (RigidBody2D) root node
We want the “Drop” scene to automatically fall or bounce according to gravity when its instance is added to the “World” scene. The RigidBody2D class automatically reproduces such physics-based movements according to the node’s properties.
- In the inspector dock, apply a new “PhysicsMaterial” resource to the “Physics Material Override” property.
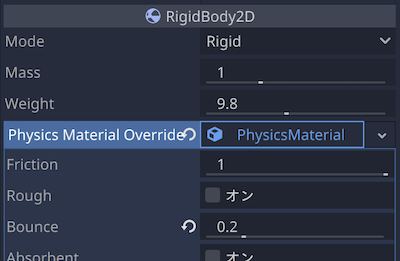
- Set the property “Gravity Scale” to 2. The purpose is to make the drop fall a little faster.

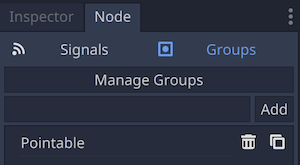
- Go to Node Dock > Groups tab and create and add a group named “Drops”. This is important for the conditional branching process in the script.

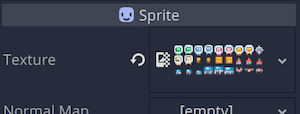
Sprite node
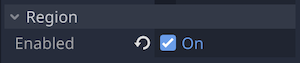
This node is used to give “Drop” a texture (appearance). The method of setting the texture of the sprite by specifying the range of textures you want to use from the sprite sheet that contains many textures imported at the beginning of this section is used.
- In the inspector, drag the resource “res://characters_packed.png” from the file system to the property “Texture” and apply it.
- Turn on “Region” > “Enabled”.
- Open the Texture Region panel at the bottom of the editor.

- Expand the panel by clicking on the expand icon to make it easier to work with.

- Select “grid snap” under “snap mode” at the top of the panel.

- Set the “step” at the top of the panel to 24px 24px. This will make the grid the same size as one texture on the sprite sheet.

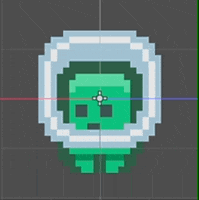
- Drag on the sprite sheet to select a range of two different textures with a green drop (looks like an alien).
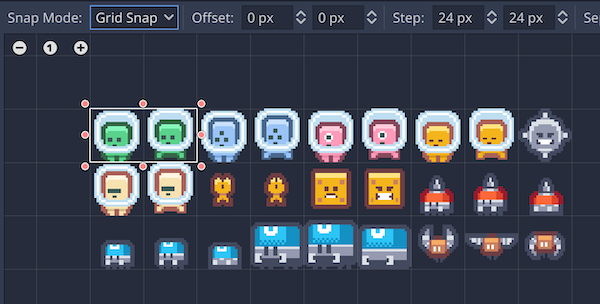
- Expand the panel by clicking on the expand icon to make it easier to work with.
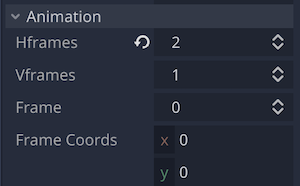
- Go back to the inspector and change the value of the “Animation” > “Hframes” property to 2.
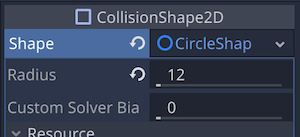
CollisionShape2D node (child of root node Drop)
This node provides a collision shape to the root node “Drop”. The root node is a “RigidBody2D” class, one of the physical bodies. The collision setting is essential to determine collisions between physical bodies. With this collision shape, it is assumed that multiple instances of the “Drop” scene will collide with each other and pile up on the screen.
- Apply a new “CircleShape2D” resource to the “Shape” property.
- Furthermore, change the value of the property “Radius” of that resource to 12. This creates a circular collision shape with a radius of 12 px, which can be intuitively sized in the 2D workspace.
PointableArea (Area2D) node
This node is used to detect when a finger or mouse cursor touches or leaves its drop. No property editing is required, but a group needs to be added.
- Go to the Node Dock > Groups tab and create and add a group named “Pointable”. This is used to determine if the finger or mouse cursor is touching the drop.
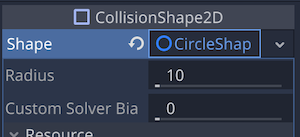
CollisionShape2D (child of PointableArea) node
This node provides a collision shape to the parent “PointableArea”. It should fit slightly inside the collision shape of the root node “Drop” so that it does not react when a finger or mouse cursor touches the edge of the drop.
- Apply a new “CircleShape2D” resource to the property “Shape”.
- In addition, change the value of the property “Radius” of the resource to 10. The collision shape is one size smaller than the collision shape of the root node “Drop”. You can intuitively adjust the size in the 2D workspace.
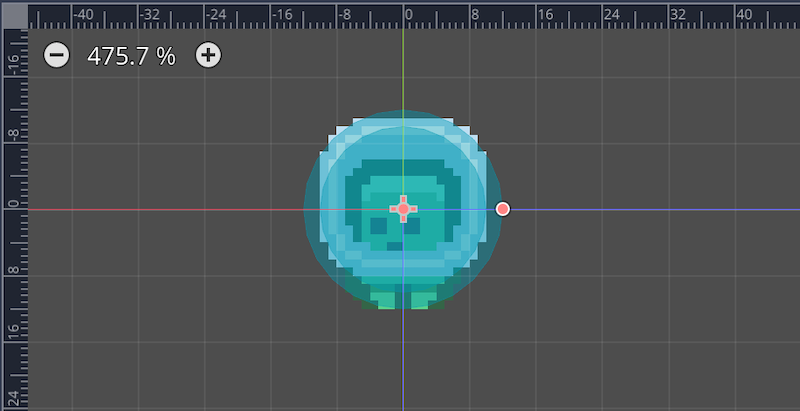 *The collision shape for this node is an inner circle
AnimationPlayer node
The first step here is to create a waiting animation for the drop when the finger or mouse cursor is not touching it, and a blinking animation to show it after it is touched. This node will be used to play those animation resources that we have created.
- Create a drop waiting animation as follows.
- Animation name: idle
- Auto play on load: Enabled
- Animation length (seconds): 1
- Animation looping: Enabled
- Track:
- Sprite node - frame property
- Time: 0 / Value: 0 / Easing: 1.00
- Time: 0.5 / Value: 1 / Easing: 1.00
- Sprite node - modulate property
- Time: 0 / Value: #ffffff / Easing: 1.00
*A track to ensure that after modulate is changed in a “flash” animation, it is reset to its initial value when the “idle” animation is played.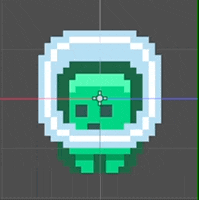
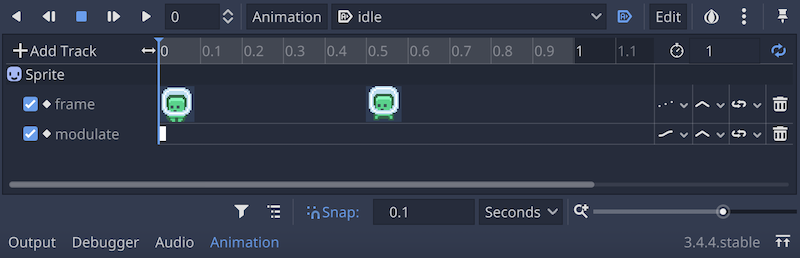
- Time: 0 / Value: #ffffff / Easing: 1.00
- Sprite node - frame property
- Create an animation of the drop in standby as follows.
- Animation name: flash
- Auto play on load: disabled
- Animation length (seconds): 0.2
- Animation looping: Enabled
- Track:
- Sprite node - frame property
- Time: 0 / Value: 0 / Easing: 1.00
- Time: 0.1 / Value: 1 / Easing: 1.00
- Sprite node - modulate property
- Time: 0 / Value: #ffffff / Easing: 1.00
- Time: 0.1 / Value: #64ffffff / Easing: 1.00
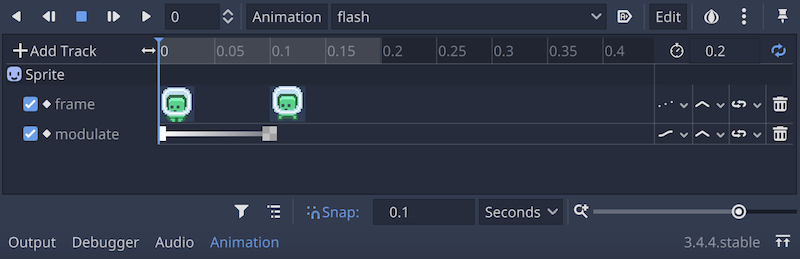
- Sprite node - frame property
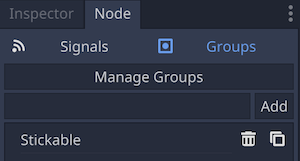
StickableArea (Area2D) node
This node is used to detect if a drop is in contact with another drop. No property editing is required, but a group needs to be added.
- Go to Node Dock > Groups tab and create and add a group named “Stickable”. This is important to determine if the drop is “adjacent” = “connectable” when you trace your finger or mouse cursor over it.
CollisionShape2D node
This node provides a collision shape for the parent “StickableArea” node. It is used to detect adjacent drops. In order to detect contact between adjacent drops, the collision shape should be slightly larger than the collision shape of the root node “Drop”.
- Apply a new “CircleShape2D” resource to the property “Shape”.
- In addition, change the value of the property “Radius” of the resource to 18. This creates a circular collision shape with a radius of 18 px. It can also be intuitively sized in the 2D workspace.
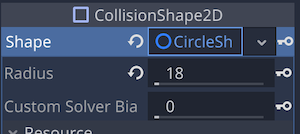
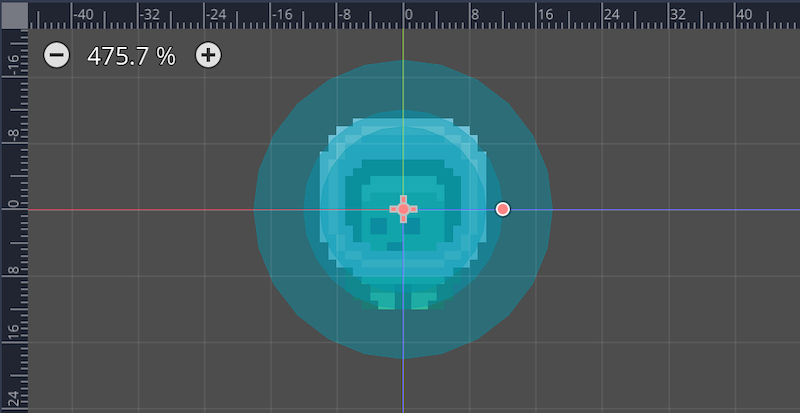 *The collision shape for this node is the outermost circle.
This completes the editing of each node.
Controlling the Drop scene with a script
Now let’s attach a new script to the root node “Drop”. Create a script file with the file path “res://Drops/Drop.gd”.
Edit the script as follows.
### Drop.gd ###
extends RigidBody2D

# Properties to assign each color name to a scene that inherits from the Drop scene
export var color = ""

# define stuck_drop as an array to contain adjacent drops
var stuck_drops = []

# Reference to the AnimationPlayer node
onready var anim_player = $AnimationPlayer
Next, we will use signals from the Area2D node of the “StickableArea” node. Let’s connect the “area_entered” signal, which is sent out when a drop makes contact with an adjacent drop, and the “area_exited” signal, which is sent out when a drop that was in contact with a drop leaves the area, to the script.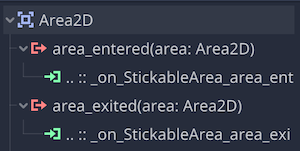
Edit the method generated when you connect each signal as follows.
### Drop.gd ###
# Method called when a StickableArea is collided by another area (Area2D)
func _on_StickableArea_area_entered(area):
    # If the area was collided by a Stickable group node
	if area.is_in_group("Stickable"):
        # Define its parent node as drop
		var drop = area.get_parent()
        # Add drop to the array stuck_drops
		stuck_drops.append(drop)

# Method called when another area (Area2D) leaves StickableArea
func _on_StickableArea_area_exited(area):
    # If the area that was exited from the collision shape is a Stickable group node
	if area.is_in_group("Stickable"):
        # Define its parent node as drop
		var drop = area.get_parent()
        # Check the index of a drop in the array stuck_drops
		var index = stuck_drops.find(drop)
        # Remove the element (adjacent Drop) corresponding to index from the array stuck_drops
		stuck_drops.remove(index)
This completes the editing of “Drop.gd”.
Creating a scene that inherits from the Drop scene
The “Drop” scene we just created is a template for the scene we will create. We will now create a scene that inherits the “Drop” scene in the number of drop colors. There are five drop colors: blue, green, orange, red, and yellow. Let’s start with the Blue drop as an example.
- Select “Scene” menu > “New Inherited Scene.
- Select “Drops.tscn” as the source scene for the minor injury.
- After the scene is generated, rename the root node to “Blue.
*The name of this root node should match the color of each drop. - Save the scene. Save the file path as “res://Drops/BlueDrop.tscn”.
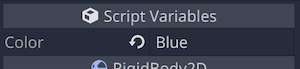
- With the root node “BlueDrop” selected in the scene tree dock, set the value of “Color” in Script Variables to “Blue” in the inspector.
- Select the “Sprite” node in the scene tree dock. Open the “Texture Area” panel at the bottom of the editor and select the two blue alien textures.
This completes the “BlueDrop” scene. Follow the same procedure to create the remaining four color scenes. The name of the root node of the scene and its property “Color” are as follows.
- Root node: GreenDrop / Color: Green
- Root node: OrangeDrop / Color: Orange
- Root node: RedDrop / Color: Red
- Root node: YellowDrop / Color: Yellow
When we have created an inheritance scene with a total of five drop colors, our work is complete.
Controlling a World Scene with Scripts
We are now approaching the end of this tutorial. Let’s attach a script to the root node of the “World” scene. Create the file path as “res://World/World.tscn”.
When the script editor opens, first define the properties as follows
### World.gd ###
extends Node2D

# Define drop_scenes as an array with 5 preloaded color drop scenes as elements
const drop_scenes = [
	preload("res://Drops/BlueDrop.tscn"),
	preload("res://Drops/GreenDrop.tscn"),
	preload("res://Drops/OrangeDrop.tscn"),
	preload("res://Drops/RedDrop.tscn"),
	preload("res://Drops/YellowDrop.tscn")
]

# Minimum number of connecting drops that can be erased
export (int) var min_erasable = 3
# Maximum number of drops displayed on the screen
export (int) var max_drops = 50

# True if the game is currently playing
var is_playing = false
# True if finger on the screen or left mouse click is held down
var is_holding = false
# Referencing the drop where the finger or mouse cursor is currently held
var pointed_drop
# Color of the drops currently connected
var active_color = ""
# Array for list of held (traced and connected) drops
var held_drops = []

# A reference to the Spawner node
onready var spawner = $SpawnPath/Spawner
# A reference to the Drops node
onready var drops = $Drops
# Reference to a DropsLine node
onready var drops_line = $DropsLine
# Reference to a Pointer node
onready var pointer = $Pointer
Next, let’s code the maximum number of drops (50) to fall from the top of the screen immediately after the game starts.
### World.gd ###

# Method called when all nodes in the World scene have been loaded
func _ready():
    # Built-in method that will randomize the output of random methods every time.
	randomize()
    # Loop for the number of max_drops (50)
	for _i in range(max_drops):
        # Call a method (defined later) to generate drops
		spawn_drop()
        # Wait 0.025 seconds after one drop is spawned, then spawn the next drop
		yield(get_tree().create_timer(0.025), "timeout")

# Method to spawn a drop
func spawn_drop():
    # Reference to a scene file for a randomly chosen color drop from the array drop_scenes
	var drop_scene = drop_scenes[randi() % drop_scenes.size()]
    # Instantiate a drop scene of the selected color
	var drop = drop_scene.instance()
    # Make the position of the drop instance the same as the position of the Spawner node
	drop.position = spawner.global_position
    # Add the drop instance to the World scene
	drops.add_child(drop)
Now let’s run the project and watch the behavior of 50 drops of randomly determined colors falling at the start of the game. Note that when we run the project for the first time, we should set the main scene as “World.tscn”.
The position of the “Pointer (Area2D)” node will be coded to follow the position of the finger or mouse cursor, and the “PointableArea (Area2D)” of the “Drop” instance will detect when the finger or mouse cursor overlaps with it and when it leaves it. The “Pointer” node detects this and sends a signal. Let’s use this to code the process when tracing a drop.
Select “Pointer” in the scene tree dock and connect the signals “area_entered(area: Area2D)” and “area_exited(area: Area2D)” to the script in the Node Dock > Signal tab.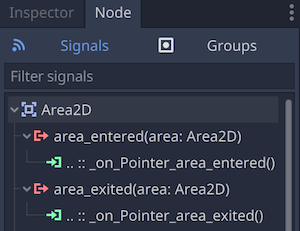
Edit the automatically generated methods as follows.
### World.gd ###

# Method called when a Pointer node touches another area (Area2D object)
func _on_Pointer_area_entered(area):
    # if area is a node in the "Pointable" group
	if area.is_in_group("Pointable"):
        # Pass a reference to the parent node of area (Drop node) to pointed_drop
		pointed_drop = area.get_parent()
        # If drop in hold is non-zero..
        # and the last drop in the hold is adjacent to pointed_drop
		if not held_drops.empty() and held_drops[-1] in pointed_drop.stuck_drops:
            # Call a method to update drop connections (defined later)
			update_drops_connection()

# Method called when the area (Area2D object) that the Pointer node was touching leaves
func _on_Pointer_area_exited(area):
    # If area is a node in the "Pointable" group
	if area.is_in_group("Pointable"):
        # Set pointed_drop to null
		pointed_drop = null
Next, use the built-in function _process to execute the method you want to call every frame (60FPS).
### World.gd ###

# Built-in function: called at 60FPS
func _process(_delta):
    # Update the Points property of the DropsLine node
	update_drops_line()
    # Receive finger or mouse cursor actions
	get_input()

# Method to update the Points property of a DropsLine node..
# to change the position of a drop as it rolls or falls
func update_drops_line():
    # If there is at least one drop in hold
	if not held_drops.empty():
        # Create a temporary Vector2 array
		var temp_array = PoolVector2Array()
        # Loop over held drops
		for drop in held_drops:
            # Add the position of the drop in hold to the temporary array
			temp_array.append(drop.position)
        # Update the points property of the DropsLine node to the position of the currently held drop
		drops_line.points = temp_array

# Methods to process finger or mouse input
func get_input():
    # Always set the Pointer node position to the finger or mouse cursor position
	pointer.position = get_global_mouse_position()
    # If you press the screen with a finger or the left mouse button
	if Input.is_action_just_pressed("tap"):
        # Call a method (defined later) to hold the drop
		hold_drop()
        # Call a method (to be defined later) to update the connection of drops on hold
		update_drops_connection()
    # If the finger leaves the screen or the left mouse button is up
	if Input.is_action_just_released("tap"):
        # Call a method (defined later) to erase drops on hold
		erase_drops()
        # Call a method to release holds (to be defined later).
		release_drops().
The following methods, which are called in the method get_input defined in the above code, will be defined in order after this.
hold_dropupdate_drops_connectionerase_dropsrelease_drops
First, let’s define the methods hold_drop and update_drops_connection to be called when a drop is held down.
### World.gd ###

# Methods to hold a drop while it is being held
func hold_drop():
    # If finger or mouse cursor is touching the drop
	if pointed_drop:
        # Hold the drop.
		is_holding = true

# Method to update drop connections
func update_drops_connection():
    # If drop is holding and ..
    # if finger or mouse cursor is over the drop
	if is_holding and pointed_drop:
        # If is_holding and pointed_drop: # if held_drops.empty(): # if held_drops.empty()
		if held_drops.empty():
            # If the color of the drop to be held is currently set to the color of the finger or ..
            # color of the drop that the mouse cursor is currently touching
			active_color = pointed_drop.color
            # Call a method (to be defined later) to connect drops
			connect_drop()
        # If the color of the drop currently touched by the finger or mouse cursor..
        # is the same as the color of the drop being connected
		elif pointed_drop.color == active_color:
            # If the number of drops in hold is greater than or equal to 2 and ..
            # if the current touched drop is the same as the second last drop in the hold
			if held_drops.size() >= 2 and pointed_drop == held_drops[-2]:
                # Call a method (defined later) to disconnect
				disconnect_drop()
            # If the drop currently touched by the finger or mouse cursor is not in the held drops
			elif not pointed_drop in held_drops:
                # Call a method (defined later) to connect the drops
				connect_drop()
If you look inside the method update_drops_connection defined here, you will see that there are further undefined connect_drop and disconnect_drop methods called.
Let’s continue to define these methods.
### World.gd ###

# Methods to connect drops
func connect_drop():
    # Play the animation "flash" on the currently touched drop
	pointed_drop.anim_player.play("flash")
    # Add the currently touched drop to the list of held drops
	held_drops.append(pointed_drop)
    # Add the position of the currently touched drop to the Points property of the DropsLine node
	drops_line.add_point(pointed_drop.position)

# Methods to disconnect drops
func disconnect_drop():
	# Define the last drop in the list of held drops as canceled_drop
    var canceled_drop = held_drops.pop_back()
    # Stop animation ("flash") in AnimationPlayer of canceled_drop
	canceled_drop.anim_player.stop()
    # Play the animation ("idle") in AnimationPlayer of canceled_drop
	canceled_drop.anim_player.play("idle")
    # Remove the last point from the Points property of a DropsLine node
	drops_line.remove_point(drops_line.get_point_count() - 1)
Within the get_input method, we will now define two methods, erase_drops and release_drops, which will be called when the finger leaves the screen or the left mouse button is raised.
### World.gd ###

# Methods to erase drops
func erase_drops():
    # If the number of held drops is less than the minimum number of drops that can be erased
	if held_drops.size() < min_erasable:
        # Immediately terminate the method
		return
    # Duplicate the array of held drops as the value of variable erased
	var erased = held_drops.duplicate()
    # Loop over the elements of array erased
	for drop in erased:
         # Release the drops in array erased
		drop.queue_free()
        # Create a new drop for each erased drop
		spawn_drop()
        # Wait 0.1 seconds (then next loop)
		yield(get_tree().create_timer(0.1), "timeout")

# Method to release holds from drops
func release_drops():
    # Release status while holding
	is_holding = false
    # Loop over the elements of the array of held drops
	for drop in held_drops:
       # Stop animation "flash"
		drop.anim_player.stop()
        # Play the animation "idle".
		drop.anim_player.play("idle")
    # Empty the array of held drops
	held_drops.clear()
    # Empty the Points property of the DropsLine node
	drops_line.clear_points()
This completes the editing of the “World.gd” script.
Executing the scene to check the operation
Finally, let’s run a scene to see if it reproduces the movement as expected.
Have you confirmed that the following is as expected?
- When the left mouse button is pressed while the mouse cursor is near the center of the drop, the drop is held and a “flash” animation is played.
- If you hold down the left mouse button and trace the adjacent drop, the “DropsLine” will be connected.
- If you return to the drop you have traced, the hold is released and the “idle” animation returns to playback.
- When three or more drops are traced, all drops in the hold disappear when the left mouse button is released.
- If less than three drops are traced, releasing the left mouse button does not erase the drops, only releases the hold.
Sample Games
We have prepared a sample game that further brushes up the project created in this tutorial.
The project file is located in GitHub repository , so please download the .zip file from there and you can check it by importing the “project.godot” file in the “Sample” folder with the Godot Engine.
Conclusion
In this tutorial, We created a puzzle game in which you have to trace the same color to make it disappear. It is the kind of game that one cannot help but feel addicted to. Let me summarize the key points in the creation of the game.
- Use RigidBody2D for the drop and let the engine do the physics.
- Add Area2D class nodes to the drop to detect fingers and cursors, and Area2D class nodes to detect adjacent drops, and use their signals.
- Always follow the Area2D class node to the finger or mouse cursor and use the signal of this node for contact with the drop.
Links
- KENNEY
- Godot Docs: Physics introduction
- Godot Docs: RigidBody2D
- Godot Docs: Using Area2D
- Godot Docs: Area2D
- Godot Docs: CollisionShape2D
- Godot Docs: CollisionPolygon2D
- Godot Docs: Path2D
- Godot Docs: PathFollow2D
- Godot Docs: Line2D
- Godot Docs: Introduction to the animation features
- Godot Docs: AnimationPlayer